Olivia's Frontline Guide!!! 7.4
note: some things are currently in revision, so might be buggy. 1/9/2025
Tip of the year: You can sprint and mount at the same time.
Preamble:
Base:
Maps:
Advanced:
Credits and Resources:
If you want to follow or support!
Change Log:
Known Issues:Change Log:
2/2/2025
-Glossary Alphabetized
-Coming Soon section is displayed
-"Comps" in comp section were changed.
-Numerous grammatical errors fixed.
2/22/2025
-New comps added to "Comps"
-New tactics added to "Tactics"
-"Scenarios" Section Added
-"Pinches" Section Added
3/10/2025
-"Pulling" Section Added
-"Change Log" made its own section.
-3/19/2025
-major update to "Jobs/Comps" page
8/3/2025
Seperated "Jobs" and "Comps"
Added new comps
8/11/2025
Added macro section to guide
1/2/2026
Began edits for next patch
1/15/2026
New Comps added.
1/16/2026
Seal Rock and Shatter Edited
1/22/2026
Onsal updated, Preface and Goals added, General macros started.
Updated tierlist.
1/30/2026
Updated the Triumph section of the guide, fixed the symbols section.
4/22/2026
Spelling Errors fixed, Tank, Healer, and Melee burst rotations changed. Key section of tier list updated. New comp added.
4/24/2026
All jobs burst rotations updated.
Preface
After my static broke apart in Shadowbringers, I was devastated. Raiding no longer held the same draw when I wasn’t doing it with them. On top of that, my job, Scholar, had been irreparably changed, the content had begun to feel stale, and long stretches passed with very little to do.So I took a break.When I eventually came back to XIV, I set out to do all the content I had once written off. Maps. Mount farms. Venues. Everything.One of the things I had failed to truly engage with was PvP.I was bad.
Really bad.Like everyone before me, I had no idea what was going on during my first Frontline matches. Chaos everywhere. Deaths that felt instant and unavoidable. Losses that seemed inevitable.But beneath that chaos, I saw something deeper.I saw games where we were completely trounced by the enemy teams. I also saw moments where a commander stepped up. Someone made calls. The alliance followed. Suddenly, that same mess of players moved as one, claiming victory after victory.I saw those commanders, and I knew I wanted to be like that.I wanted to be someone who could take a cobbled together group of strangers and lead them to a stunning win.And I was still bad.
Really bad.But I was hooked.Because sometimes, it worked.And the deeper I dove into the strategy, the design, the movement, the positioning, the psychology, the better I became.And it felt good.I can say, without a doubt, that Frontline is an incredibly deep mode. One that rewards effort, learning, and skillPerhaps you already understand that.
Why else would you be here?This guide is a deep look into Frontline. It covers the basics. Maps, scoring, jobs. It also goes further. Much further. Into positioning, combat flow, tactics, and decision making.It may seem intimidating.That is okay.
It is.But I promise you this. Your efforts will be rewarded.I hope you find this guide useful.
I hope it helps you claim many victories and suffer few defeats.Go forth.
Learn.
Master.
Triumph.
Goals
This Guide's Purpose: To Win
Then:

Now:
It is not about fairness or balance. It is not about having a good game or a friendly match.Frontline is a war, and I treat it as such.That is to say, I will not mince words in this guide. If I believe something is broken, I will say so. If I believe something is bad, I will say so.I believe that any advantage you can obtain, aside from cheating, should be used. Anything at your disposal should be leveraged.That is what it means to chase victory.
Bias
That is not to say this guide is without its faults:-The strategies presented here are written from the perspective of an NA player, with NA teammates in mind.-The guide assumes that the opposing teams are of roughly equal strength.-The guide assumes that your team has a commander, or that you are willing to step into that role.
Call me Out
I will be the first to admit that there may be better strategies out there. However, many of them are simply impractical in the current state of play.That said, if you have tactics or strategies that consistently outperform my own, I welcome them. Show me the results, and I will gladly update this guide to reflect them.
Basics
The game does not teach you the fundamentals. This section gathers easy-to-apply knowledge that will help you succeed with minimal effort.
Setting Up
Unlocking Frontline:
To queue for Frontline:
You cannot be on the Free Trial.
You must have a job stone equipped (excluding Blue Mage).
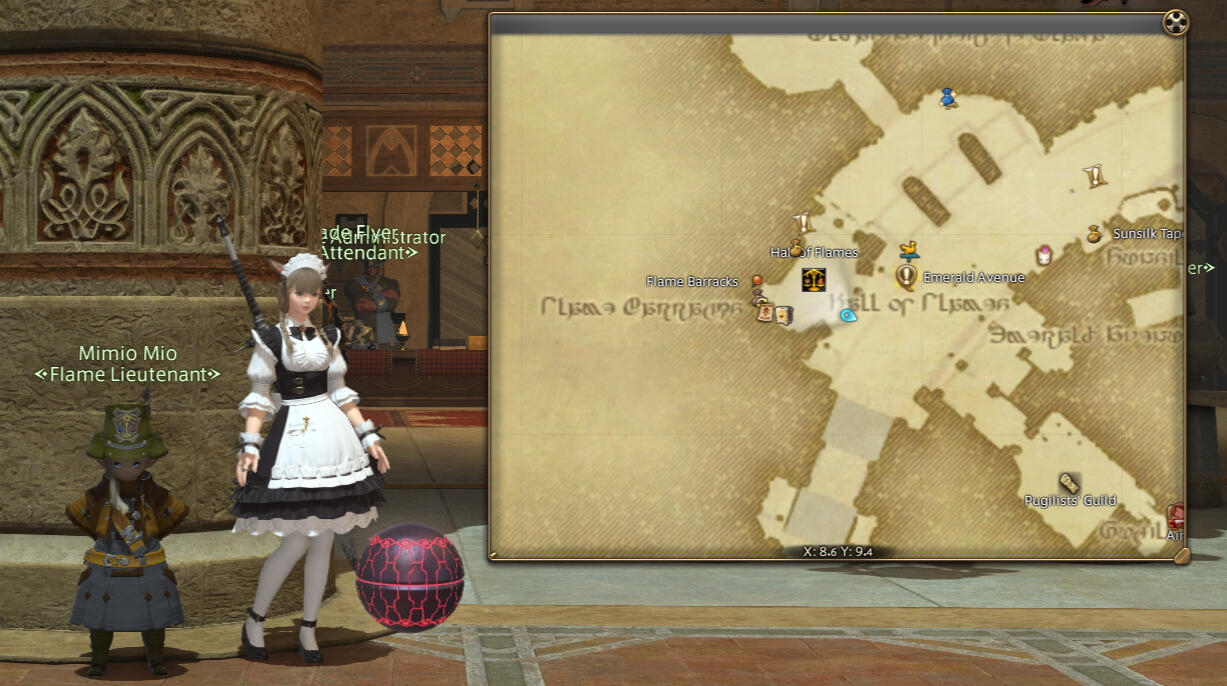
You must complete the quest "Like Civilized Men and Woman".
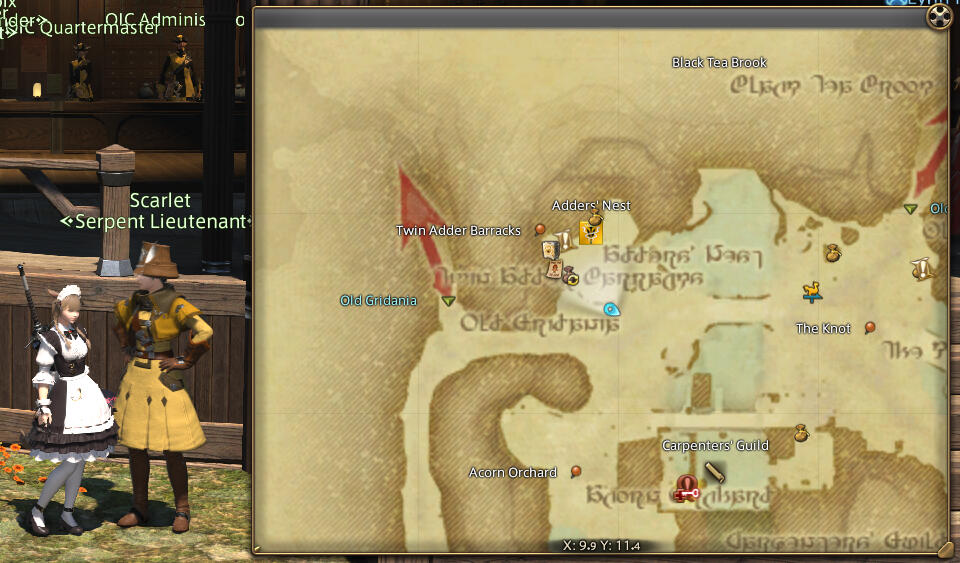
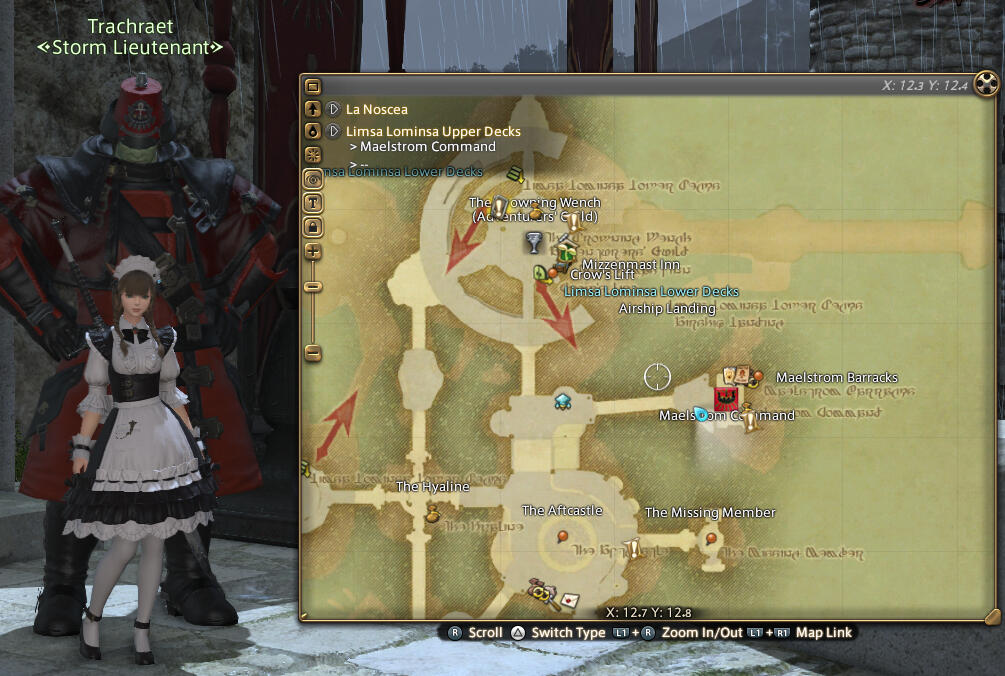
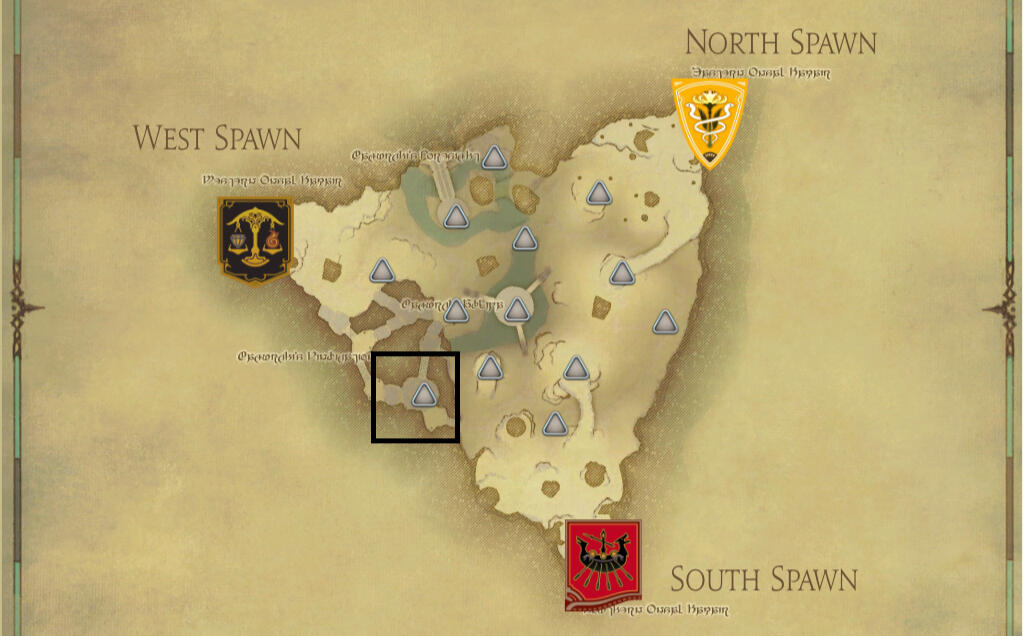
The location of the quest is linked to your Grand Company. The spots are shown below.
Flames
Adders
Mael
You will be sent to the Airship landing to speak with the Frontline Attendant, compleing the quest.You can obtain additional information by interacting with them again.DO NOT QUEUE IN YET!!!
Your skills are not set up; you won't be able to attack or defend yourself.
Setting Your Abilities:
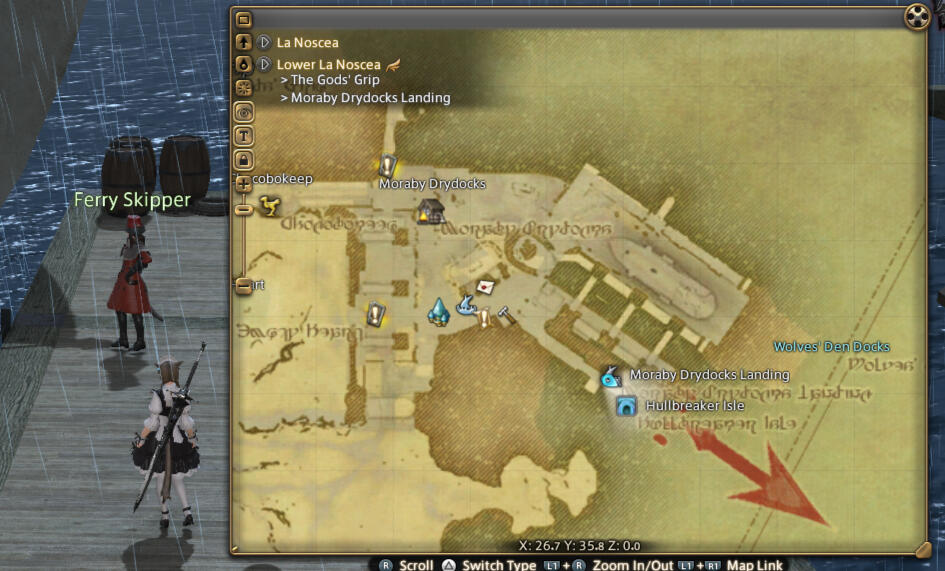
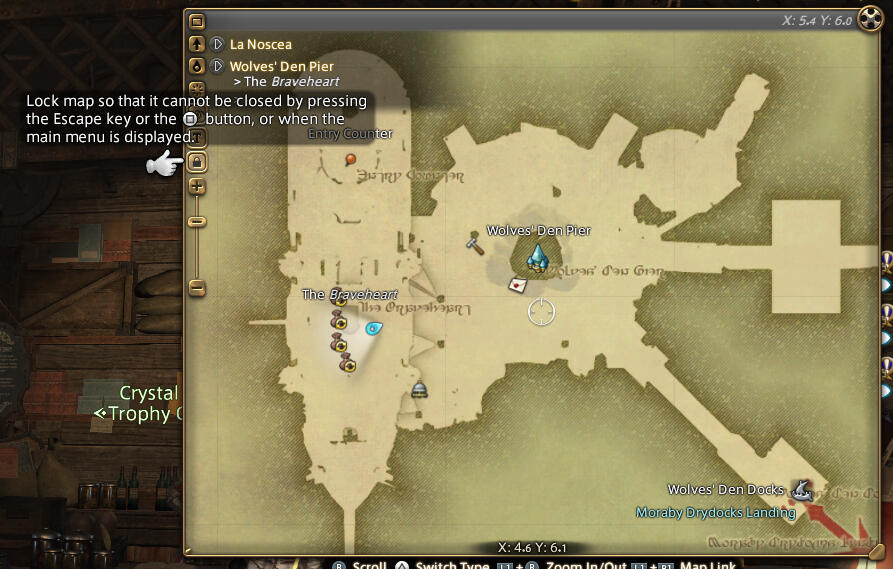
To set up and edit your hotbars, you need to go to Wolves' Den Pier.The fastest way to get there is by speaking to the Ferry Skipper at Moraby Drydocks. Once you attune to the aetheryte, you won't need to do this again.
Once you arrive at the Pier, your hotbars will switch to their PvP versions.These are completely separate from your PvE hotbars, and any changes you make to one will not affect the other.To edit them:
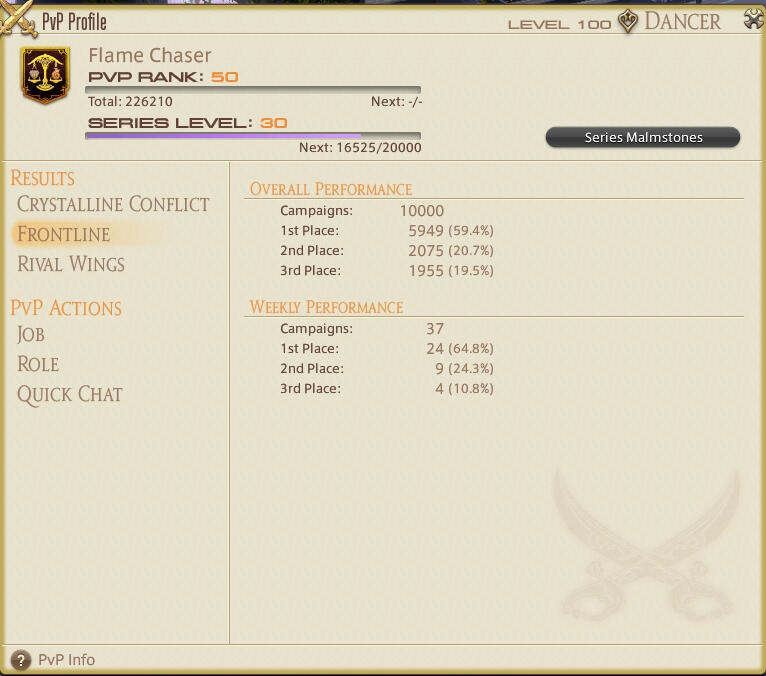
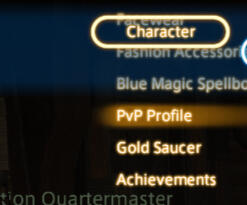
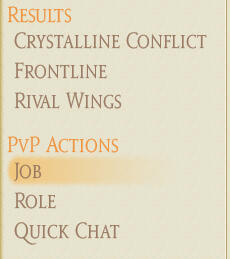
Go to "Character" then "PvP Profile".Once the PvP menu is opened, navigate to the "Job" section.
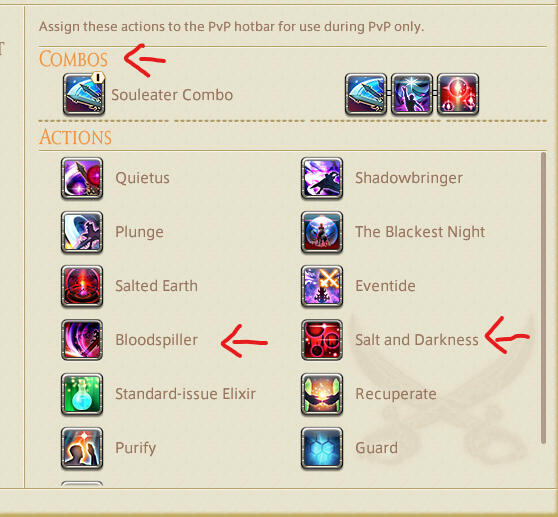
YOUR ABILITIES DO NOT DO THE SAME THING AS IN PvE. MAKE SURE TO READ THEM!
Most jobs have a "Combo" Action that is easy to overlook.
Some actions cannot be assigned to hotbars, so double-check that you have everything available.
Don't forget "Return", which is in the "General" Actions with your other PvE skills.
BUT THAT'S NOT ALL!!!
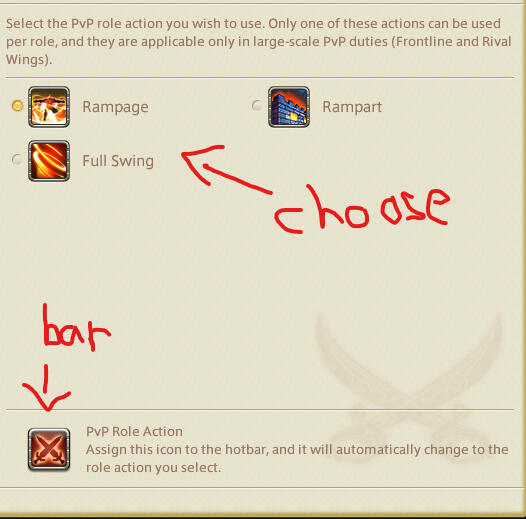
Do not forget your role action! These are very powerful; not using them will put you at a serious disadvantage!

Mechanics
Locking Your Map:
When playing Frontline, you should lock your map open. While this may feel distracting at first, the amount of real-time information it provides is invaluable, and most players quickly adjust.Once adjusted, you will not want to play without it.
Why?:
Real-time enemy position and movement
Objective spawn locations, the remaining time till activation, and their remaining active duration
Enemy movement and objective locations are the two key factors that drive every macro-level decision in Frontline. Locking your map open gives you constant access to both.Many teams miss new objective spawns or incoming enemy pushes simply because they aren’t watching their map. Don’t be one of them.
Battle High
Battle High is the most important mechanic in Frontline. Without it, your ability to influence the outcome of a match is severely limited.
Make sure you are actively participating in combat and building as much Battle High as possible.
1 Kill = +8 BH
1 Assist = +4 BH
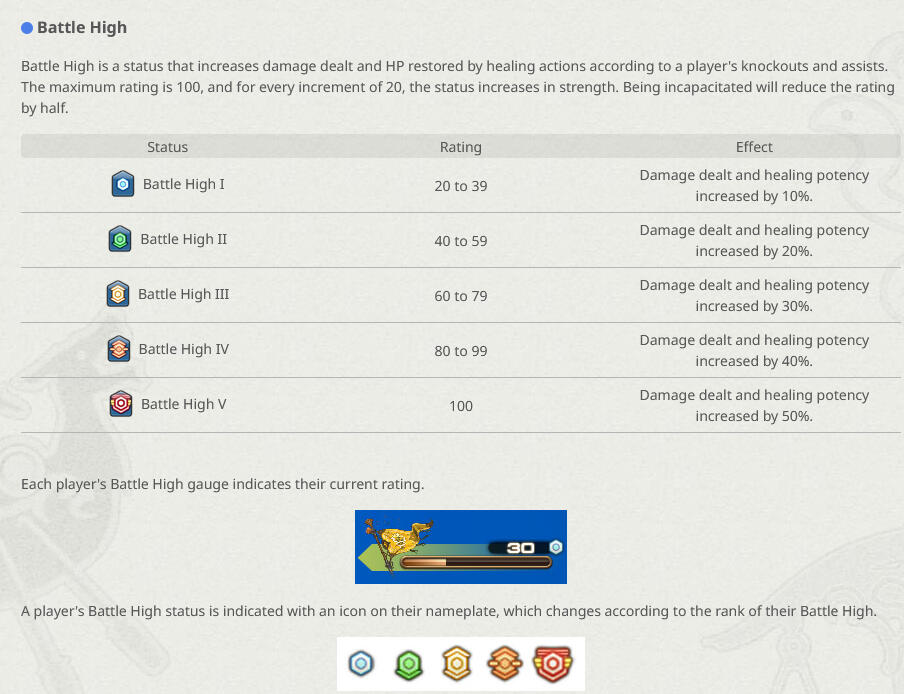
Note: Dying means losing HALF of your current rating
Why?:
As your Battle High increases, so does your damage, allowing you to secure KOs more quickly and earn even more points.Battle High also increases your healing, making you harder to KO, meaning your team loses fewer points from deathTogether, these offensive and defensive bonuses allow you to control objectives, defeat enemies, and survive longer in fights.
Damage Changes
In PvP, an action’s listed potency directly equals the damage it deals before any buffs or debuffs are applied.I.E.
8,000 potency = 8,000 damageIn Frontline, additional buffs and debuffs are applied based on your job, as shown below.

If you’ve ever wondered why tanks and melee jobs are so difficult to kill, it’s because of this additional mitigation layered on top of all other sources of damage reduction.
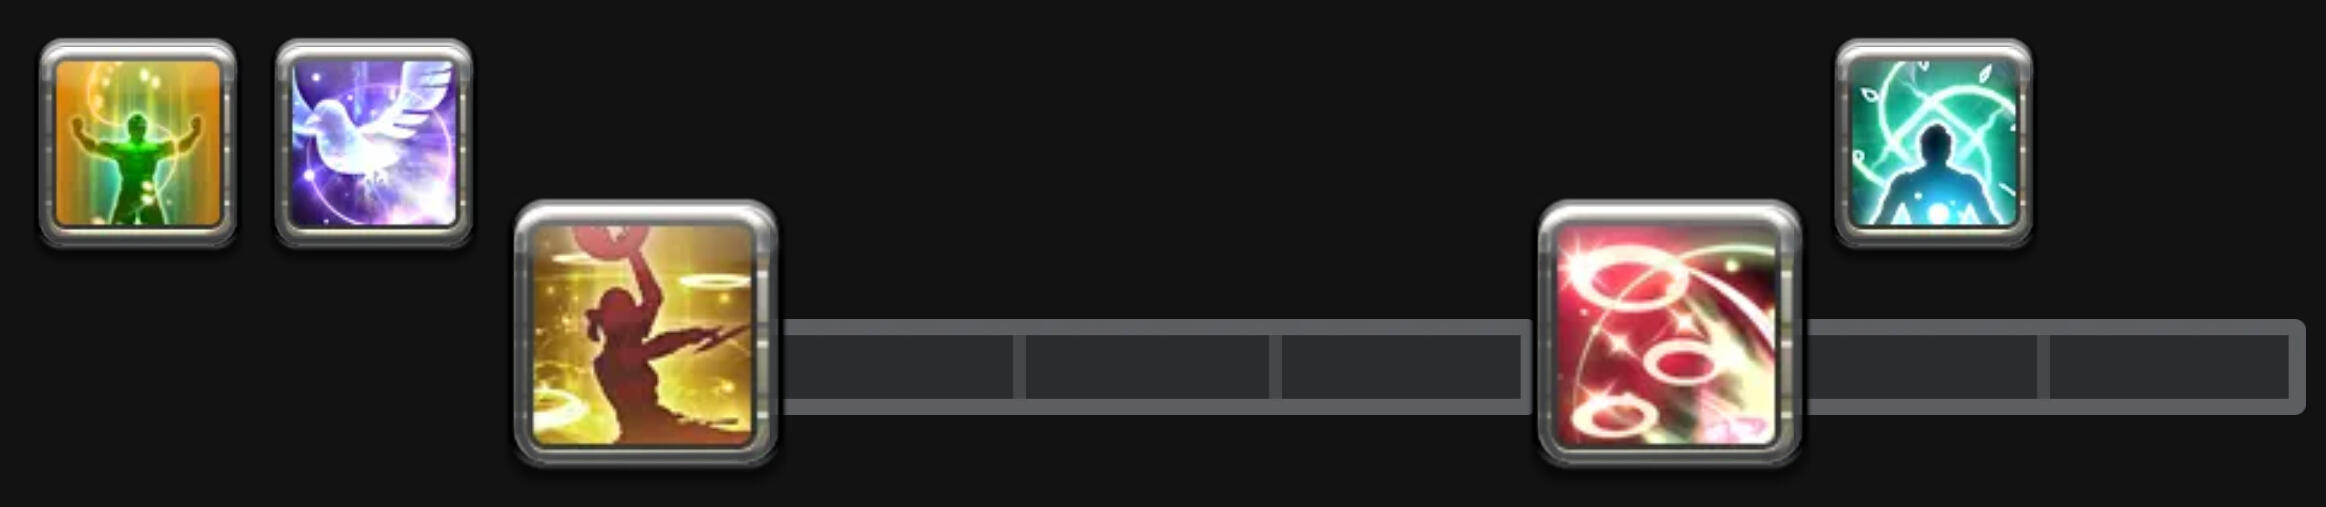
Signs
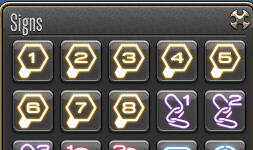
Signs have amazing power. Information is king on the Frontline, and knowing what each one means easily improves your play.
Commanders

Current Enemy Target

Enemy Commanders

Guard Break

High Prio Target (6 and up)

Don't hit these enemies

*Note: Depending on who's calling or marking, these meaning can differ.
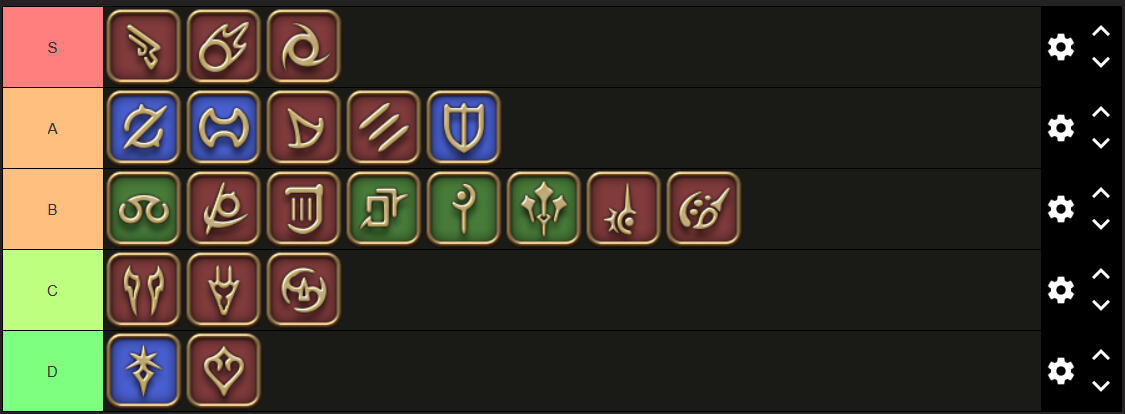
Cordinated Play Tier List
Having a caller drastically increases the effectiveness of many jobs—some far more than others.
While no job in PvP is especially difficult to play, tier placement matters less than coordination, and it’s valuable to have multiple options available.The middle of the tier list is also very compressed. A strong player can easily elevate a mid-tier job into a top performer, while poor play can drag even the strongest choices to the bottom.

No Calls Tier List
Playing without a caller fundamentally changes how Frontline is played. While this is far from an optimal way to secure victory, if the only person you can rely on is yourself, the following options can help you find success.

Maps


Improving
Improving in Frontline isn’t all about mechanical execution. There are only a few buttons to press, and little advanced movement tech. Instead, success comes from risk management, pattern recognition, and adapting to constant change.
Know your job: Spend time on a training dummy—30 minutes if you can, 15 if you’re short on time, and at least 5 if nothing else. PvP jobs don’t have many buttons, so you should understand what each one does and when to use it.
Knowing how to execute both AoE and single-target burst is essential to contributing effectively.
Know other jobs: This knowledge isn’t just for your own performance—it’s essential for understanding matchups.
You should know what other jobs are capable of and how to respond to them, rather than asking “What just happened?” after the fact.
Don't die: More than anything else, deaths decide matches. Going 0–7 can very easily lose the game for your team. Play safely, take bursts when opportunities present themselves, and gradually increase your impact as you grow more comfortable. You know your job now—success comes from knowing where and when you can use your tools safely.
Communicate: Frontline is a team-based mode. Even if you aren’t calling shots, communicating key information—such as an incoming pinch, a ready Limit Break, or locking down a high-priority enemy—can have a huge impact on your team’s success.
Bank your burst: If you’re playing with a Dark Knight caller, expect Salted Earth every 30 seconds. Save your abilities with ~20-second cooldowns so they’re ready for the next pull. If you’re playing with a Sage or Warrior caller, their burst windows operate on roughly 20-second cycles. Using your abilities as soon as they’re available will naturally keep you aligned with their timing.
It’s a short list, but this is the basics section. Continue on if you want to learn more, because from here on out, you’ll be entering the deep end of the guide.Simply knowing how your job works already puts you ahead of most players. But Frontline is a game mode that truly rewards skill and knowledge.You get out of it what you put into it, and I hope to help guide you along that journey.
Combat
It’s PvP—there’s a lot to unpack, with multiple subsections to explore. Take your time to understand them; this is the most important part of the mode.
You Must Kill to Win:
PvP means Player vs. Player. After over 2,000 submissions and comparing score breakdowns, the team with the most kills won over 80% of matches.This should make sense intuitively. Every kill your team secures earns points and takes them from the other team. Conversely, every death costs your team points and gives points to your enemies.As much as you may want to “play the objective,” you can’t do so if you can’t win fights. As one famous tactician put it: "How can you protect the objective if you can't protect yourself?"Kills also create a snowball effect through Battle High. The more kills you secure, the stronger you become, making it easier to earn additional points through future engagements.At the same time, increased Battle High makes you harder to kill, reducing point loss from deaths and preserving your team’s advantage.
Burst Game-play:
Stunlock Enemies
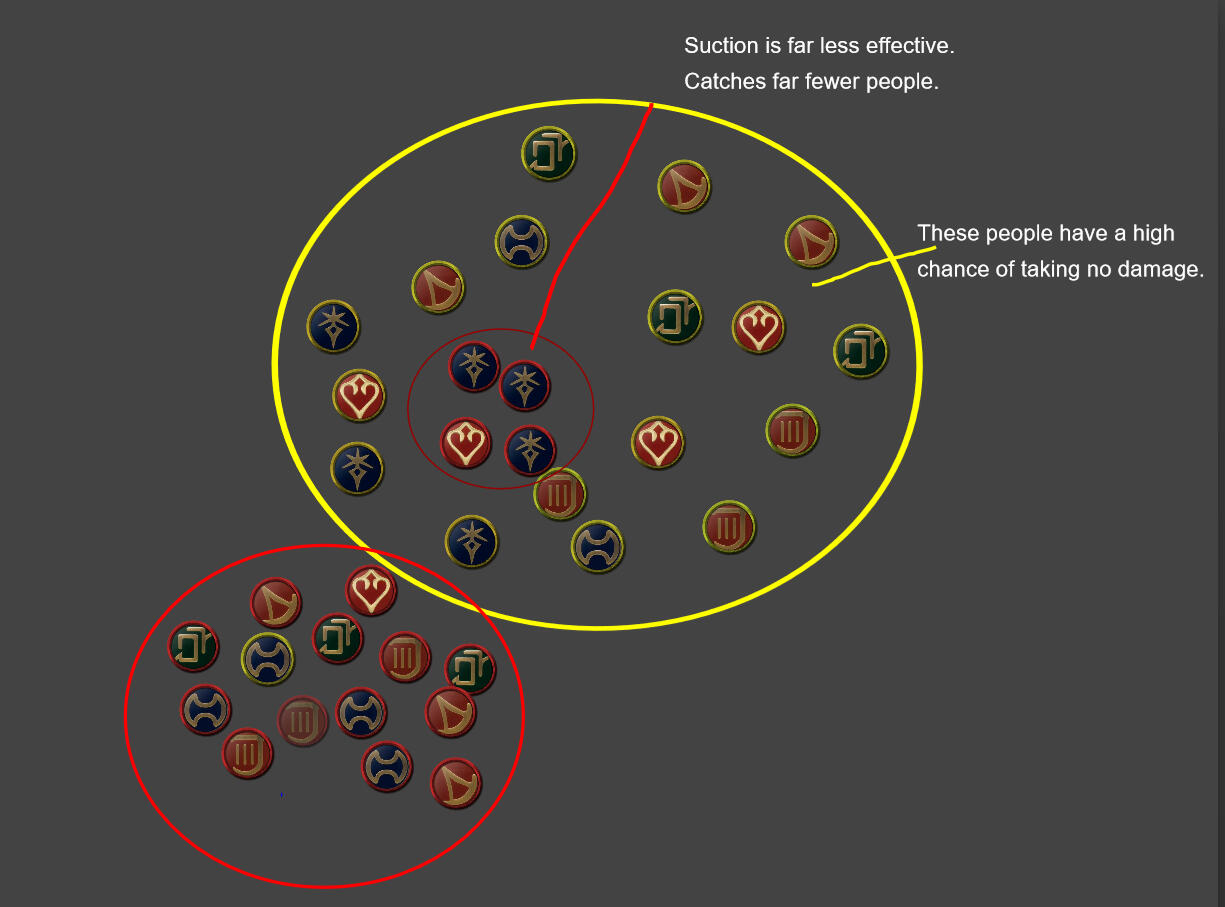
Suction
Burst


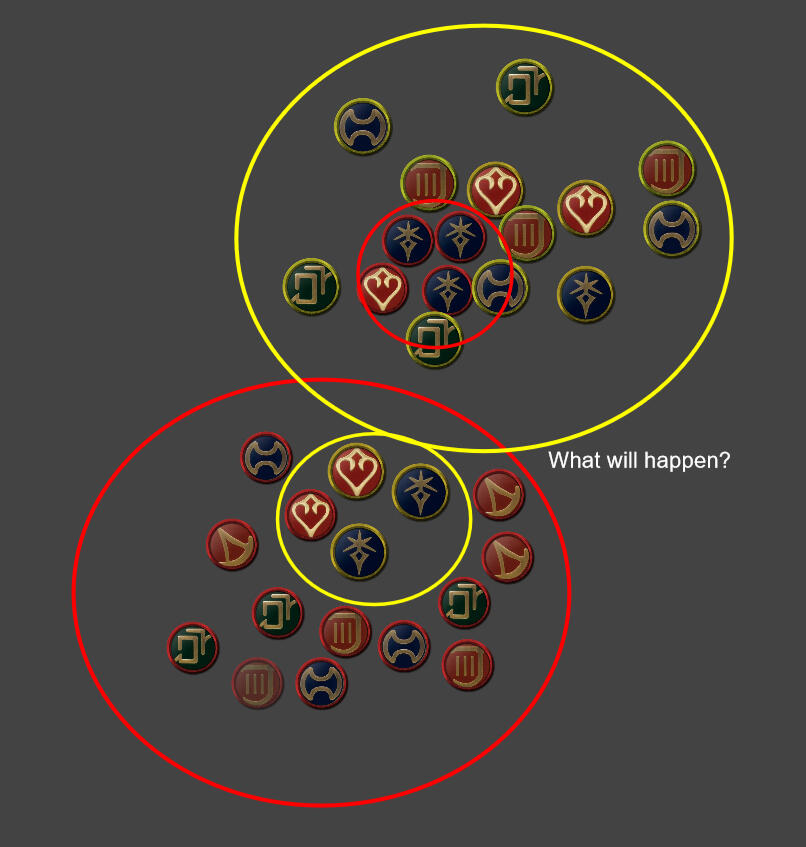
Much like PvE, PvP is built around burst. However, unlike PvE’s two-minute cycle, Frontline revolves around burst windows every ~30 seconds.These windows are centered on the Dark Knight’s pull, Salted Earth, and the Dancer’s Limit Break, Contradance. The goal is simple: stun enemies, pull them together, and burst them all at once.
There are several reasons why burst game play is the optimal way to play:
1. Your hardest-hitting abilities deal AoE damage, often without diminishing returns.
2. Damage outside of your job’s burst window is extremely low.
3. Enemy defenses are very high, making sustained damage inefficient.
4. Fast kills prevent counterplay, stopping enemies from responding or disengaging.
5. Quicker engagements reduce exposure to the third team, lowering the risk of being pinched or losing other objectives.
Why Burst is Strong:
Hitting more enemies dramatically increases the total damage you deal. This effect compounds rapidly in Frontline, where there are a lot of enemies.
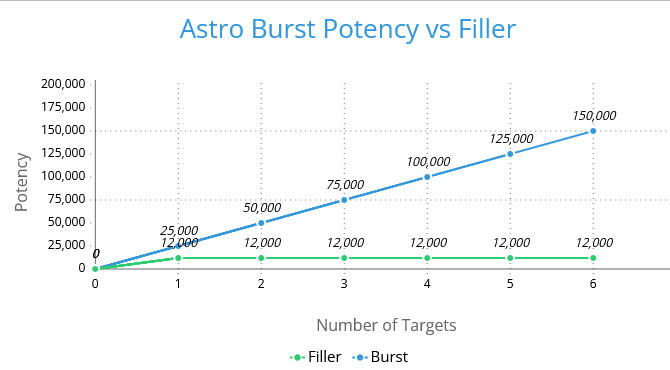
By looking at the Graph, you see the difference between the burst and filler.Your burst on 6 targets will be 10x more damage than your filler actions in the same two GCDs.This is what makes burst-centric gameplay so powerful. Entire alliances (24 players) can be wiped by a single Salted Earth followed by coordinated burst from Astrologians and other AoE-heavy jobs.It is not an impossibility for an Astro to hit all 48 enemies and deal 1,200,000 potency within 2 GCDs.
Battle High For All:
Battle High is what wins games.
The more of it your team has, the better your chances are.Staying together and bursting as a group builds Battle High far faster than playing split, and this comes directly from how assists work.As long as you damage an enemy within the 10-second assist window, you gain Battle High when they die. It does not matter whether one person hit them or twenty-four... the assist rules stay the same.
-
So, for example:Example 1One person kills an enemy. They get 8 Battle High.
Total Battle High: 8.Example 2
Eleven people work together to kill an enemy.One of them gains 8 Battle High.
Ten get 4 Battle High.
Total Battle High: 48
-Example 3
Now, what if 7 enemies die?One Player: 56 BHEleven Players: 336 BH
-Working together doesn’t just make fights easier. It makes your team stronger and faster than any amount of solo play ever could.
Understanding Defenses:

Before we move on, we need to understand our defensive tools.
Purify lets you ignore most forms of CC for 2 seconds.
Sprinting away allows you to escape a burst by moving out of range.
Guard reduces damage taken by 90%.
Recuperate lets you heal any damage taken.
Purify:

Purify is your main defense against CC.You will be pressing this a lot.If you are getting hit with CC, it usually means you're also getting hit by the strongest attacks the enemy has. With that being the case, being unable to act is incredibly dangerous.With how short the cooldown of Purify is, hitting this every time you get CC'd and comboing that with recuperate is a solid, if MP-intensive option.Better safe than sorry.
Sprint:

Sprint works very differently in PvE vs PvP.
1st - it has infinite duration.
2nd - It is on the GCD
3rd - It ends early if you use ANY other action.
4th - It has no CD.So, how do you use sprint effectively?
The main purpose of sprint is to avoid damage entirely. If you do not get hit, you do not take damage, and you cannot die.Sprint has no resource cost, no CD, and unlimited duration. An enemy chasing you that is out of range will NEVER be able to catch you unless they have additional movement buffs.
Guard:

"Guard" is your primary defensive tool.
It blocks 90% of incoming damage and negates most crowd control. Its one drawback is a significant movement speed reduction.Guard is not an escape tool. It is a preemptive tool.
You use Guard before the damage lands—when you expect to take heavy hits—not after you’re already in danger.Enemies only have a limited number of high-impact abilities, and they usually spend them early. By guarding these burst windows, you bait out their strongest tools, leaving them with weaker filler actions.Using Guard to flee when you’re already out of resources is far less effective. The movement penalty means you’re usually just delaying the inevitable, not creating a survivable situation.
Recuperate:

"Recuperate" is your primary healing tool.You are responsible for your own health.Healers can help keep you alive if they're in your party, but their options are limited. You cannot rely on them.Other than that, this is your basic healing tool. It shares a resource cost with "Purify," so be wary of overspending on either.It also scales with Battle High. This can make it a very potent tool and one of the main reasons BH5 players are very difficult to kill.
Bursting with Dancer:
Ideally, you are never truly “fighting” your enemy in Frontline. A fair fight implies your opponent has a real chance to win—and if your goal is to win, you should never give them that opportunity.Instead, Frontline engagements are about overwhelming your enemies: collapsing on them, denying counterplay, and ending fights decisively.This is achieved by removing their ability to fight back—by preventing them from staying alive long enough to respond. To do that...you want Dancer LB.
Dancer’s Limit Break completely incapacitates enemies for 4 seconds, removing their ability to:Purify
Sprint
Guard
RecuperateOnce enemies are charmed, your team can follow up with Dark Knight or Sage suction and unload all of your damage. Even if enemies survive, they’re tightly stacked, under heavy pressure, and usually forced to retreat.
Bursting without Dancer:
Unless you have several Dancers on your team, you will have to use burst without their LB multiple times a match.Bursting without a Dancer LB is much more dangerous than without. Against stronger teams, it's something you avoid entirely.Why?Without a dancer LB, your team's suction is less effective. The enemies can use purify and sprint to spread out after the suction.Since they are more spread out, your AoE buttons will hit less players, meaning less overall damage.Not only that, but the damage you do deal can be guarded, reducing it by 90%.That's only 1 recuperate of damage even when getting hit by everyone on the enemy team, and even then, they have 4 more.Then the enemies that didn't get hit earlier can now burst you instead! You have to use multiple resources to get in an attack effectively, but now you have very few to defend yourself. Failing to KO your enemy will effectively get your team wiped instead.
Conculsion:
Even if you survive the engagement, the result is often a stalemate. This creates an opening for the third team, not currently involved, to rotate in and pinch either side; gaining all the benefits of the fight with none of the risk.In a twisted sense, the moment you start "fighting," you've already lost the engagement.That doesn't mean you should never "fight." There will be times where you must defend an objective, or push against an enemy that would win otherwise, but winning consistently is about maximizing your KO potential while minimizing your risk of death.The old, terrible phrase "Let them fight" has some truth to it. You want the enemy teams fighting each other as often as possible, not because you get free objectives, but because you can swoop in and reap all the benefits.
Counterpoint:
The key point of my argument was: when the enemies are strong.When you are fighting enemies that are of equal strength or weaker than you, this risk becomes smaller. That does not mean it is zero, but you can assess the strength of your team and determine if a more aggressive approach is applicable.
"Fighting":
Fighting, in this context, refers to situations where neither team has successfully burst the other, but neither side is able to disengage.This creates a prolonged engagement where you must rely on filler damage and defensive tools to survive until your next burst window, or gradually wear the enemy down enough to force a rout.Here are the things to focus on during the encounters:
Focus Fire
To consistently get KO's. Your entire team should hit the same target. This will ensure the highest likelihood of securing the KO by dealing more damage than they can heal through.Most commanders use the "Attack 1" marker to show who you should hit. If you see that marker. You should try to hit them.
Prioritize Targets
Focusing the same target is important, but which target that is, is just as important. There is no hard and fast rule, but some general ideas are:
DO:
1. Target the enemy commander.
Killing the commander means the enemy's 2nd burst will bemuch weaker. A commander is also usually putting out a lot of damage. If you can target them, it's never a bad idea to.2. Target any range targets that are in the frontline.
Ranged jobs have far less damage mitigation than tanks and melees. If one has moved into the front, they're much easier to kill than other targets.3. Target any enemies that have just exited guard.
If an enemy has just left guard, they have limited defensive options to stop incoming damage. This is the best moment to secure the KO.DON'T:
1. Target Rampart Tanks, especially Gunbreakers and Paladins
Tanks with rampart can have anywhere from 70%-95% damage reduction. Hitting these targets is resulting in single digit damage numbers!Not only that, but gunbreakers deals spikes damage, meaning that hitting them hurts you, and with the amount of defense they have, you deal more damage to yourself than to the enemy!Paladins, while not dealing spike damage, will often have Limit Break, which will give them 10 seconds of invincibility to escape, making your time spent hitting them wasted.2. Target Lone Samurais who dive into your team.
Samurai Limit Break allows them to instantly kill anyone who attacks them during a specific window. Lone Samurai dives are often intentional bait designed to punish unfocused damage.If a Samurai charges into your team and you don’t know how to counter their Limit Break (covered later in this guide), do not hit them. Ignoring the dive prevents unnecessary deaths and denies the Samurai value.3. Vipers
Vipers have an ability that allows them to take and additonal 50% reduced damage for up to 4 seconds, then retaliate in a wide area, healing for the damage dealt.They have two charges of this ability, and when combined with their strong mobility, it allows them to weave in and out of danger while wasting enemy time and burst.
Am I getting attacked?
Is your HP dropping? Are you being targeted by crowd control? If the answer is yes, you need to fall back behind teammates who are not currently being focused.By surviving the enemy’s attacks, you’ve effectively wasted their time and resources.From there, you can Elixir and re-enter the fight far sooner than if you were KO’d.
Soak as much damage as possibleWhile you do want to disengage when focused, you also want to absorb as much damage as you safely can without being KO’d.The primary tool for this is Guard. Guard is not a last-ditch escape. It’s a proactive defensive tool used to keep your HP and MP high while the enemy commits into you.With the current PvP system, if you see a large attack coming, you can activate Guard in advance to block the damage entirely.If you find yourself being focused: Guard, then use your purify and recuperate to escape.
Elixar Close, Elixar Often
You don’t need to retreat far to use Elixir. Once enemies stop focusing you, a short distance behind the front line is often more than enough.Minimizing deaths is a key component of winning matches. If you don’t have CDs available to meaningfully contribute, consider using Elixir so you can re-enter the fight at full strength.
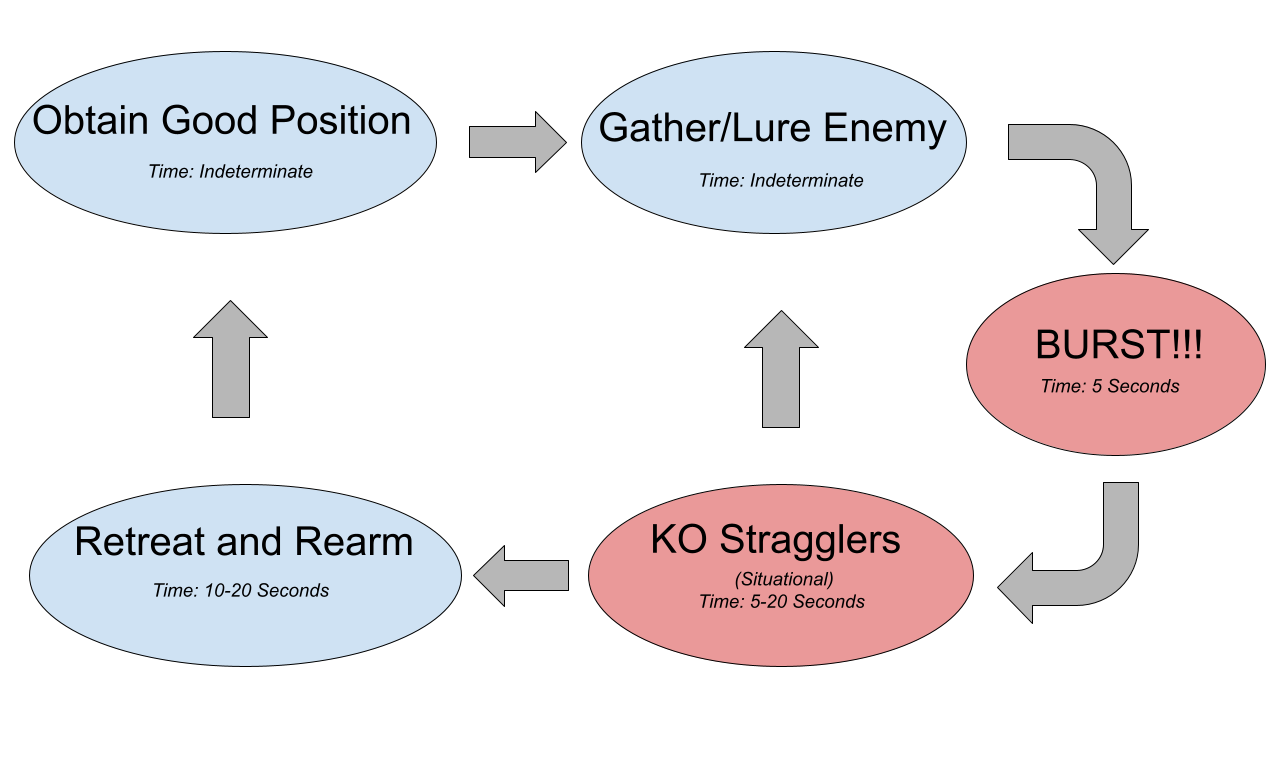
Flow
"Flow" is the core game play loop of Frontline.
Positioning
What is a Good Position?
Good Positions offer multiple ways for your team to attack and escape while limiting your enemies' movement and baiting them into pinch-able positions.Signs of Good Positions:
High Ground – Better vision of the enemy, lets you hide your numbers, and allows you to attack while making it harder for enemies to hit back.
Ends of Funnels – Forcing enemies through a funnel clumps them together. This reaches maximum effectiveness right before the funnel ends.
Favorable Cover – Cover close to your position lets you dip in and out of combat to safely elixir.
Single Entry – When there’s only one way to enter an area, it becomes a much stronger funnel.
Multiple Exits – Having more than one way out lets you choose how to disengage and avoid being pinched.
Bad Positions limit your attack and escape options and make your team vulnerable to pinches.
Signs of Bad Positions:
Low ground - Low ground gives the enemies a clear sight on your numbers and makes it difficult to attack them.
Middle of Funnels - Fighting in the middle of a funnel makes it very easy to be pinched.
Pushing into cover - Cover hides enemy numbers and makes attacks very difficult when having to turn corners.
Multiple Entries - The more entries an place has, the less defensible it is.
Few Exits - A place with no exits will lead to your team no space to run back to elixir and re-enter the fight.
Between two teams - This is a pinch, and regardless of where you go, your backline will be attacked.
The difference between a good and a bad position can be as little as ten feet.
Your position’s validity is always contingent on where enemy teams are located.What might be a strong position in one moment can quickly become a poor one depending on enemy movement, rotations, and pressure.
A Note on Nodes
Nowhere in this section have nodes or objectives been mentioned, and that is intentional. Being near a node does not automatically mean you are in a good position.Nodes are often placed in bad positions.Positioning is about controlling space, not standing on objectives. By denying enemies access to key areas, you prevent them from safely capturing objectives in the first place.You do not need to stand next to a node to consider it yours. When your team controls the space around a node, it will naturally be captured—even if your team is positioned far away.
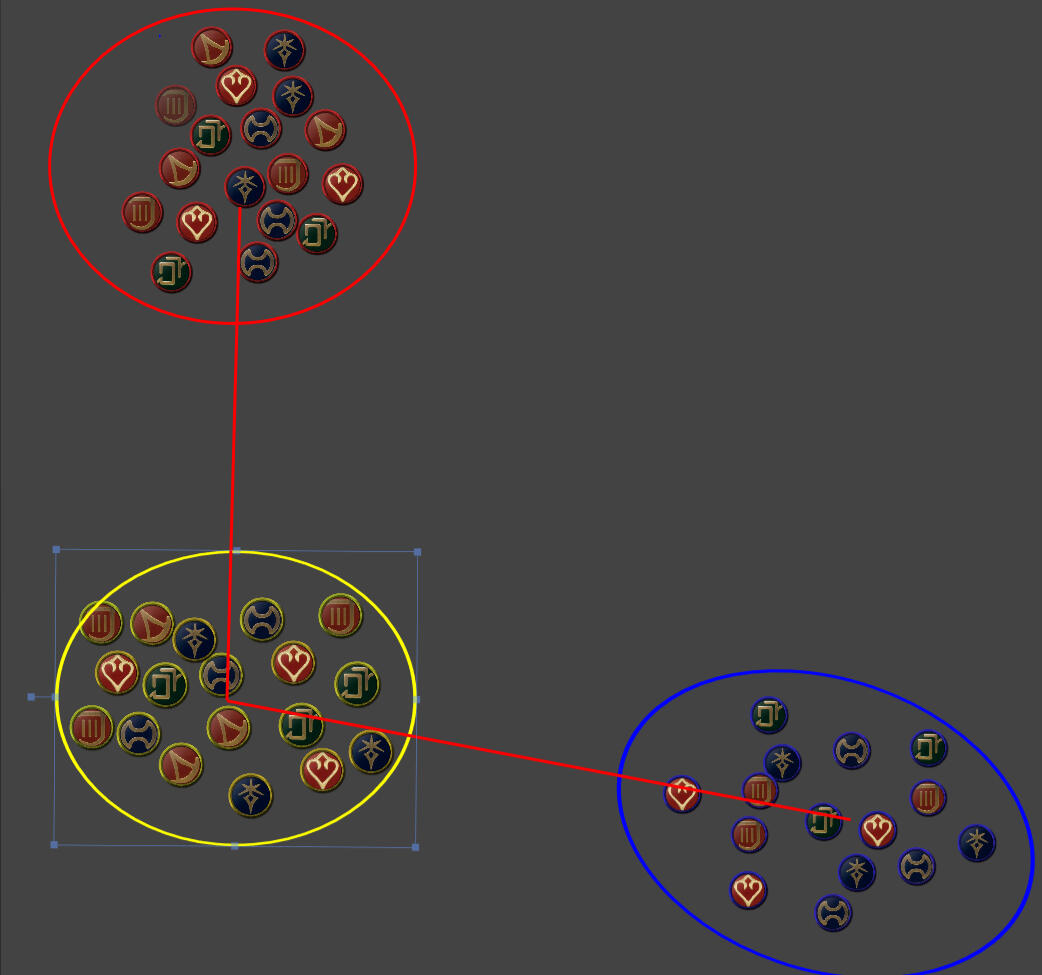
Shatter: Bad Position 1

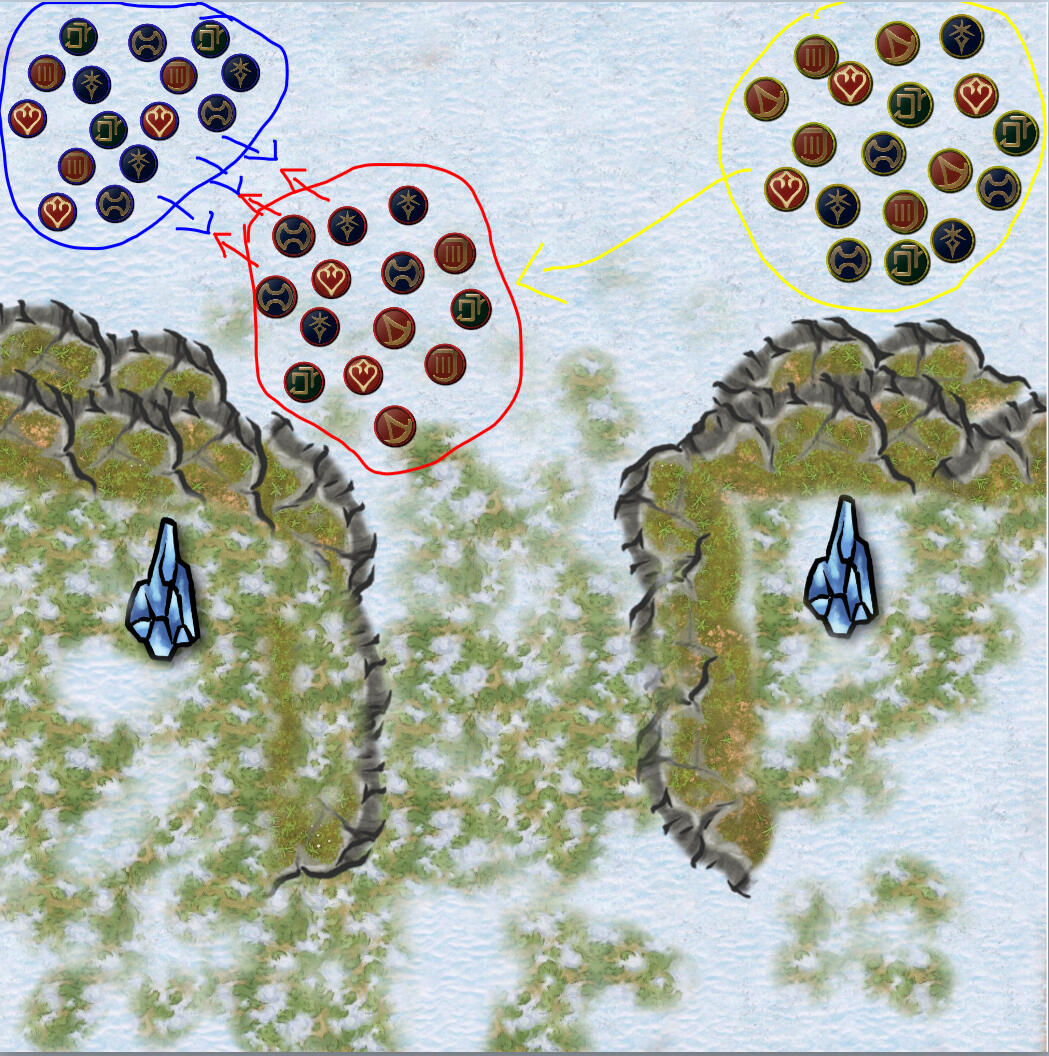
In this scenario, we are Red. We’ve chosen to engage Blue, but we’ve pushed too far forward and exposed ourselves to Yellow, who are approaching from their safe ice side.This puts us in a bad position.Why This Position Is BadOur attack angles are limited.
Regardless of which team we choose to engage, we must attack from the front. There are no flanks or safe collapse angles available.We are vulnerable to a pinch.
By committing forward, we’ve placed ourselves between two enemy teams. Either engagement results in pressure from the other side.The terrain works against us.
The surrounding walls restrict movement and compress our formation, making us more susceptible to pulls, AoE burst, and crowd control.Our retreat options are predictable.
Our only real option is to retreat backward, and Yellow knows this, making it easy for them to chase, catch, and burst us down.So, what can we do differently?
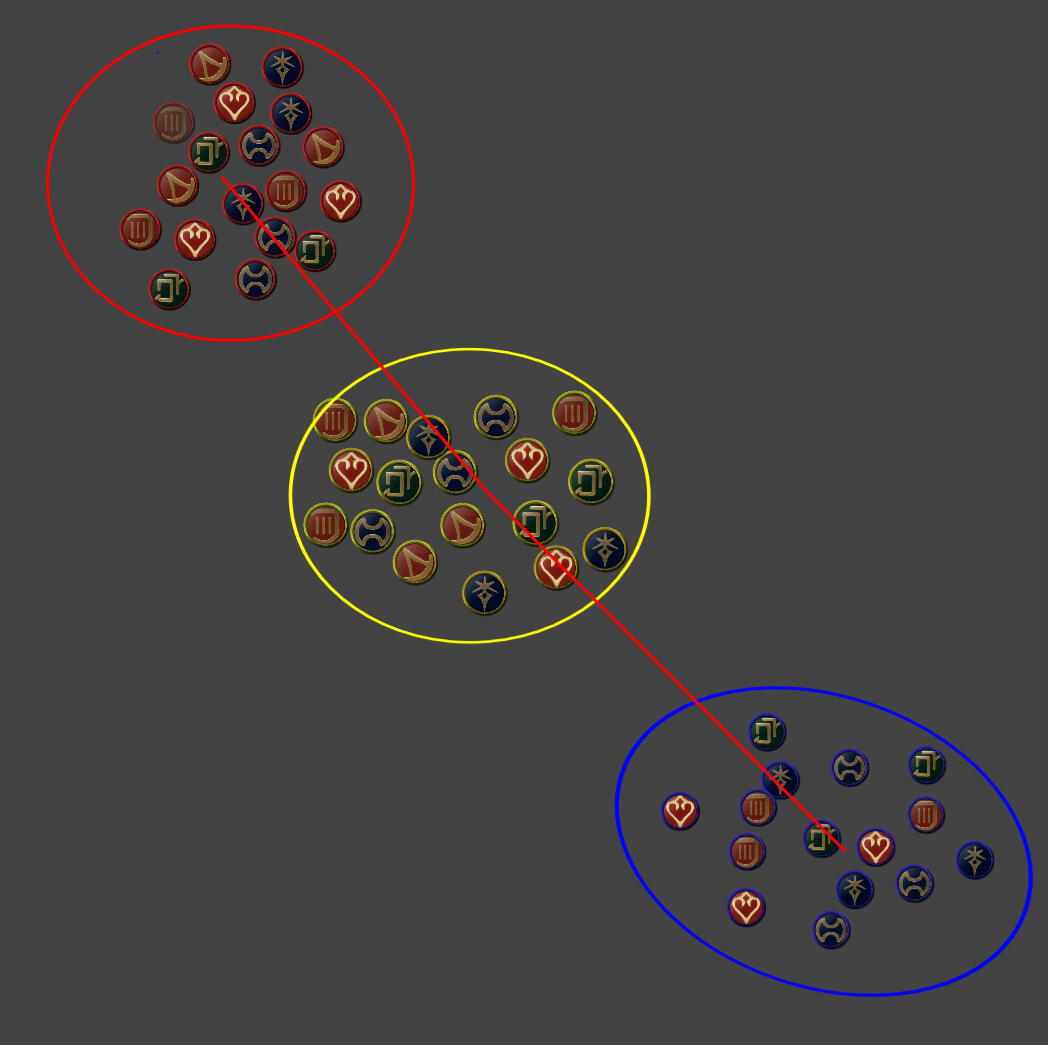
Shatter: Good Position 1
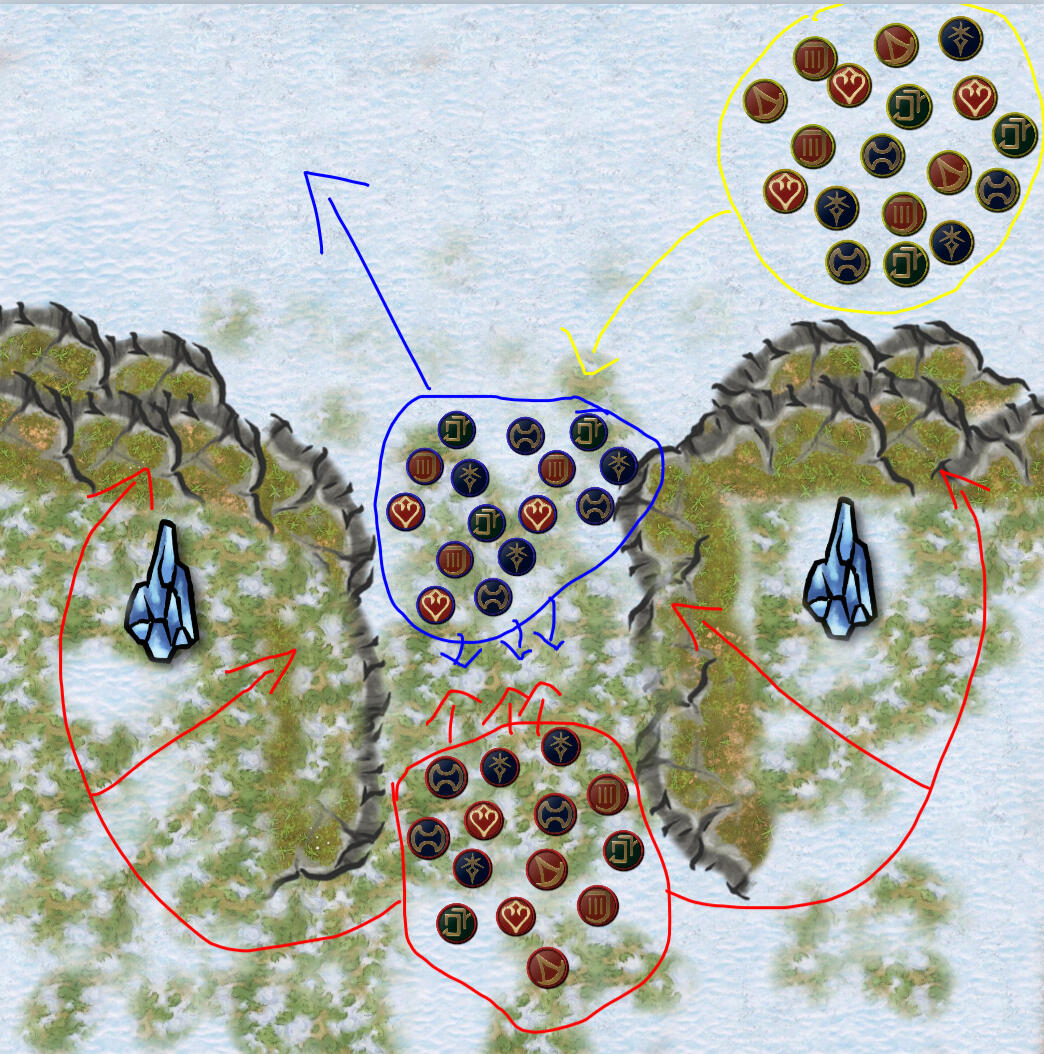
Fixing it
To turn this into a favorable position, we don’t need to push forward—we need to pull the fight back into our funnel. The added lines illustrate how this creates new angles of attack and safer movement options.We can still pressure from the front, but Blue is now forced to enter through the funnel, causing them to clump tightly. From here, we can also use the cliffs to our advantage, attacking at range where they can’t easily respond.Yellow continues to approach from the same direction, cutting off Blue’s retreat. If Yellow commits to fighting Blue, we can rotate along the cliffs and punish them from above. If Yellow chooses not to engage and both teams attempt to camp us, we retain multiple escape routes and flexible attack angles that allow us to reposition between them.Now look at the enemy positions.If Blue wants to attack us, they have only one entry point—the same problem we were facing earlier. They’re also limited to a single escape route. Yellow can’t reach us at all without going directly through Blue. If Yellow instead rotates to the upper layer, that movement is clearly visible, and we still retain an escape route to the west.Many bad positions are caused by overextension. Look at these images in reverse and think about how often your team pushes forward, only to be hit from the side. Learning when to pull back into a funnel is a critical skill—and one that keeps your team alive far more often than reckless aggression.
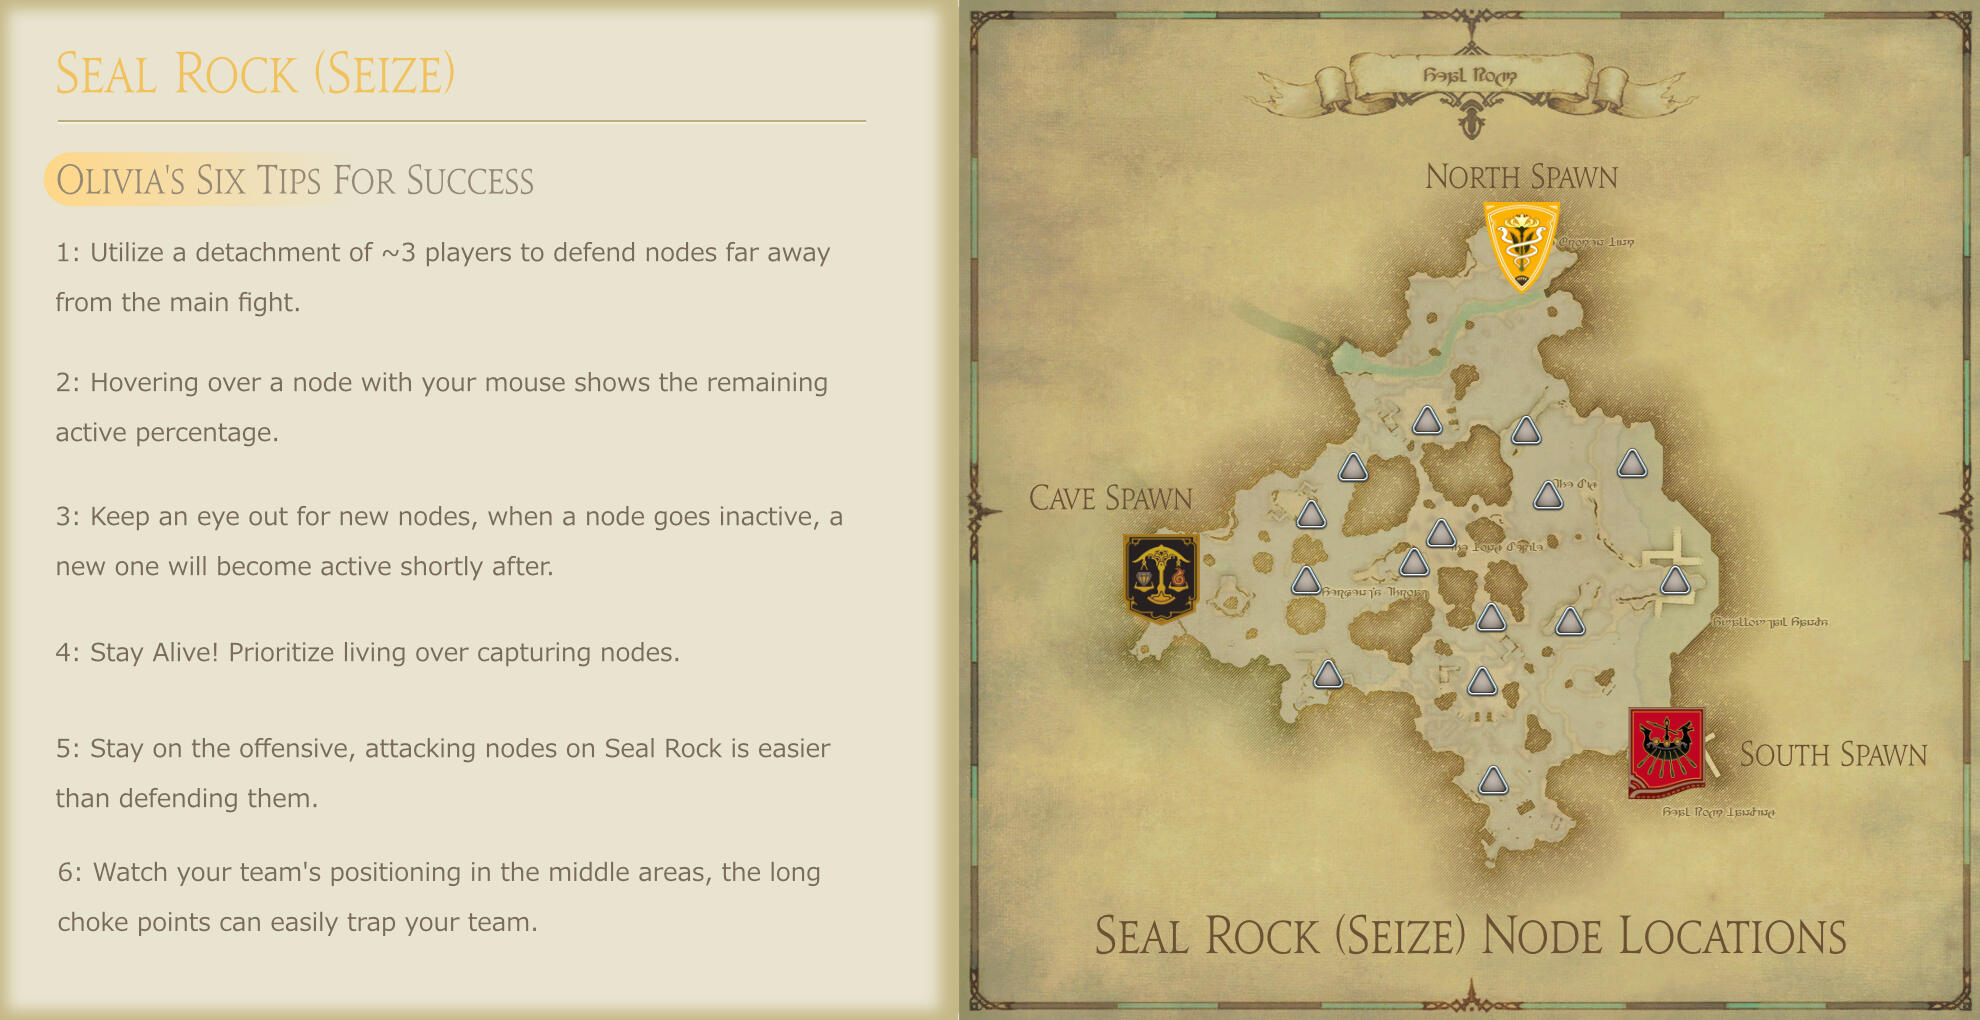
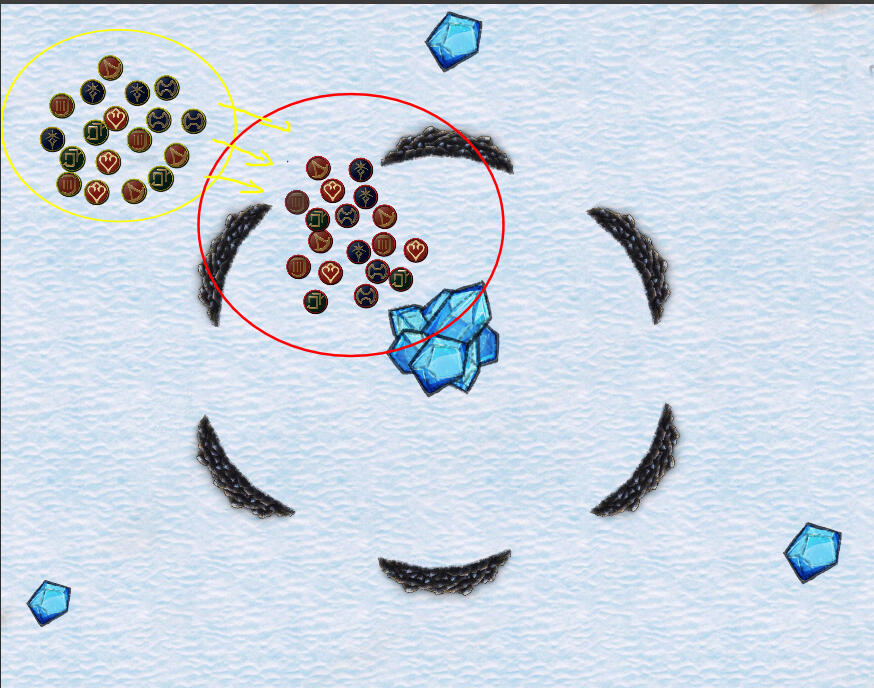
Seal Rock: Bad Position 1

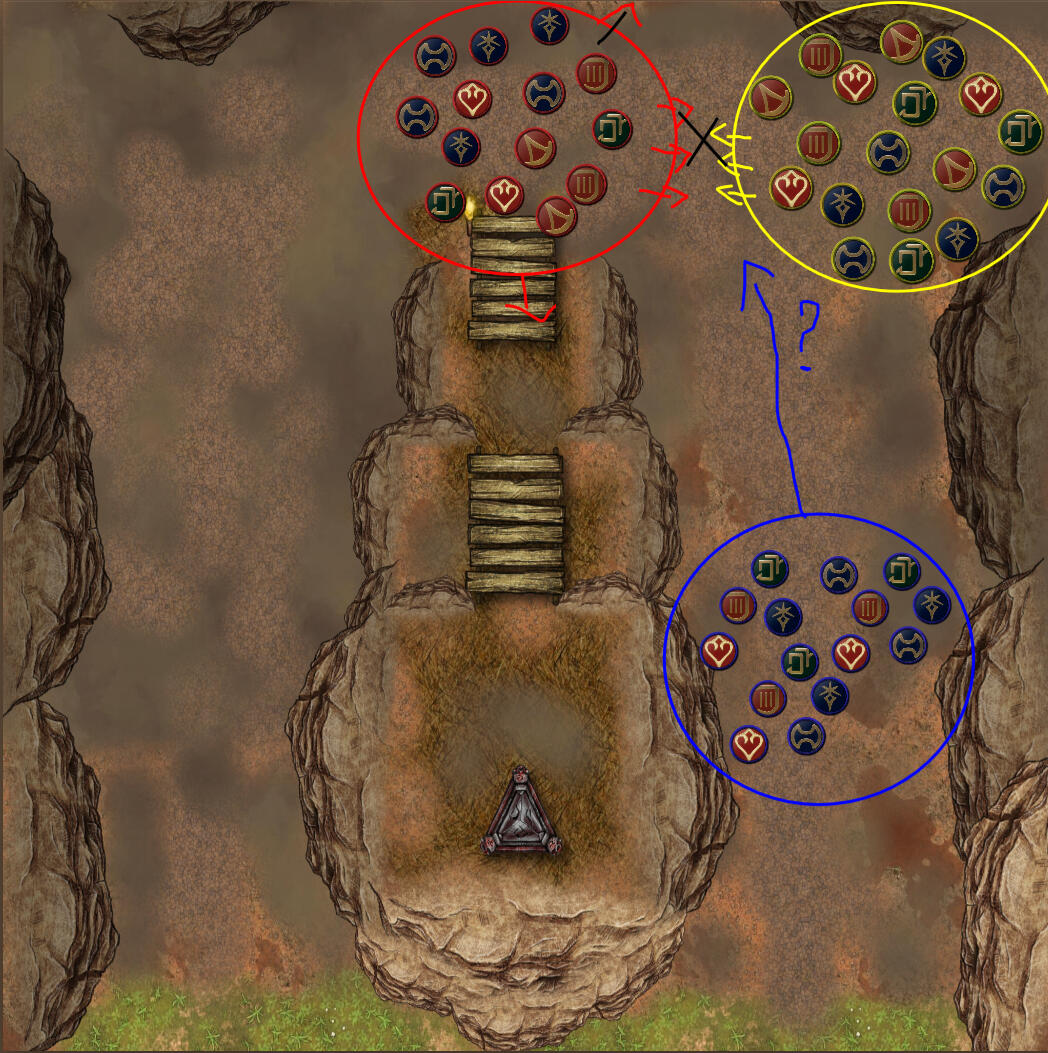
We’re Blue this time. We want to hit Red, who’s holding the upper mid cave node. This node is naturally defendable—but Red is positioned poorly, much like the Shatter 1 example. So how do we capitalize?From this angle, we don’t...
We have no safe way to pressure Red (or Yellow) without inserting ourselves between both teams.A lot of good positioning depends on pathing. The most direct route is not always the best route.A “scenic” path usually trades speed for better attack angles and safer escape options. Sometimes that trade is negligible. Sometimes it decides the entire fight.So what should we do instead?
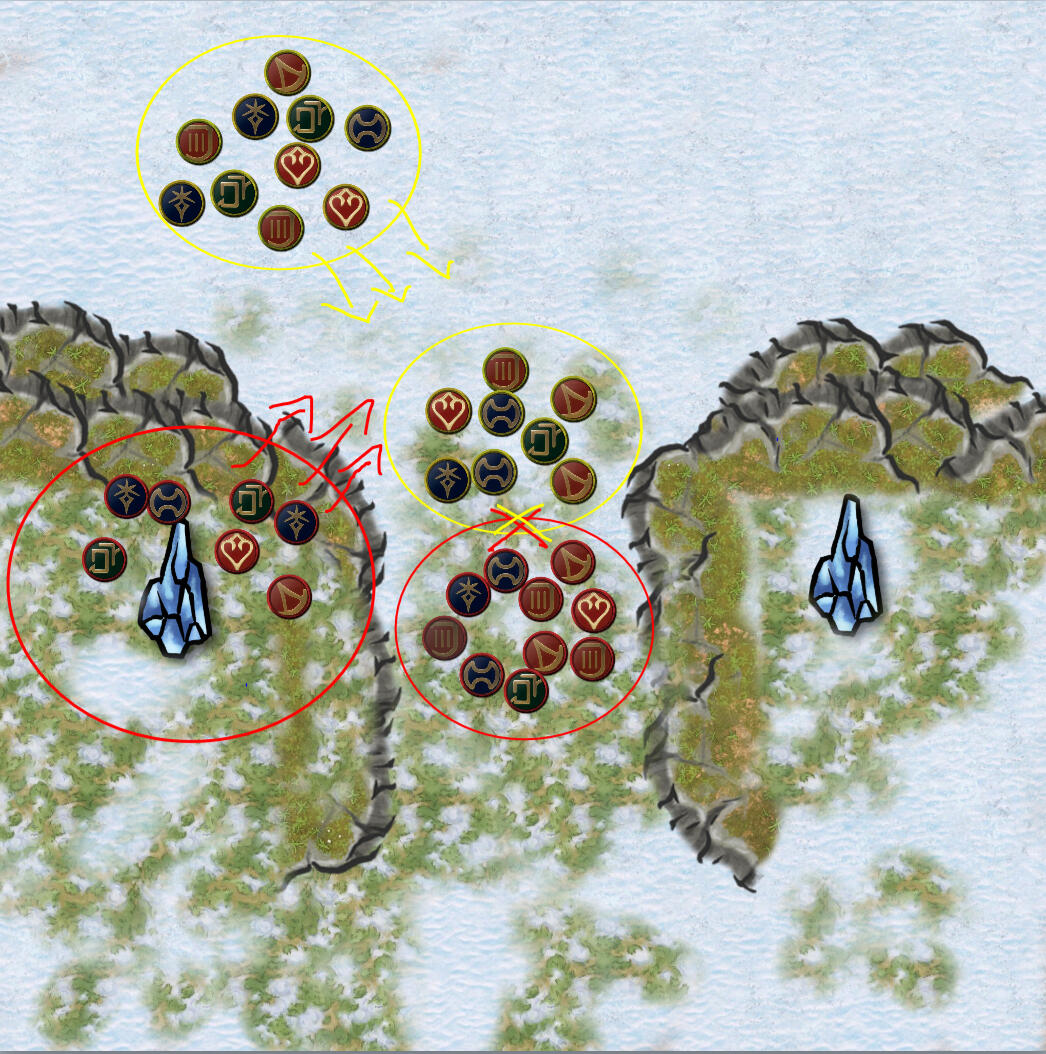
Seal Rock: Good Position 1
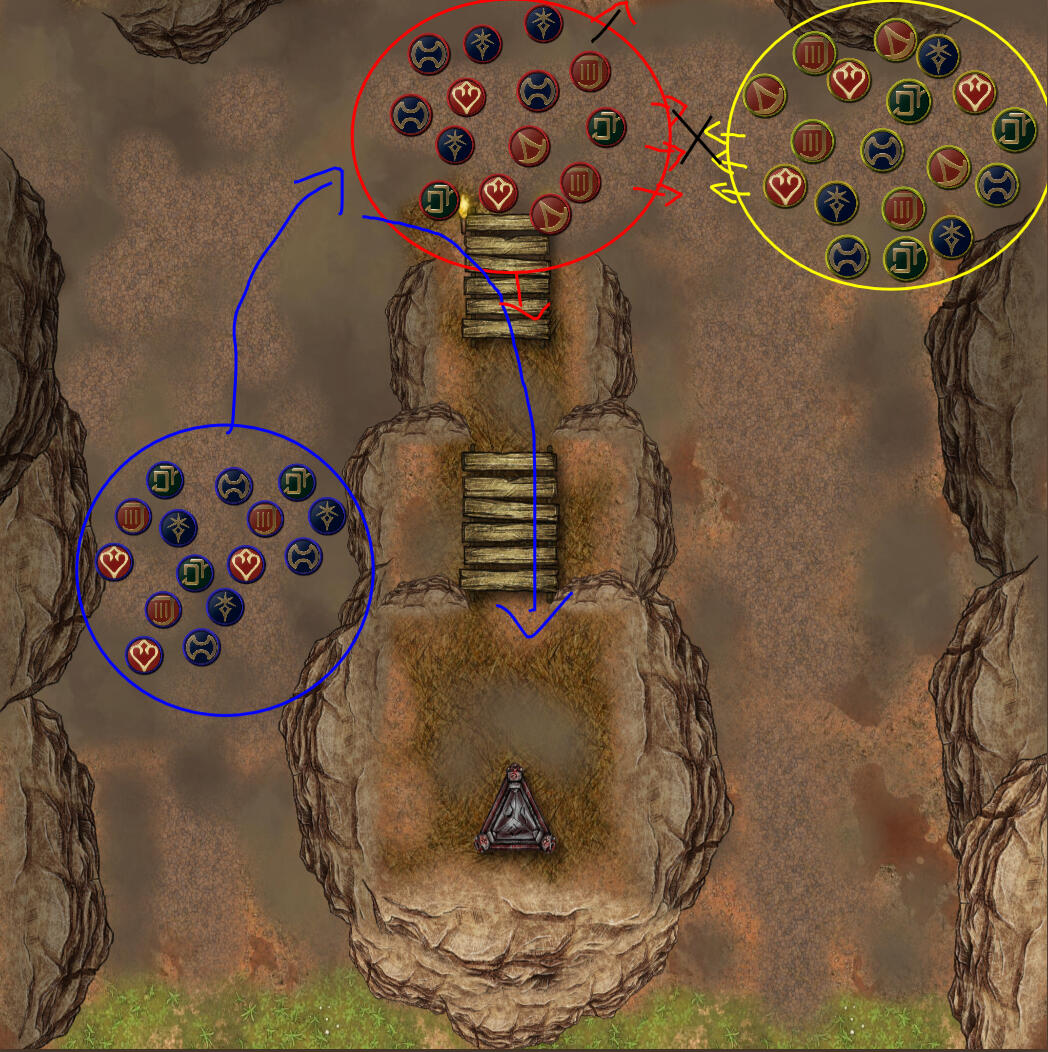
The fastest and safest solution is to backpedal around the cliff to the opposite side. From here, we gain a clean angle to pressure Red while denying Yellow any opportunity to engage us first.Red’s available escape routes are now limited: either retreating up the ramp or falling back toward their spawn. In practice, this usually splits their team. That split gives us the opportunity to bulldoze up the ramp and secure the node, while Yellow is forced to fight through Red’s frontline if they want to contest it.In terms of attack and escape routes, this is still a fragile position.
If Red had claimed the high ground instead, we would be in a very dangerous scenario, similar to what we saw in the Shatter 1 example. The difference here is not the node; it’s how each team is positioned around it.This is why the relative positions of all three teams matters when evaluating whether a position is good or bad. A position does not exist in isolation.We’ll expand on this idea further in “Attack Angles”.Finally, remember that positioning is not static. Your team is always moving, and your position is constantly being re-evaluated. Holding a neutral or good position may not produce immediate rewards, but being in a bad one can result in your alliance being wiped instantly.
Onsal: Bad Position 1
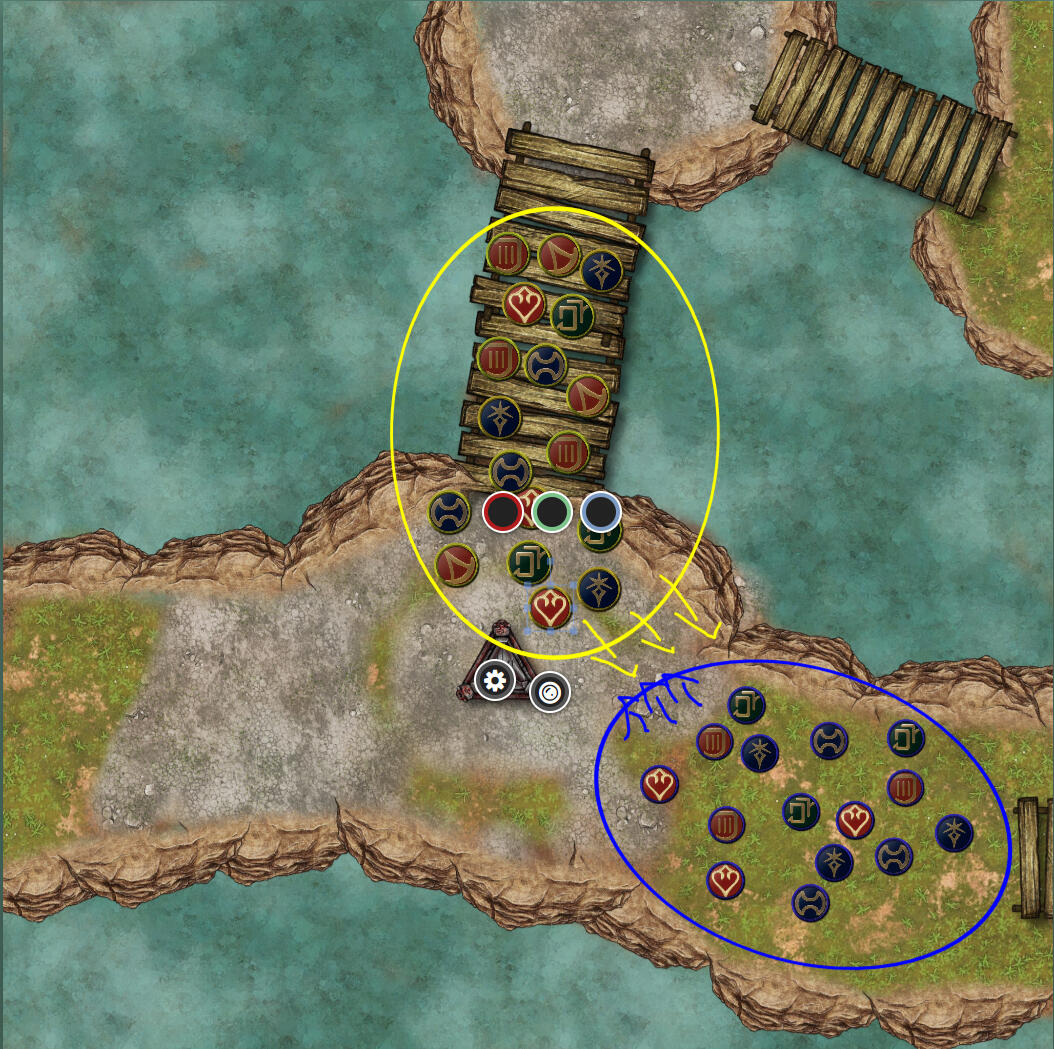
Here, we’re Yellow at Onsal’s southwest node. A fight has already broken out, and in a practical sense, we’ve already lost it. The only team not present is Red (the northeast spawn), but we have a very good idea of what they’re going to do.They’re going to pinch.
The only question is who.That question existing at all is what makes this a bad position.Because of poor pathing, we’ve placed ourselves in a spot where Red has options. They can pinch Blue... but they can just as easily choose to pinch us.Good positioning removes enemy options. Bad positioning creates them.
Onsal: Good Position 1
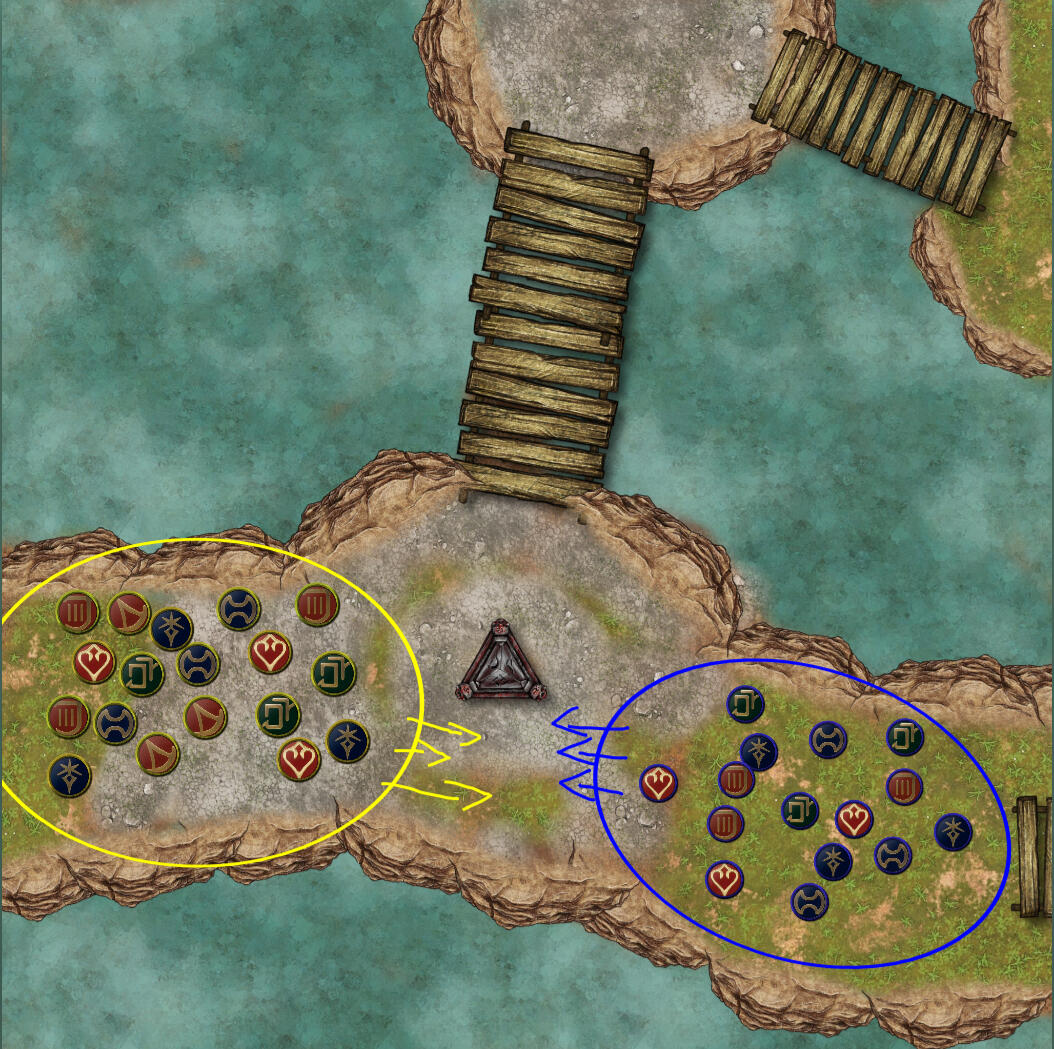
By changing our angle of attack, we’ve minimized the risk of getting pinched. In this situation, unless we have a significant point advantage, Red will take the quickest and easiest path to score kills, which means hitting Blue.They could also choose to enter from the north path, sacrificing their positional advantage for a chance at the node. This isn’t a bad outcome for us either. If that happens, we can disengage cleanly and pressure Red instead.Even in the event that Red commits to us, the roundabout path they’d need to take gives us ample time to react. We can retreat, reposition, and completely dodge their pinch attempt.
Good positioning is one of the most important factors in winning “fights.” We may not be able to defeat Blue outright here, but when Red comes from behind them, we can push forward and secure the node.Effective positioning lets us use the other teams as tools rather than treating them as adversaries.
Angles of Attack
When positioning, you need to be thinking about angles. For those who haven't taken a Math class in several years, there are 4 types.
Right – Measures exactly 90 degrees and forms an “L” shape.
Acute – An angle less than 90 degrees, like squeezing the ends of an “L” closer together.
Obtuse – An angle greater than 90 degrees, like pulling the ends of an “L” farther apart.
Straight – A 180-degree angle, forming a straight line (“—”).
To measure your angle of attack, draw a line from your team to the team you want to engage. Then draw a second line from that team to the third team.The smaller the angle between those lines, the more dangerous the attack.Smaller angles mean the third team can reach you quickly after you engage, giving them a strong chance to pinch. They could choose to hit the same team you’re attacking, but that’s usually less appealing—there are fewer isolated targets and less value.Larger angles, on the other hand, mean the third team has farther to travel or must take a less direct path. This makes a pinch less likely, or at the very least gives you more time to disengage, reposition, or stop the third team’s advance.
An Acute "Bad" Angle
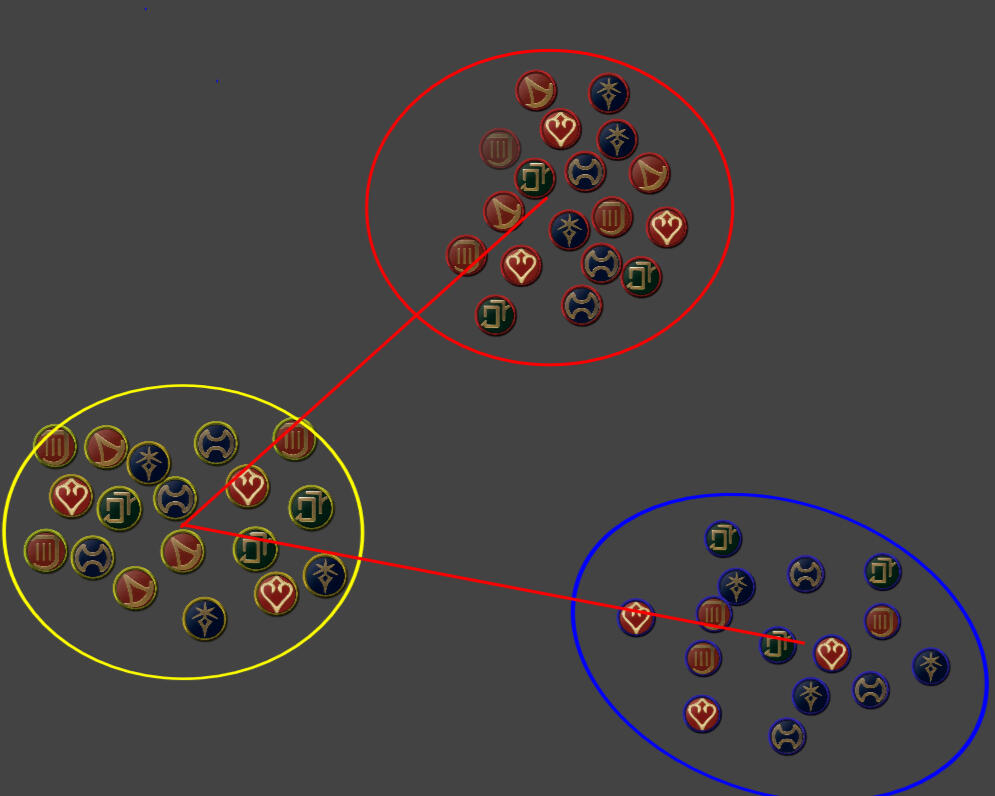
An Obtuse "Decent" Angle
An Obtuse "Strong" Angle
When terrain offers fewer natural advantages, you should rely more heavily on angles of attack. Your goal is to position your team so the enemy you’re engaging is sandwiched between you and the third team.At the same time, you must avoid being positioned between two teams. This is especially important when you’re in first place, where both enemy teams are actively looking for an opportunity to collapse on you.As a team, you should be rotating around an engaged enemy, constantly updating your position to reduce pinch risk while making your current target more attractive to the third team.If you want to reinforce this concept, go back to the maps above and draw the angles yourself. You’ll quickly see how angle size directly reflects good and bad positioning.
Note: Any attack angle that passes through the third team before reaching your target is a bad angle. Angles of attack do not account for walls, cliffs, or other terrain hazards.
Gathering and Baiting
Enemies don’t want to be in bad positions. They definitely don’t want to neatly clump themselves into an easy target.But that doesn't mean they won't.Gathering and baiting enemies is about encouraging them to move, group up, or commit mistakes all on their own,All that's left for us is the Cou de Gravey.So how do we do that?
There are a few reliable ways.
Waiting
Objective Bating
Player Baiting
Funneling
Engaging
False Retreating
Waiting
Sometimes, there’s no need to be fancy. Patience is a virtue. If you’re in no real rush and already holding a node, simply wait and let enemies naturally gather and come to you.This is usually used in conjunction with the other methods. Waiting too long, or relying on it alone, can lead to overly passive play and give enemies time to reposition or coordinate.
Objective Baiting
Like moths to a flame, enemies can’t help but gravitate toward objectives. In many cases, simply waiting just outside engagement range is enough to cause a large group to cluster around a node.This strategy is especially effective in Shatter, where interacting with the objective also strips enemies of their offensive capabilities. By waiting patiently, you allow them to gather, commit, and spend cooldowns on the objective itself.Once they’re clumped, you pounce.
Player Baiting
Have a lone player in a conspicuous position. Ideally, someone who can survive pressure or escape easily, such as a Paladin, Ninja, or Reaper. Enemies will often overcommit as they chase what looks like an “easy” kill, naturally grouping themselves in the process.Once they’re committed and are out of position, the rest of your team can come outta hiding and attack.You don’t always need a dedicated bait player for this to work (though it helps). An ally who has already overextended and is now running for their lives can serve the same role.If you are intentionally acting as bait, communicating that to your team is important so they’re ready to capitalize.

Funneling
Funnels are your friend. Lure enemies into chasing you through one, or initiate a fight at the end of a funnel to force them to condense into a tight space.This is usually used with other tactics as this is the place you want to lure them to.
Engaging
Having part of your team start a “fight” is an effective way to gather enemies. While they commit to the initial engagement, your more mobile or burst-heavy players can come in from the side or rear and collapse on a weakened group.Starting fights can also be used to anchor an enemy team in place, creating an opening for the third team to engage them instead. This is often desirable when locking down the team in first place—but you must be careful not to become the target yourself.Engage with intent. If the third team has an easier path to you than to your target, you’ve made a mistake.
False Retreat
“Appear strong when you are weak, appear weak when you are strong.”Once enemies believe you’re retreating, they’ll often overcommit to the chase—and that’s exactly what you’re counting on. By pulling back deliberately, you lure them into an unfavorable position where they think they have the advantage.Once they commit, you turn, re-engage at full strength, and punish the mistake.This is similar to player baiting, but applied to the entire team. Instead of tempting enemies with a single target, you’re using the whole team as bait.
Burst
Now that you’ve secured a good position and the enemy is grouped, it’s time to commit.When bursting, your priority is to involve as much of your team as possible and convert that engagement into decisive kills. The goal isn’t just damage, it’s removing players from the fight.Once the burst resolves, reassess the situation. Decide whether you can continue pushing, need to reposition, or should disengage entirely.
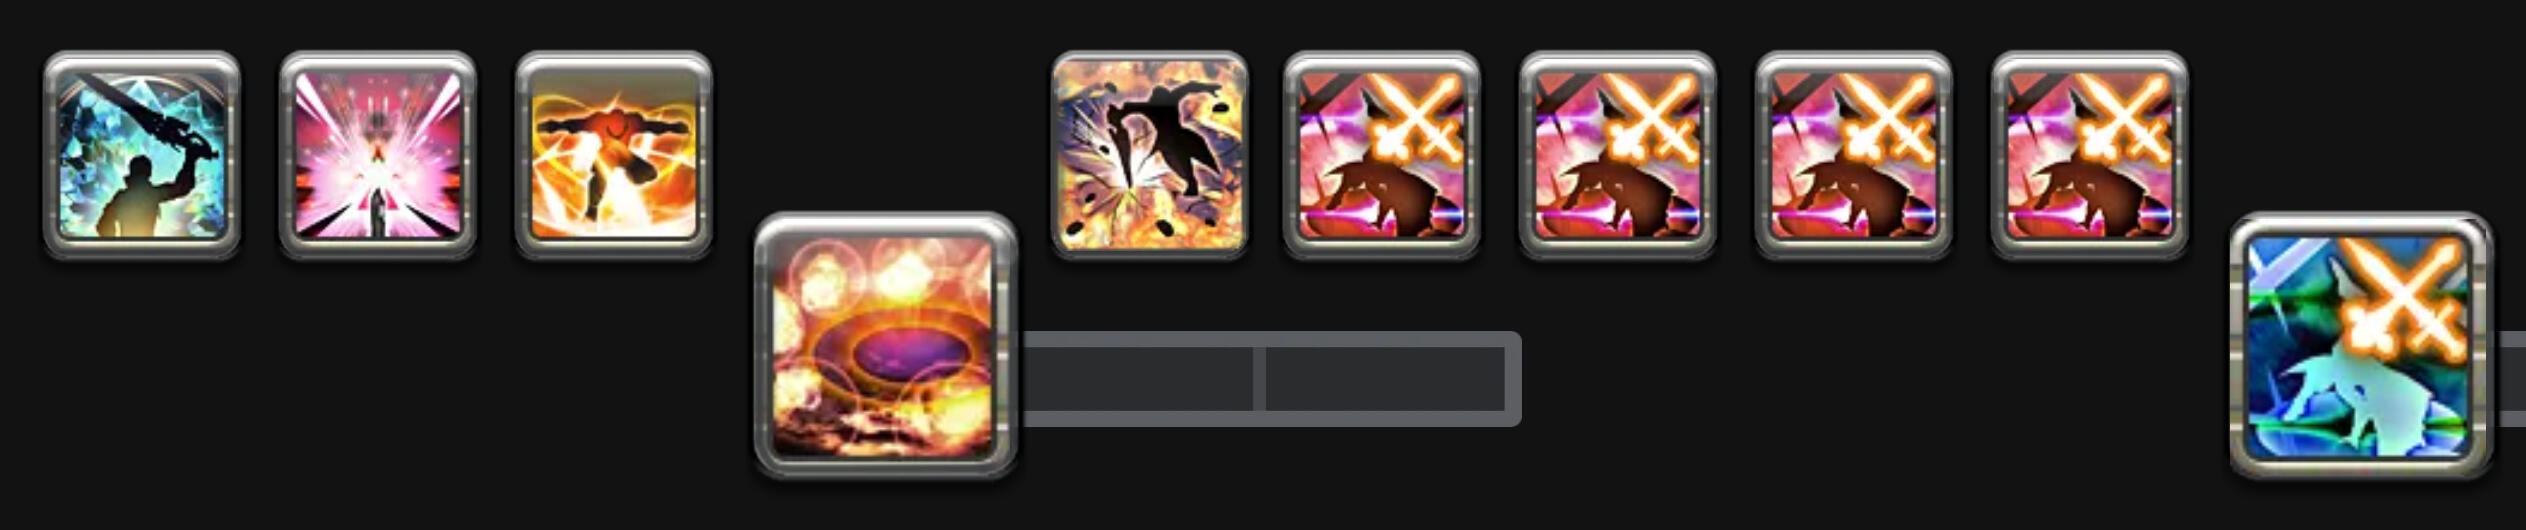
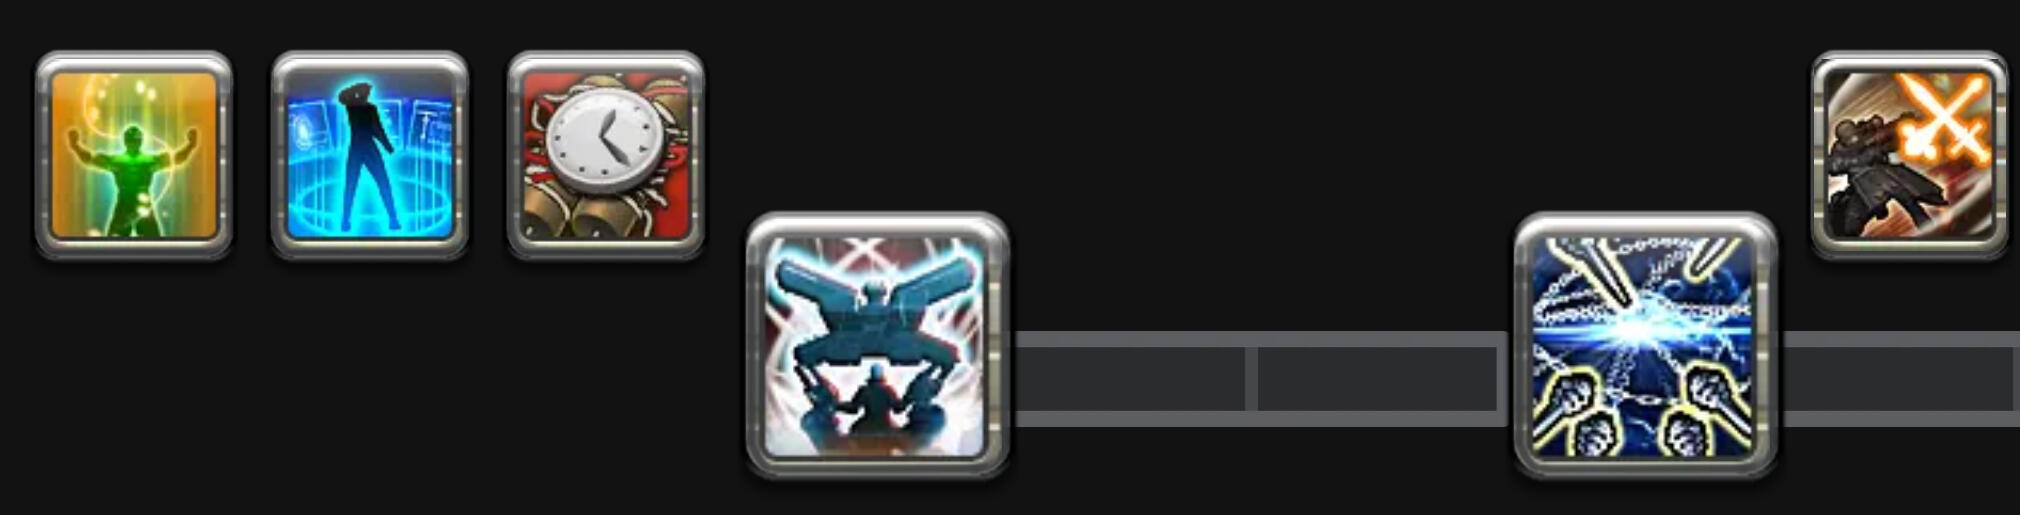
Roles in Burst
There are 4 major roles when using burst-style gameplay:
-
Guard Break: Composed of Dancer, Reaper, and Warrior.Jobs in this role specialize in removing Guard and preventing enemies from acting. While their primary purpose is disruption, this does not mean they lack damage; they often rival or exceed burst jobs.An easy way to think about Guard Break is that it effectively increases your team’s damage by 90%, since that’s how much damage Guard mitigates.
You want as many Guard Break jobs as possible in your alliance to ensure consistent and reliable burst windows on every pull.You should have one of these jobs in your repertoire if you're aiming to win consistently.
-
Suction: Composed of Dark Knight and Sage.After enemies have been made helpless, the next step is to pull them even closer together. Tight grouping ensures your team’s AoE damage hits as many targets as possible and maximizes the value of the burst.Similar to the Guard Break role, you can never have too in this role. Because of counterplay, relying on only one or two Dark Knights makes your burst very easy to disrupt.
-
Interference: Mostly Monks, but other jobs can assist.There will be enemies trying to stop your burst, Burst Stoppers (BS for short). This role comprises of jobs dedicated to stopping the enemies who are trying to stop you.They tend not to contribute to the actual killing in the burst, but they will be enabling it to happen successfully. Players in this role will also tend to be in charge of marking high-priority targets like commanders, dancers, and max Battle High enemies.
-
Damage: Everything elseAnything that doesn't suction the enemy or have Guard Breaking CC falls into this category. Players in this role should focus on where the Guard Break and Suction land and ensuring their damage is applied effectively. It is imperative that you do this. In a frustrated commander's voice... "This is your one job."You don’t strictly need dedicated Damage players. Many jobs in the Suction and Guard Break roles already deal significant damage, making this role something of a “leftovers” category. However, having damage diversity can be valuable—especially in extended fights or when a burst fails.Even if a burst fails because you lacked enough setup roles, having players who can still apply pressure in a prolonged fight can keep you from losing the engagement outright.
-
Timeline
Step 1
Step 2
Step 3
Keep in mind that these three steps should happen within three GCDs... the fewer, the better. The more spread out your burst becomes, the less likely you are to create a rout and transition into a chase.If your burst drags on, the momentum flips. Instead of chasing, you’ll be forced to retreat and defend against an enemy counter-burst, often with far fewer cooldowns and resources available.
Stopping an Enemy Burst
The first and best way to stop an enemy burst is to never be in a position where they can.If the enemy can’t close in because you hold high ground, if they can’t reach you without going through the third team, or if attacking you would place them between you and another alliance, then a successful burst against you simply isn’t possible.

The second best way to stop an enemy burst is to run the hell away.Are you in a bad position? Go get to a good one.Are both teams coming at you? Just leave.I'm very serious about this.Unless the objective you’re defending is game-determinative, your life is the most important asset on the Frontline. No objective, kill, assist, location—none of it—is worth giving it up.There are plenty of comeback and RNG mechanics in Frontline. Giving the enemy more Battle High while losing yours (and a ton of points) is not one of them.
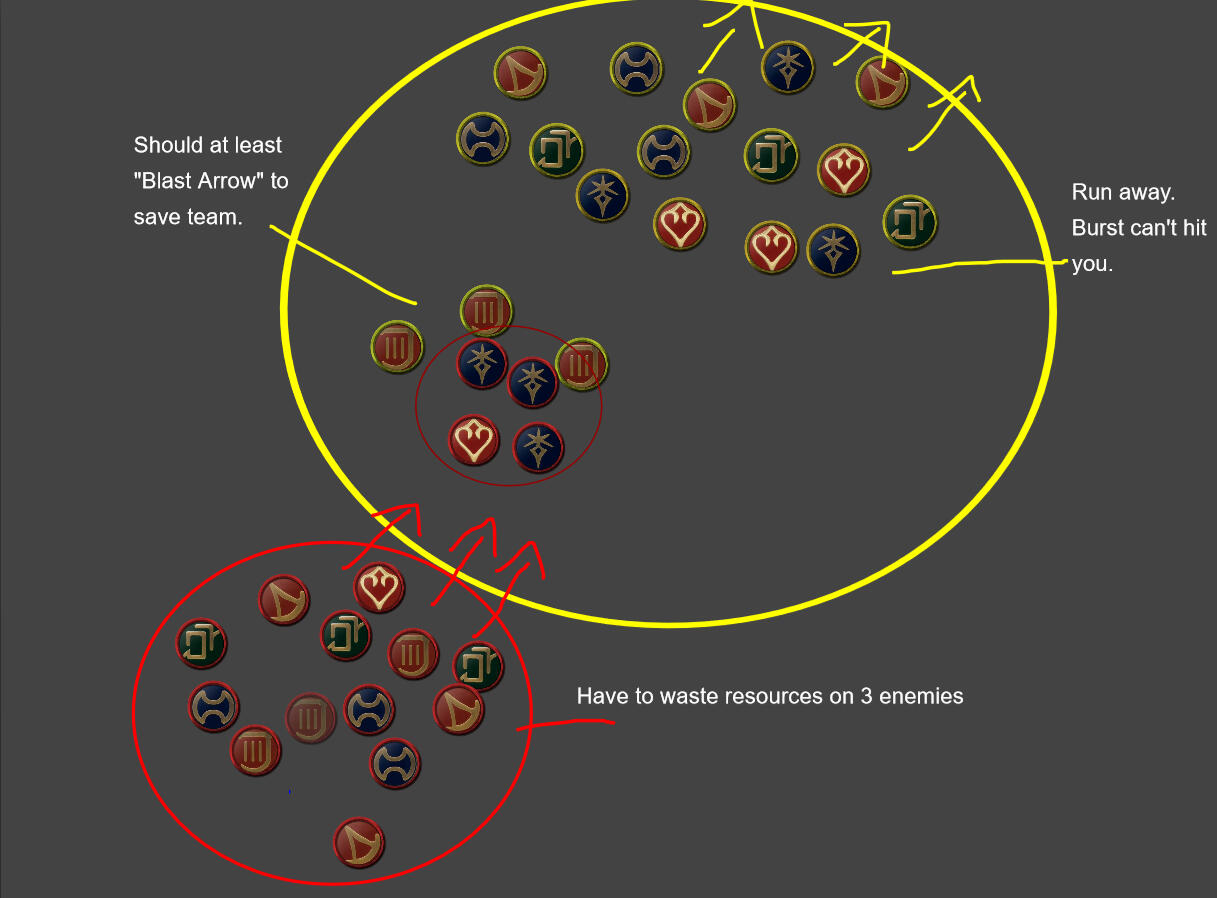
The third best way to stop an enemy burst is to spread the hell out.Most burst happens in the span of 3 GCDs in a small 10-yalm radius.Being outside this range could mean taking 0 damage. The more spread out everyone is, the less damage your collective team takes.This does hinder your own offensive capabilities, but surviving outweighs having to regroup.
**The fourth best way to stop an enemy burst is to burst them.This is a dangerous option.
If you’re attacking because the enemy is about to attack you, there’s a high likelihood they’re well-positioned and sitting on plenty of resources. Teams don’t usually commit to a burst unless they believe they have the advantageStill, an attack could mean mutual destruction, fewer deaths overall, or actually be a complete success.Sometimes it's the only option, but better to attack when you're ready, not when the enemy is.
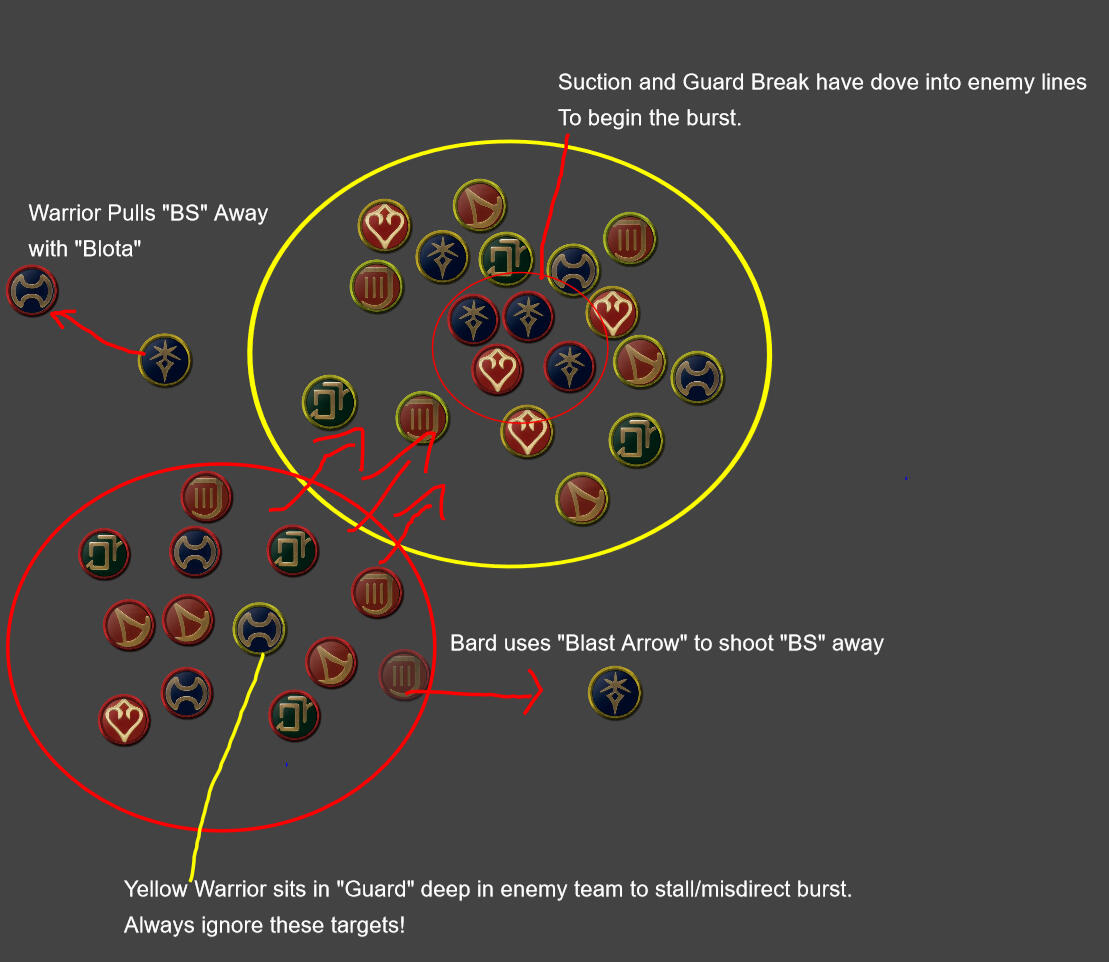
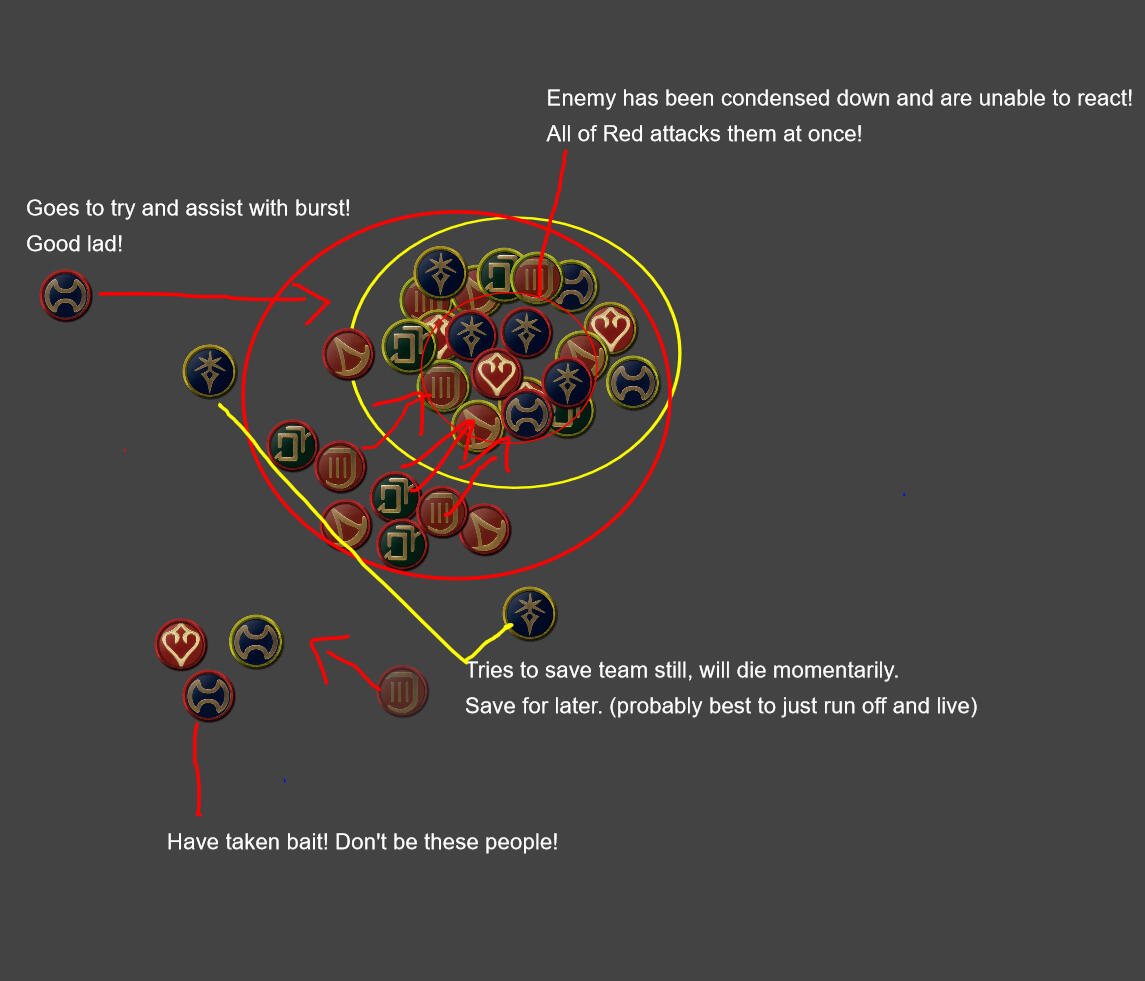
Tied with 4th is de-syncing the enemy burst.This tactic utilizes "BS" to spread out incoming damage.If you can successfully kill the guard break, stop the suction, or delay the DPS, then the enemy can't kill effectively.The enemy needs to attack together to be effective. By using some of your resources to spread them out and stop them from guard breaking, suctioning, or DPSing, you've effectively crippled their burst.From there, you can use your own burst to push them back or just kill them outright.
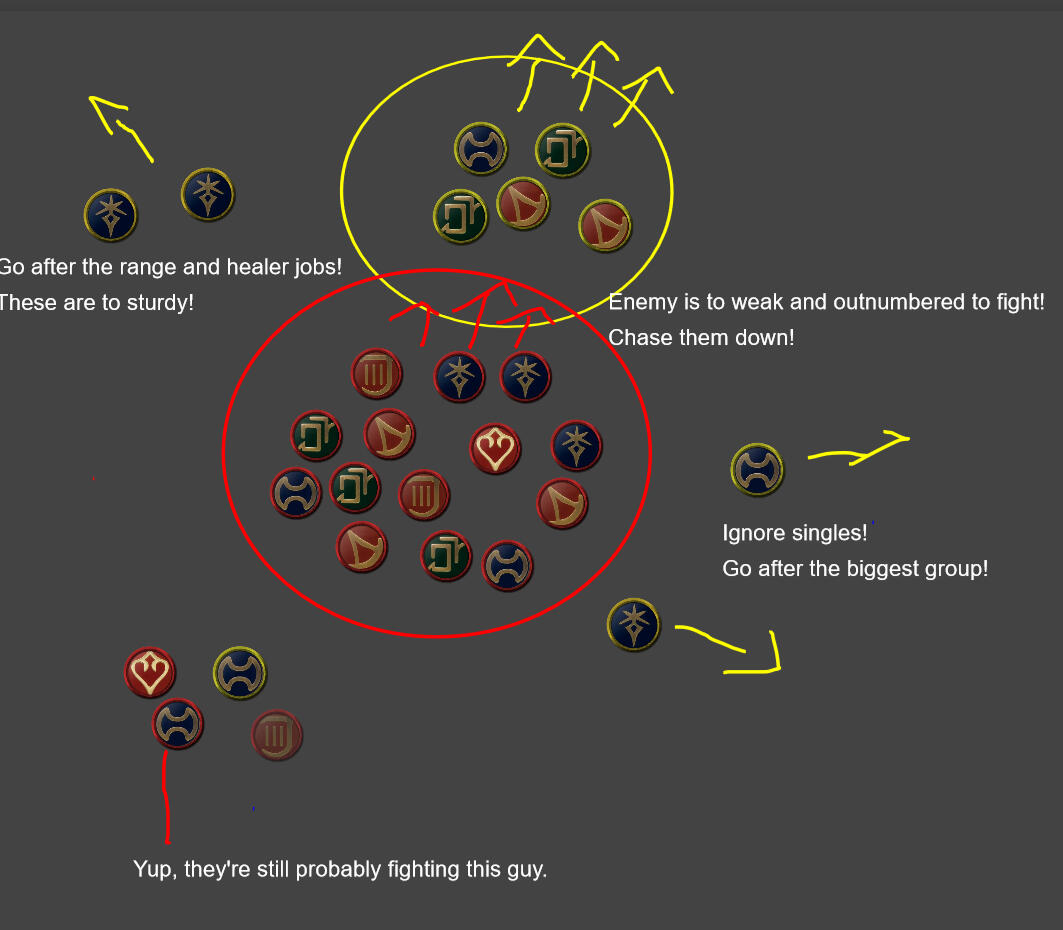
Routing the Enemy
If you successfully burst, most of the enemies are dead and the remaining ones are thrown into disarray.Routing the enemy is about cleaning up what's left.Mark the closest target "1" and kill them. Keep moving forward towards the second target as you do so, otherwise they might get away.These kills are often free points, but it’s important to understand that this is also a very inefficient way to earn them. Moments ago, you should have killed five or more enemies in a single burst. Now, you’re lucky to secure one kill every three GCDs.And chasing can have consequences.It almost always puts you into a worse position. The longer you chase, the greater the risk of being pinched by the third team—or by the same team regrouping and counter-bursting you.This is easily the most dangerous section of the "Flow." There is little to gain while risking a whole lot more.It's better to take your winnings and leave than risk losing all that you've gained.A telltale sign of bad players are players that stay in this phase for too long and die because of it.
Retreat
Retreating is about returning to a good position as quickly as possible while losing as few people as possible.
Without fail, someone will test their luck, greed a kill, or miss the call. That’s normal. Just make sure it isn’t you.Many attacks fail not because a team didn't kill a lot of enemies, but because the enemies killed you back when you tried to leave.Also, retreating does not mean running toward spawn.
In most cases, spawn is a weak position with little strategic value. On NA in particular, teams rarely know how to retreat into spawn correctly and abuse invulnerability, which makes it even worse. Treat spawn as a last resort, not a default destination.When you retreat you should head towards a good position or towards a node you're trying to defend.Retreating gives you time to elixir, reset cooldowns, and realign roles for the next burst. Remember the core loop: bursts generate Battle High and points while minimizing risk.Constant aggression isn’t sustainable. The longer you stay out, the more disjointed your attacks become from the rest of your team.Use retreats to regroup, sync cooldowns, and see who’s Guard Breaking next.One last thing:If you're late in your retreat, then do not drag the enemies back into your team.Leaving late is on you; don't put your team in a bad position by having the enemy chase you.If you're going to die:
-Stall out as long as possible,
-Run towards the 3rd team,
-Run back towards the attacker's spawn!You may die, but use what life you do have till the very end!
Roles
Every player has a job, and no, I don't mean of the job stone variety.In Frontline, your role is how you generate value for your team.That value can be measured in points per second (PPS).Every action you take contributes to PPS in some way: capturing objectives, winning or stalling fights, denying enemy points, or creating space so others can score safely.How to best do that is up to you and your playstyle.
Commanders:
Commanders use a combination of markers and macros to direct the main force of the team. They decide what objectives to go for, when to engage or disengage, and keep the team alive through coordinated movement.Their effectiveness is directly tied to how well the team can follow and execute on those callouts. When done well, Commanders consistently post some of the highest win rates in Frontline... not because they do the most damage, but because they maximize the team’s PPS.Keep this in mind: everyone starts somewhere. A bad commander is often better than no commander at all. A suboptimal coordinated play is far superior to unorganized chaos.If no one on your team is taking up the mantle, you should.There should always be one Commander.
No more. No less.
Soldiers:
Soldiers are the main force of the team. They work directly with the Commander and focus on the highest-priority objectives and targets.While usually more tacit than the Commander, Soldiers still communicate key moments when necessary: Limit Break charge, incoming pinches, or game-deciding events.Soldiers maximize team PPS by enabling successful bursts. Without Guard breaks, suction, and damage, it does not matter how well a commander can call because the team will be unable to execute them.The majority of players should be operating in this role. Nothing works without soldiers. No objectives are taken, no fights are won, and no leads are held without them.
Guardians:
Guardians protect out-of-the-way objectives and vulnerable nodes. They’re often positioned slightly away from the main force, predicting spawns and watching approach routes.This is not an AFK role. Guardians specialize in stalling, dueling, and most importantly... knowing when to run away before a bad fight turns into death and lost points.Guardians generate value by holding objectives your team would otherwise lose. Everyone remembers the one lone Ninja back-capping a node that wins a game. Guardians exist to prevent that.You usually don’t want more than three players watching a node—two if you’re holding multiple out-of-the-way objectives. Anything more is wasted manpower.Communication matters. Let the team know when a node is covered so others can leave, and call for help early if heavy reinforcements are incoming.
Mavericks:
These players are unique as they weave between being a soldier and a more spy-like role.What they do is varied... back-capping enemy objectives, baiting enemy teams into each other, or acting as bait for the main force.They're typically strong players specialized in killing out-of-position enemies or have high mobility and survival tools.Optimal group size is 4, but great for strong solo players. Remember to judge your value against whether your main force can kill without you or not.This is an advanced role who's contributions can't be directly measured. Have a firm understanding of Frontlines before attempting to take up this playstye.
Coordinated:
Coordinated burst is the most effective way to win games.
Jobs that contribute directly to this playstyle sit at the top of the meta, while jobs that operate outside of it are inherently less valuable.A healthy number of Enablers is mandatory. Without them, your team’s engages can be shut down before they even begin.Many people will see one good dark or one good dancer and assume that will be enough when all it takes to stop them is a single monk or machinist.If you want to apply the strategies outlined in this guide. Mastering Dark Knight and Dancer should be one of your top priorities.Other jobs are important as they bring things these two can't do, but they need to stand on a strong foundation of guard break and suction to maximize their effectiveness.
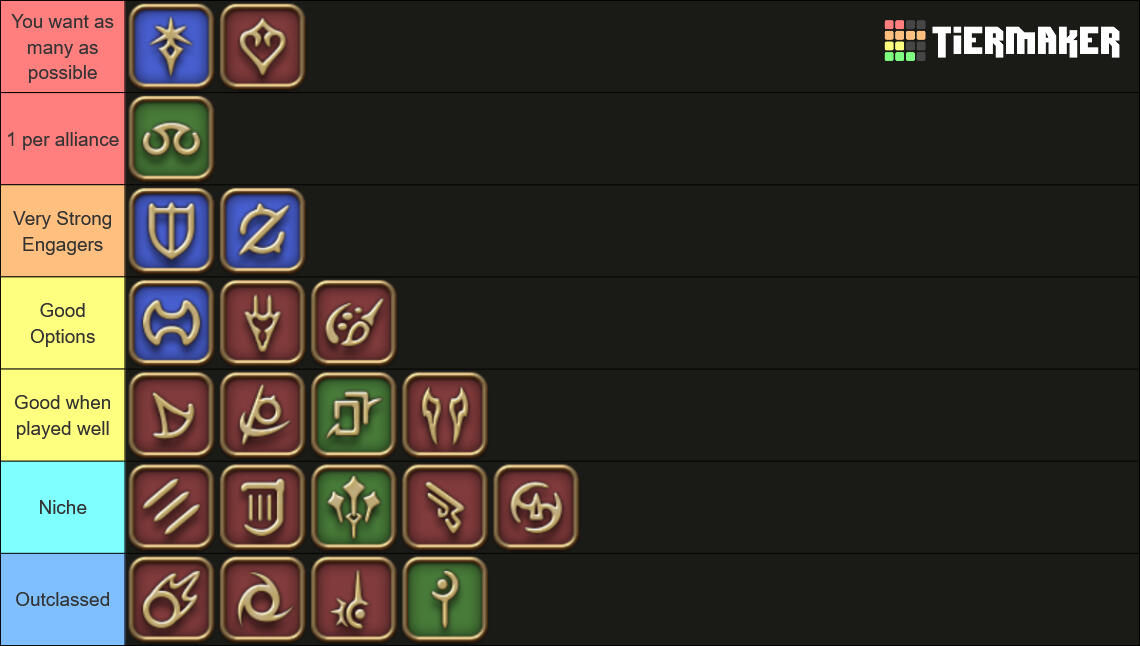
"You want as many as possible" - These jobs stack exceptionally well. Every additional player on one of these jobs directly increases your win rate.
1 per alliance - Scholar's heal-down stacking and massive AoE pressure provide incredible utility. Unfortunately, these benefits do not stack, making every additional Scholar far less effective than the first.
Very Strong Engagers - These jobs hold ground and deal real damage. While Dark Knights and Dancers enable the engage, they are fragile and not top-tier damage dealers. These jobs provide the stability, pressure, and follow-through while being very hard to kill.
Good Options - These jobs can’t anchor a fight like the tiers above, but they still bring useful buffs, crowd control, or pressure, making them solid backline or flex picks.
Good when played well - These jobs require more finesse to use correctly. That doesn't mean their ceiling is less powerful, but their floor is higher
Niche - These jobs do one specific thing very well. That thing is rarely game-defining on its own, but no other jobs can replicate it. Best used deliberately, not stacked.
Outclassed - These jobs are functional, but another job simply does what they do better, more reliably, or with fewer drawbacks.
Uncoordinated:
When playing without a commander, raw damage and kill security matter most.
Jobs that can reliably finish targets rise in value, and the ability to absorb pressure for your team is still important.There’s little reason to go in-depth here. The single most effective thing you can do with an uncoordinated team is to start coordinating them. Even minimal shot-calling will outperform any job selection advantage.If no one is leading, be the one who does.

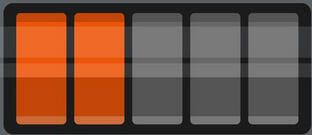
Stats:
Burst Damage

Sustain Damage

Crowd Control

Utility

Survivability
Mobility

The higher the gauge, the higher better a job is in that department.Burst Damage - How much AoE Damage a job can deliver with extra points given for how fast and how often the job can deliver it.
Sustain Damage - How much damage a job can output in between burst.
Crowd Control - How much crowd control a job has. Extra points are given for AoE and short cool downs.
Utility - Accounts for buffs, debuffs, and other supportive options that don't directly contribute to DPS
Survivability - How well a job can stay alive, includes healing, defenses, and movement options the job has.
Mobility - How versatile the job's movement options are including dashes, gap closers, and disengages.
Roles:
Commander

Soldier

Guard/Mav

Solo

How well a job performs in the roles listed earlier in the combat section from rank "D" being the lowest, and "S" being the highest.Commander - Player that calls attacks, retreats, and leads team with macros and markers.
Soldier - Player that works with Commanders to attack in burst and capture the main objective.
Guardian/Maverick - Players that either protect distant nodes or hinder/delay enemies
Solo - How well a job plays when there is no commander.
Jobs
Not all jobs are created equal.
Every job has a niche, but having a niche does not automatically make it good.You should play jobs you enjoy, but if your goal is to win consistently, the optimal choices are not subtle.Any job can look powerful in the hands of a skilled player. The difference is effort versus payoff. Some jobs demand significantly more precision to achieve results that other jobs deliver naturally, and there are things certain jobs simply cannot do. No job pulls enemies together like Dark Knight, and no job applies crowd control like Dancer.Frontline is a team-based mode. Specialized jobs outperform generalists when coordination exists.To succeed as an alliance, you need a strong foundation of Enablers, jobs that create opportunities for your team to delete the enemy. If you only have one or two reliable initiators, they will be shut down repeatedly, and your team will lack the tools to burst effectively. At that point, no amount of advice in this guide will matter.It is perfectly fine to play lower-tier or niche jobs. But if you are serious about winning, you should have these higher-impact jobs in your back pocket. When your team needs them, you need to be able to step in and contribute.
Coordinated:

No Calls:
Tanks:


Stats
Burst Damage

Sustain Damage

Crowd Control
Utility
Survivability

Mobility

Roles
Commander

Soldier

Guard/Mav

Solo

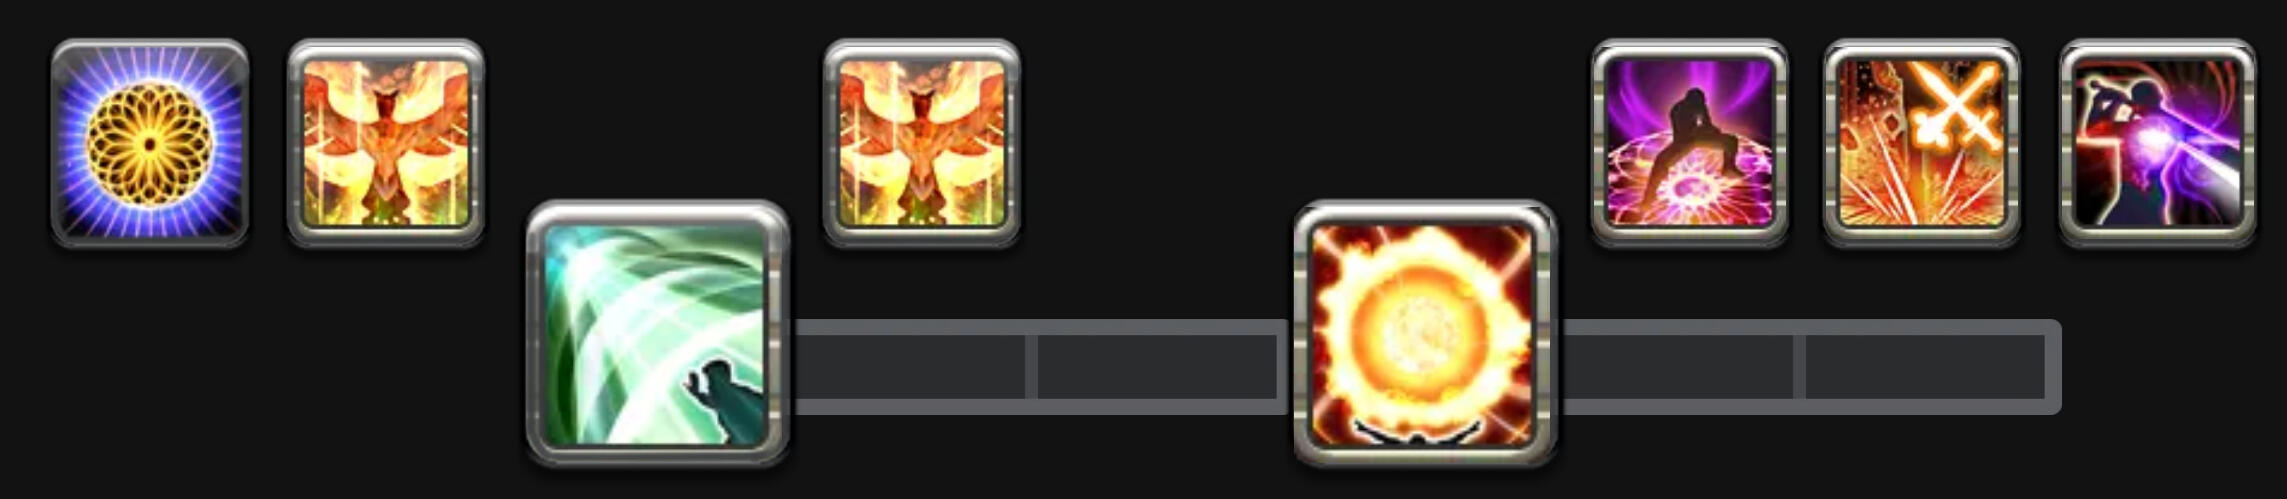
Normal Burst:

Note: Late weave "Intervene" to ensure Sheltron hits 1 second on it's duration.
LB Burst:

Note: You can press LB anywhere in the sequence to eat more damage for your team.
Pros:
Invincibility/High Defense
Offers tons of suport to the team
Low CD stun for routs
High Damage
Cons:
Big part of its damage needs them to not get hit
Long LB Charge Time
Paladin is an absolute monster right now.
With the nerfs to Purify duration, Paladin’s ability to completely negate crowd control and damage for a party member is a true game changer.On top of that, Paladin has a surprisingly brutal burst, including a 3-second Heavy, which makes it extremely valuable even when it isn’t actively covering someone.That said, covering high-profile engagers like Dancers or Dark Knights is where Paladin truly shines. Protecting these targets during an engage can easily make the Paladin the MVP of the match.Paladin also functions well as a Guardian or Maverick. It can comfortably withstand pressure from multiple enemies while steadily chipping them down, making them difficult to ignore or get away from.


Stats
Burst Damage

Sustain Damage
Crowd Control

Utility

Survivability

Mobility

Roles
Commander

Soldier

Guard/Mav

Solo

Normal Burst:
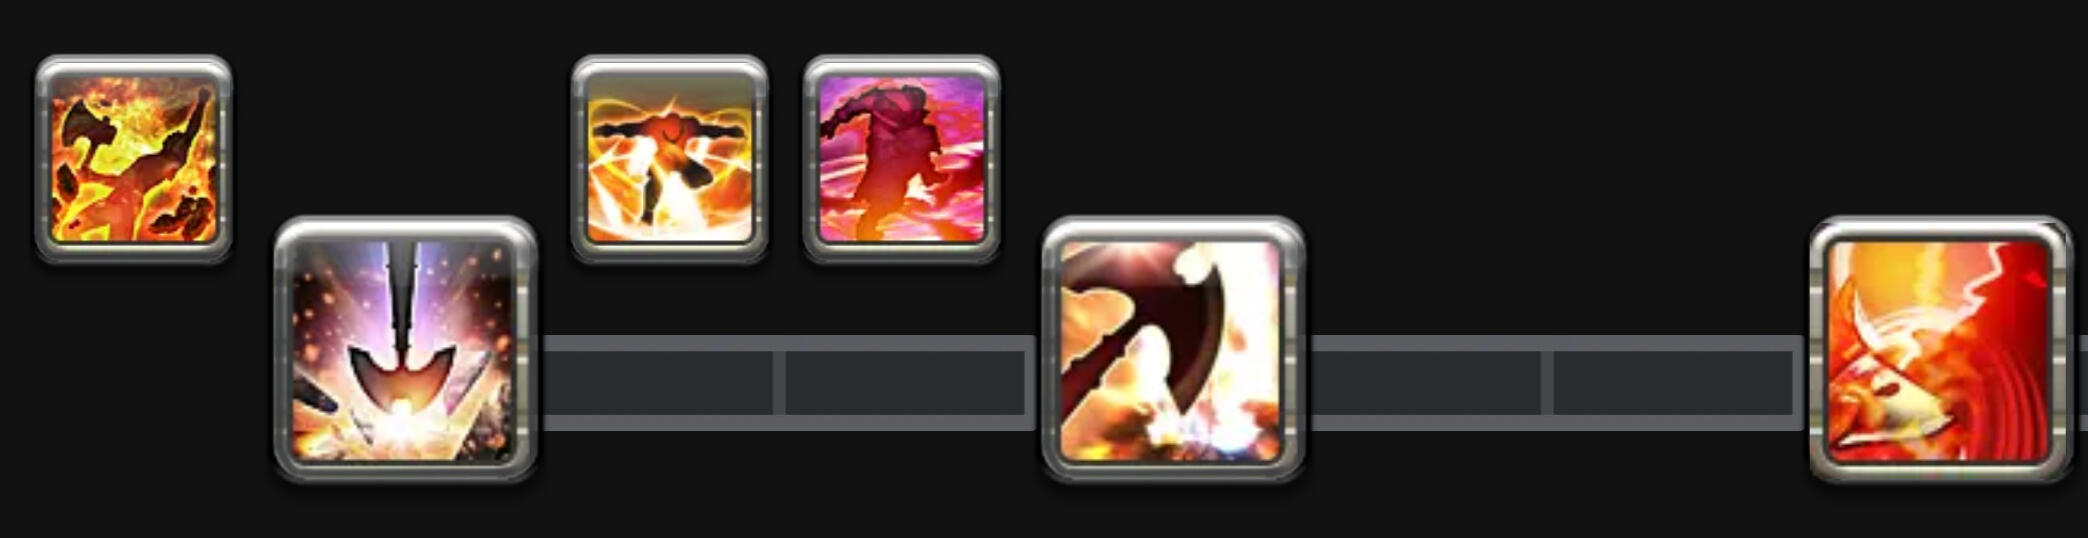
LB Burst:

Pros:
Good Damage
Guard Break
Pulls enemies out of position
Cons:
Few escape options
Low sustain damage
Aiming LB is difficult
Warrior is a good option for most styles of play. High damage, high utility... it has it all, but it suffers from trying to do it all.Using Primal Rend to lock enemies in place, remove their guard with LB, and then bind them afterward makes for a strong engager, but once again, a dancer does something stronger in a wider area.
-
It can function in the interference role, thanks to "Blota" singling out high-profile targets, but once again, monk does it better.
-
It performs adequately as a Guardian or Maverick, but its lower sustain damage becomes more noticeable in these roles. Compared to other tanks, Warrior lacks some of the staying power needed for prolonged solo holds.
-
If your team needs you to furfill multiple roles at once, then warrior is a strong option, but specialization will usually prove more beneficial to your team.


Stats
Burst Damage

Sustain Damage

Crowd Control

Utility

Survivability

Mobility

Roles
Commander

Soldier

Guard/Mav

Solo

Normal Burst:
LB Burst:

Pros:
Suction is Great Tool
Tanky with invincibility
Cons:
Slow LB Charge
Low Damage
Damage cost HP
Needs team support
The commander's job.A staple of the Frontline, and still the biggest enabler out of all the jobs.As an engager, your primary goal is to use Salted Earth to suction as many enemies as possible. Every additional target pulled directly increases your team’s effective DPS. If you can stay in afterward, that’s bonus damage—but your real value is in getting in and landing a strong pull.
-
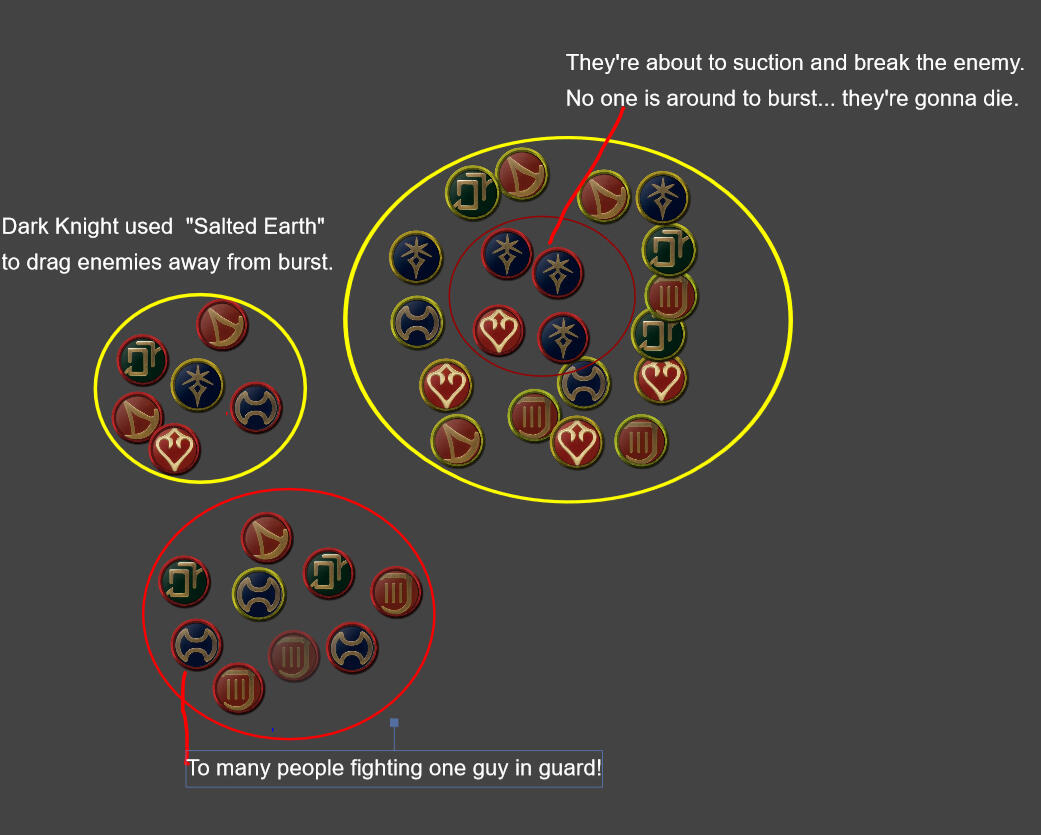
Salted Earth also excels as an interference tool. Pulling enemies away from their own engage spreads out their damage, and can completely ruin a push.
-
Dark Knight can function as a Guardian or Maverick, but only as a stalling tool. Securing solo kills is unlikely, and without teammates to capitalize, Salted Earth becomes largely wasted.


Stats
Burst Damage

Sustain Damage

Crowd Control

Utility

Survivability

Mobility

Roles
Commander

Soldier

Guard/Mav

Solo

Normal Burst:
LB Burst:
Pros:
Good Single Target Damage
Punish enemies for hitting you
Will Not Die
Cons:
Small AOE
Easy to mess up LB
Weaker against better players
With the return of additional actions and recent buffs, Gunbreaker has become an absolute juggernaut of a tank.It can use Limit Break in conjunction with Rampage to apply massive damage amplification to enemies, or take Rampart and become nearly unkillable while opponents waste resources trying to bring it down.Gunbreaker can still struggle if enemies choose to ignore it, but it has firmly established itself as a strong option. With proper team support, it transitions from durable to downright oppressive.
Healers:


Stats
Burst Damage

Sustain Damage

Crowd Control

Utility

Survivability

Mobility
Roles
Commander

Soldier

Guard/Mav

Solo

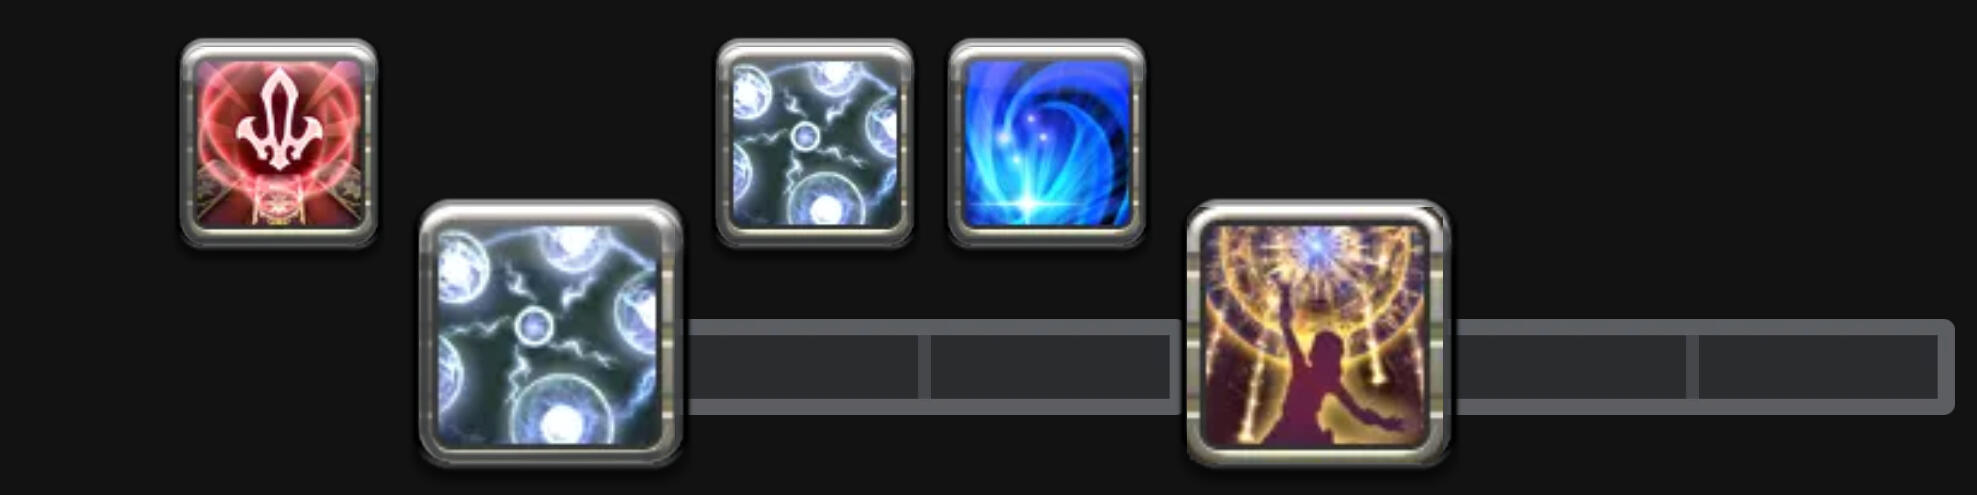
Normal Burst:

LB Burst:

Pros:
All rounder
Great party buffs
Good Healing Output
Extra CC immunity
Cons:
10% Damage Penalty
Healing has cast Times
No mobility options
White Mage may never be the “best” choice, but its toolkit is versatile enough to fit into almost any role.Its Limit Break can be used offensively to stun enemies and secure an engage, or defensively as interference to prevent enemies from reaching your team.White Mage’s burst also comes with built-in mitigation and additional healing, allowing your party to stay alive long enough to finish an attack, disengage safely, or withstand counterpressure.Polymorph remains a powerful tool for shutting down key targets and stopping enemy engages outright.White Mage does not perform well in Maverick or Guardian roles. To get the most value, focus on supporting your team and enabling successful fights rather than trying to operate independently.


Stats
Burst Damage

Sustain Damage

Crowd Control

Utility

Survivability

Mobility

Roles
Commander

Soldier

Guard/Mav

Solo

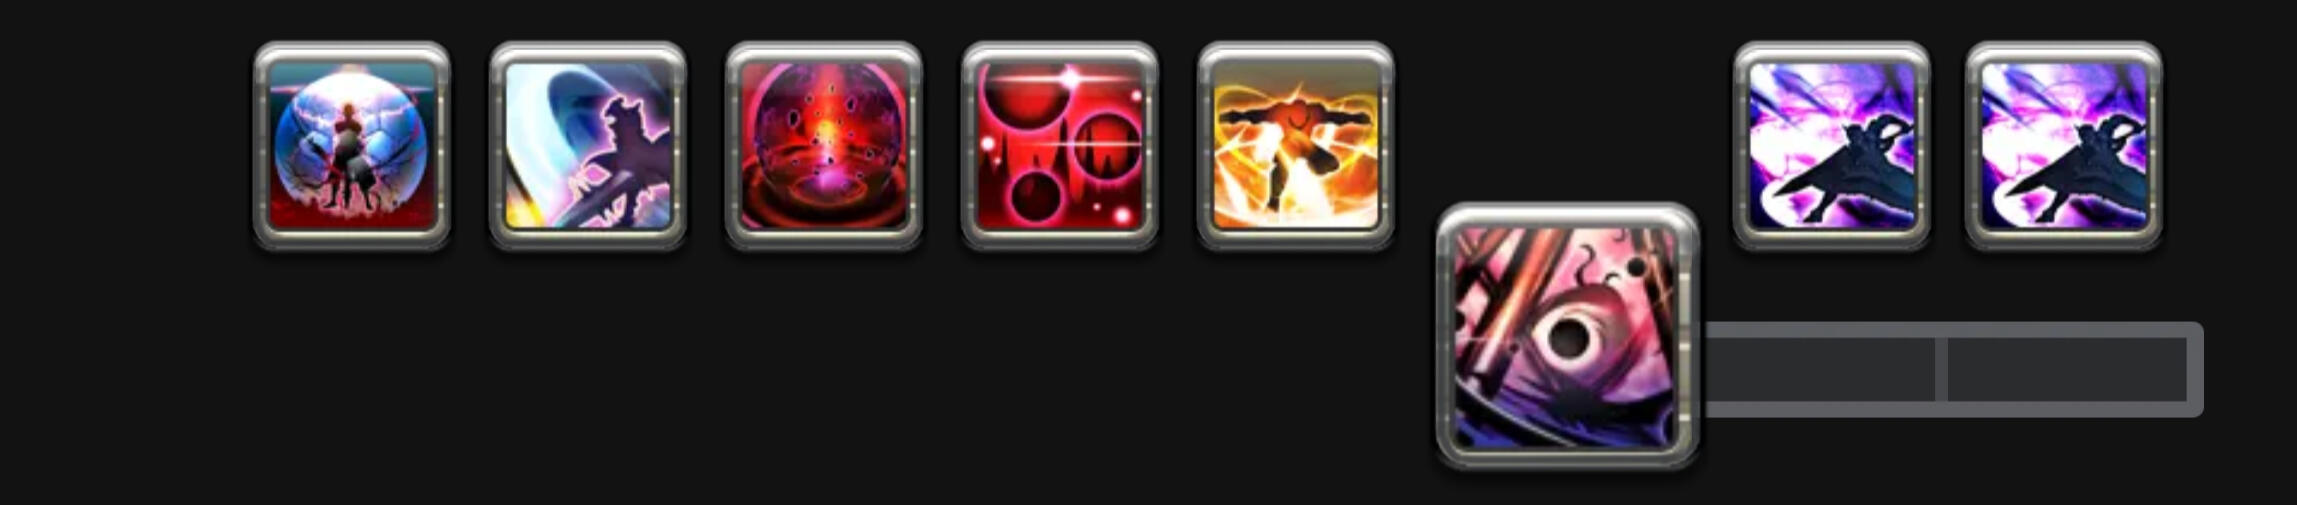
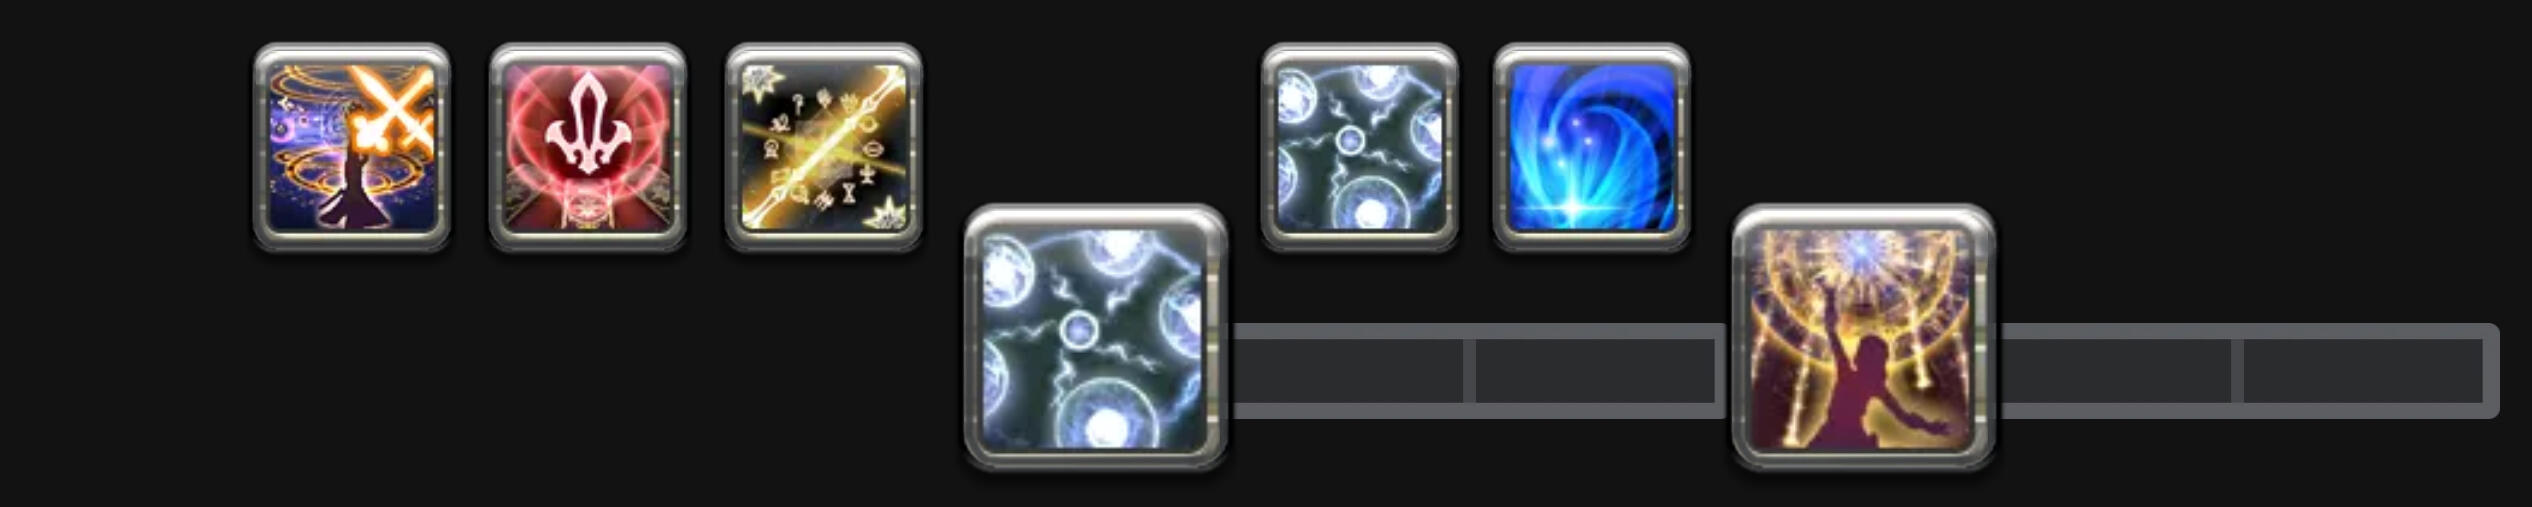
Normal Burst:

LB Burst:

Additionals significantly flesh out Scholar’s kit, making it a strong option... but only when there is one per alliance.Scholar’s extremely powerful debuffs do not stack, which causes its value to drop sharply after the first. Additional Scholars bring diminishing returns and are far less impactful than the initial one.Its support potential is still respectable. Providing a 10% damage and defense increase on every pull is meaningful, but other jobs, such as Bard, often fulfill this role more efficiently while offering additional utility.If you are the only Scholar in your alliance, you are providing excellent value. If there are multiple Scholars present, strongly consider switching to another job to better support the team’s overall effectiveness.
Pros:
Big Shields at BH5
Better for long "fights"
AOE CC cleanse.
Cons:
10% Damage Penalty
No Damage
Team Dependent


Stats
Burst Damage

Sustain Damage

Crowd Control

Utility

Survivability

Mobility

Roles
Commander

Soldier

Guard/Mav

Solo

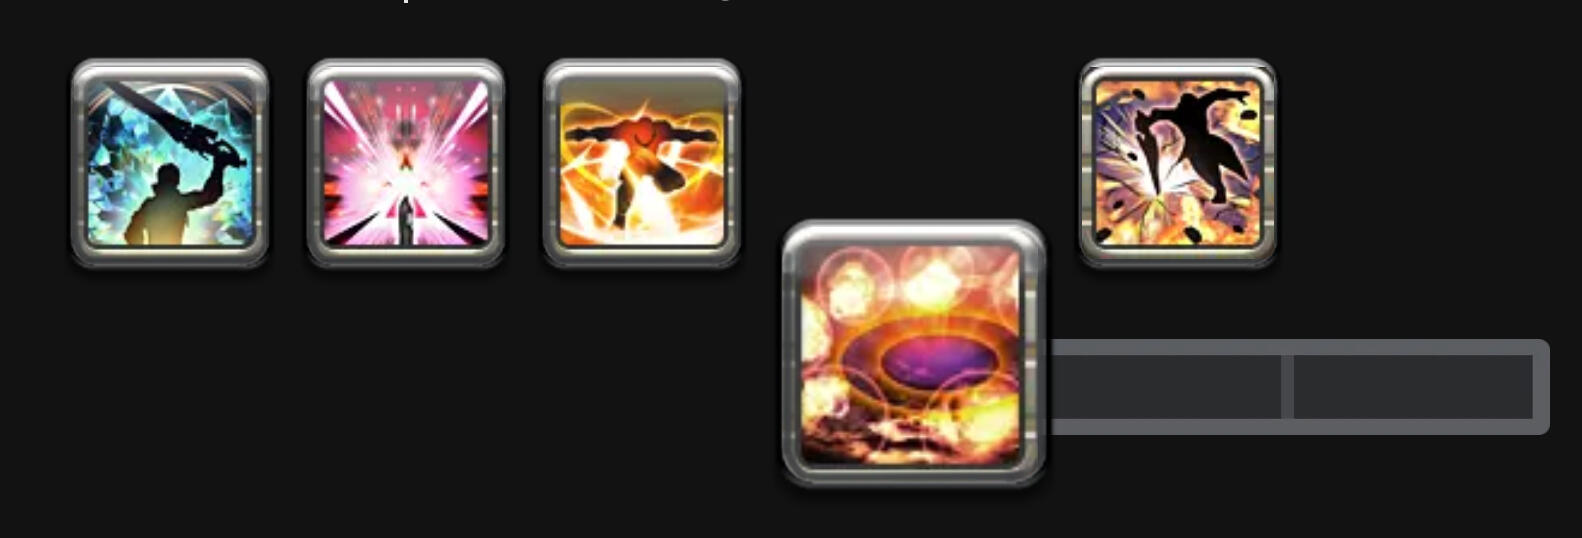
Normal Burst:
LB Burst:
Note: You may choose to use "Macro" before gravity for more safety.
Pros:
Strong Burst Damage
Mobility, shielding, healing
Burst is fully at range
Cons:
15% Damage Penalty
No sustain damage if burst fails
Very frail if targeted
It can deal exceptional damage, provide massive healing, and escape danger with little trouble. That said, it truly shines when supported by Dancers and Dark Knights who create the openings it needs.Astrologian is a team-oriented job. Its strength lies in bursting effectively and keeping its party alive through decisive engagements.


Stats
Burst Damage

Sustain Damage

Crowd Control
Utility

Survivability

Mobility

Roles
Commander

Soldier

Guard/Mav

Solo

Normal Burst:

LB Burst:

Pros:
Suction CC is good
Debuffs are stronger then buffs
nullify damage completely
Cons:
Has to play risky
big hit has cast time
Long LB charge
Sage has a lot going for it.
Granting party-wide invulnerability, pulling enemies in, applying AoE shields, and increasing damage taken all make it a very solid pick.It performs well as a commander or a solo queue job, where its broad utility can consistently impact fights.Sage’s real strength comes from team play, maximizing both your party’s damage and survivability. There are far better choices for Guardian or Maverick roles, where Sage’s value drops off sharply.
Melee DPS:


Stats
Burst Damage

Sustain Damage
Crowd Control

Utility

Survivability

Mobility

Roles
Commander

Soldier

Guard/Mav

Solo

Normal Burst:

*Note: Can thunderclap after pressing the first rising phoenix. Can also use Riddle of Earth for defense instead.
LB Burst:
Note: Monk LB is single target, different variations exist.
Pros:
Good mobility/support options
Able to call out high priority targets
Able to Burst at range
Cons:
Main interferance is LB.
Monk LB is one of the most nasty tools to stop a burst. Its knockback can also be used for burst or interference. It does have some dueling potential, so it's not a bad option as a guardian or maverick either.
-
Making the most out of Monk is about how you should be playing and shifting which playstyle you're in as needed.


Stats
Burst Damage

Sustain Damage

Crowd Control

Utility

Survivability

Mobility

Roles
Commander

Soldier

Guard/Mav

Solo

Normal Burst:

*Note: Can "Nastrond" later in pull for more buffed smites, Can use "Elusive" and "Wyrmwind" after "Starcross."
LB Burst:

Pros:
Good mobility with extra CC cleanse
Still strong burst with BH
Cons:
No CC or utility
Damage is worse then jobs who do bring it
Sometimes I feel I am to hard on Dragoon, and other times I feel I am to soft.Dragoon hits hard and hits fast, but it does not bring anything else other than its damage.If your team has enough CC, then dragoon becomes a solid pick that can delete enemies.If it doesn't, then you will find it performing alright, but not game changing.


Stats
Burst Damage

Sustain Damage

Crowd Control

Utility

Survivability

Mobility

Roles
Commander

Soldier

Guard/Mav

Solo

Normal Burst:

LB Burst:

Note: Ninja can LB once enemy is under 50% health. This is single target
Pros:
Amazing for routing enemies
Great Mobility and Single Target CC
Cons:
Hard to pick up and play
Small burst
"win more" job
Ninja is a highly versatile job that truly shines once your team begins routing the enemy. Its access to multiple stuns, lethal kill chaining (or reliably securing a commander kill), and flexible ranged options make it a strong pick... provided your team can reach that advantage state.Ninja also functions well as an interference unit through double-stun setups or intelligent Doton placement. These tools, combined with a powerful Limit Break, allow it to operate effectively as a guardian or maverick when played with intent.


Stats
Burst Damage

Sustain Damage

Crowd Control

Utility

Survivability

Mobility

Roles
Commander

Soldier

Guard/Mav

Solo

Normal Burst:

Note: You can Midare instead of AoE'ing after ogi combo.
:LB Burst

Note: Make sure the enemy hits you first.
Pros:
LB is unfair
Extra CC cleanse
Decent at everything
Cons:
Cast Times
10% Damage Penalty
The increased tankiness across all jobs has made Samurai’s Limit Break significantly more valuable. Combined with additional AoE burst options and improved survivability, Samurai is better positioned than before. While melees as a whole remain in a rough spot, Samurai can now accomplish far more when played alongside the team.It isn’t exceptional at interference, though it can still contribute through its stun and bind. Samurai can excel as a guardian or maverick, leveraging its powerful Limit Break and strong sustained damage to apply consistent pressure.


Stats
Burst Damage

Sustain Damage

Crowd Control

Utility

Survivability

Mobility

Roles
Commander

Soldier

Guard/Mav

Solo

Normal Burst:

Note: You can plentiful last for more kill confirms, or use Guillotine if you need more stacks.
LB Burst:

Note: You can continue pressing AoE buttons after this. You can also skip Plentiful Harvest if damage not needed or unavailable.
Pros:
LB causes "helpless state"
Strong AOE CC and support tools
Decent at everything
Fast LB charge + Instant Kill
Cons:
Bad LB use can ruin team's burst
Damage is very spread out
Reaper is in an unusual spot right now. Misusing its Limit Break is more punishing than ever, often harming your team rather than helping it, and its burst damage is spread thin across multiple actions. While it does possess a unique AoE instant kill, the 25% threshold is an extremely narrow window to capitalize on.That said, Reaper excels at interference. Its Limit Break charges quickly and can be deployed repeatedly to disrupt enemy pushes or save your team from wipes.As a guardian or maverick, Reaper performs adequately, primarily in a stalling role, but it will generally generate more value by working directly with the team rather than operating independently.


Stats
Burst Damage

Sustain Damage
Crowd Control

Utility

Survivability

Mobility

Roles
Commander

Soldier

Guard/Mav

Solo

Normal Burst:

Note: "?" Indicate having to wait before you can execute "Backlash." Depending on assists, you can also "Rattling Coil" and "Snake Scales" a 3rd time.
LB Burst:

Note: You can use the generations combo instead if the enemies are weak, danced, or you are not getting hit.
Pros:
Damage goes through guard
Good Mobility
Cons:
No CC
No Utility
Numerous buffs have made Viper a serviceable job. Acting as an annoying fly that refuses to die is a genuinely valuable trait, and soaking large amounts of damage before escaping is where Viper truly excels. Getting your team to capitalize on that pressure is another matter, however, and there are ultimately stronger options for that role.Viper is also a very safe pick that newer players may gravitate toward, thanks to its abundance of defensive tools and unusually strong ranged options for a melee job.
Physical Range DPS:


Stats
Burst Damage

Sustain Damage

Crowd Control

Utility

Survivability

Mobility

Roles
Commander

Soldier

Guard/Mav

Solo

Normal Burst:

Note: Aims to maximize damage on pull while sacrificing defensive CDs. You may choose to run eagle eye shot if you aren't using bravery on a tank.
LB Burst:

Pros:
Decent Single Target CC
Helps Ally LB Charge
Good Long Range Burst
CC Cleanse
Cons:
Mild Burst Damage
Knock Back can ruin pulls
Can't Hold Ground
Bard is a strong contender for the best buffer in the game. Granting party-wide damage up, haste, and Limit Break charge, while also providing CC immunity and Bravery to a primary engager, allows Bard to excel in a dedicated support role.Beyond its buffs, Bard brings an impressive suite of crowd control, including push, silence, bind, and MP drain effects.Bard’s main weaknesses are its lackluster burst damage, extreme fragility when focused, and its reliance on a party capable of fully capitalizing on its buffs.Bard performs best when coordinating closely with its team to enable decisive bursts. Attempting to play it as a guardian or maverick wastes the strengths that make the job exceptional.


Stats
Burst Damage

Sustain Damage

Crowd Control
Utility
Survivability

Mobility

Roles
Commander

Soldier

Guard/Mav

Solo

Normal Burst:

Note: If your target is going to die, pop "Wildfire" early or the damage will be lost. If "Chainsaw is ready, use first before "FMF" and "Scattergun"
LB Burst:
Note: Single Target.
Pros:
Strong Single Target Burst
Long range LB
Cons:
No AOE CC
Turret not very good
Burst hard to line up.
Has to get in close for several moves
Machinist is a finicky job that often struggles to align its damage cleanly with team burst windows.That said, it has several tools suited to an assassin-style role, allowing it to pick off high-value targets or ensure enemies don’t escape.While Machinist can perform well, extracting that value requires more effort and precision than most players might expect.


Stats
Burst Damage

Sustain Damage

Crowd Control
Utility

Survivability

Mobility
Roles
Commander

Soldier

Guard/Mav

Solo

Normal Burst:
LB Burst:

Pros:
Best LB in mode
Buff Teammate with LB charge
Decent burst options at range
Cons:
Needs Coordination
Has to go in for LB
Targeted Easily
Dancer’s Limit Break has become the single strongest force in Frontline. Supporting it and playing around it is the core of modern burst-oriented gameplay. Dancer also generates additional Limit Break charge for itself and its dance partner, enabling even more frequent LBs, especially when paired with another Dancer.Its flaws are also clear. Dancer is an extremely frail ranged target that must commit to melee range in order to deliver its Limit Break.More than almost any other job aside from Dark Knight, Dancer relies heavily on team support to function effectively. When that support is present, there is no job that provides more impact.
Caster DPS:


Stats
Burst Damage

Sustain Damage

Crowd Control

Utility

Survivability
Mobility

Roles
Commander

Soldier

Guard/Mav

Solo

Normal Burst:

Note: You may decide to "Manipulate" in and cast "Burst" for additional AoE damage.
LB Burst:

Note: Can use "Flare" and "Flare Star" if desired.
Pros:
Short LB Charge
Full Range Uptime
Lots of survival options
Cons:
Low AOE Damage outside LB
Best Damage options require cast times.
No AOE CC except with LB
Black Mage is a sustained-damage powerhouse thanks to its full-range uptime and Fire Wreath. It can contribute to engages with Freeze Star as CC or big damage through Flare Star, but being unable to do both at once is a meaningful limitation. With very little burst damage outside of its Limit Break, Black Mage can struggle during repeated re-engages.It also performs well at suppressing high-value targets by chaining Lethargy and Rust, significantly reducing their damage output and healing effectiveness.


Stats
Burst Damage
Sustain Damage

Crowd Control

Utility

Survivability

Mobility

Normal Burst:

Note: I suggest "Crimson Strike" last as it spreads enemies out, but you can use it earlier if desired.
LB Burst:

Roles
Commander

Soldier

Guard/Mav

Solo

Pros:
Strong Sustain AOE Damage at Range.
Long Range LB with good charge time.
Cons:
Big Damage Penalty
Forced to dash in for burst
Cone Stun can miss
Summoner offers good damage, but is held back by the Frontline nerf it received back in 6.1's Bahamut era.It ends up being one of the best options for following up on successful engages, but it has to rely on other jobs to enageand set them up it can struggle when those conditions aren't present.


Stats
Burst Damage

Sustain Damage

Crowd Control

Utility

Survivability

Mobility

Roles
Commander

Soldier

Guard/Mav

Solo

Normal Burst:

LB Burst:

Note: You can LB sooner if the cluster is good.
Pros:
2 AOE CC options
Buffs team's damage and defense
Strong Burst options for Single Target and AOE
Cons:
Has to go in
LB slow charge time
A very fluid job with strong defensive tools and excellent mobility. It offers solid AoE damage and crowd control, though many of these tools require deliberate setup and can be tricky to use properly.Without defensive cooldowns available, it can still be quickly called out and punished.This job performs best when operating alongside its team. Attempting to play it as a maverick or guardian wastes its buffs and rush-down potential.It also possesses the strongest “comet” among the caster jobs, helping to offset its otherwise lackluster burst damage.


Stats
Burst Damage

Sustain Damage

Crowd Control

Utility

Survivability
Mobility

Roles
Commander

Soldier

Guard/Mav

Solo

Normal Burst:

Note: Due to Pictomancer needing to set up, you may need to move the "living muse" to before the "Mog of the Ages" or skip it entirely.
LB Burst:

Pros:
Strong Burst Options
Lots of buffs and debuffs
A bit unwieldy
Full range uptime
Cons:
Painting has long cast time
Damage hits late
This job tends to fly under the radar, but there is little reason it shouldn’t be considered a strong option. It deals heavy AoE damage, brings multiple forms of AoE crowd control, and offers respectable defensive utility on top of that.While it may not reach the same damage peaks as Summoner, it plays significantly safer.As with the other casters, there is little reason to play this job as a maverick or guardian. It performs best when fighting alongside the team and maximizing cleave damage across clustered enemies.
Comps
You can enter Frontline with a party of four players, and I highly suggest doing so. If your goal is to win, having three teammates who also want to win is a massive boost to your team’s overall potential. In my experience, the top eight players in an alliance often account for over 50% of the total damage dealt.The performance gap between players who care and those who do not is enormous. Even if you’re not interested in playing in the most optimal or try-hard way possible, playing with friends is still far better than queueing alone. Wins feel more rewarding, losses are easier to accept, and coordination naturally improves. Frontline is a social game—lean into that.The compositions listed below are examples of four-player parties that offer strong synergy and offensive power. Most of these have been tested and proven effective, though the list is by no means exhaustive.
Double Dancer Cores:
These parties run two Dancers, who will typically partner with each other to maximize Limit Break generation and increase the number of high-impact engagements over the course of a match. This creates a far more aggressive playstyle, though it can leave the group weaker during fights where Limit Breaks are not available. Even so, these are likely the strongest party compositions for general play.Dark Knight is extremely effective in these setups, making the primary point of variation the fourth party member.
Double Double

This party setup ensures the enemy team gets pulled in and hit by Dancer Limit Breaks. If you’re looking to score massive wipes on a regular basis, this is the composition built to do it.The main drawbacks are that the Dancers lack protection during their engages, and the overall damage output is lower than what you might expect from a coordinated premade.To mitigate this, I recommend having the Dancer who is not using their Limit Break on the pull engage first to draw attention and absorb pressure for the second Dancer.You will lose Dancers using this approach, but you will also take a significant number of enemies with them.
Paladin Dancer Core

A very strong composition.The Paladin helps ensure that your Dancers consistently get in for their engages. While you give up the additional suction from a second Dark Knight, which can be an issue, reliable access to the enemy often outweighs that drawback.That said, this setup places significant pressure on your Dark Knight to pull effectively. If the pull fails, there is no backup option to recover the engage.With the addition of Rampage and Bravery, this composition has become extremely powerful.
Astro Dancer Core

This comp trades out defense and suction for massive damage. Adding an Astro increases party damage by 30% while also improving survivability through its healing.The downside is that you won’t hit as many targets as you would with heavier suction, and the comp is more prone to getting “BSed” due to having three squishy targets that enemies can easily punish.That said, it can still feel comfortable if the enemy team is prone to ignoring you, or if you’re playing apart from the main group or as a follow-up squad.
Sage Dancer Core

Sage is a compromise between bringing a Dark Knight, Astro, or Paladin. It doesn’t have the suction of a Dark Knight, the damage amplification of an Astro, or the raw defensive value of a Paladin, but it can provide all three in a single slot. That kind of role consolidation is extremely valuable for teams that aren’t covering all the fundamentals needed to succeed.Sage can also use its LB to protect Dancers on the engage. It’s finicky to time and execute properly, but when it works, it’s invaluable.
Warrior Dancer Core

Warrior brings an extra guard break, strong burst damage, additional crowd control, and enough “BS” potential to let the composition function even when a Dancer Limit Break isn’t available.One of the biggest weaknesses of double Dancer comps is their reliance on having a Dancer LB ready to be truly effective. Warrior helps alleviate that dependency while also improving the comp’s survivability through its AoE stun.
"Good Stuff" Comps:
By dropping a Dancer, you trade constant aggression for more damage, more versatility, or more survivability.
In modes that require less constant fighting (such as Shatter and Triumph), these comps can outperform double Dancer options, and with proper coordination, can do so on other maps as well.
"Classical" (Paladin)

One of my favorite comps right now, thanks to how much survivability and damage it brings.Dark Knight and Warrior can lock down enemies while the Paladin ensures the Dancer can get in safely to use their LB.This can create a very oppressive scenario where the enemy has no reliable way to stop the engage.
"Classical" (Sage)

Tagging out a Paladin for a Sage is not without its tradeoffs. You give up some of the Dancer’s safety in exchange for more suction, access to Diablosis, and the possibility of party-wide invincibility.It’s not the worst tradeoff, as it can make pushing up or surviving counterattacks easier, but whether it’s worth it ultimately comes down to preference and coordination.
"Classical" (Astro)

Another hefty trade-off is bringing an Astrologian. Astrologian’s LB provides a 30% damage increase, and when paired with Rampage from the tanks, your comp will meet the damage threshold to KO by itself.The downside, of course, is that your Dancer becomes very fragile and your pulls are more prone to failure.Consider this option if your team is overall weak and there isn’t too much “BS” coming from the other teams.
"Double Dark" (Astro)

Running two Dark Knights is a bit of a luxury these days. If your team follows up on the pulls, the comp is very strong. If they don’t… you’re not going to meet the damage threshold. Bringing an Astrologian can help with this most of the time.Overall, the comp is serviceable, but it can’t reliably force pulls against enemies who know how to guard.Dancer fragility is still an issue here. While the stronger suction from the extra Dark Knight can bait enemies into guarding instead of hitting the Dancer, it’s far from guaranteed.
"Double Dark" (Sage)

Another support-oriented comp that trades the extra damage from an Astrologian for more suction and stronger defenses on the pull.Strong for teams that commit to the engage, but it can still struggle when attacking without a Dancer LB ready, as there’s no stun or silence on the pull.
Reaper Comps:
Reaper is another job that puts enemies into the Helpless state, similar to Dancer. Unlike Dancer, however, Reaper pushes enemies away instead of pulling them in. Additionally, instead of four seconds, you only have two seconds to deal damage before enemies can react.These are significant downsides, but there are benefits to bringing a Reaper.Reapers have a faster LB charge time, are more durable, and can run Swift as their role action, allowing them to forgo the need for a Paladin babysitting them.These comps aim to minimize Reaper’s disadvantages while playing to its strengths.
Reaper Double Smn
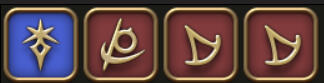
By using Summoner LB and Comet as the primary sources of burst damage, you can largely ignore the downside of Reaper pushing enemies away from the pull.These wide-range abilities still hit hard, and if the Reaper aims their LB correctly, Summoners can follow up with their normal burst rotation to clean up afterward.
Reaper Double DRG
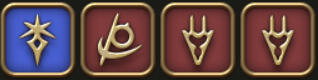
Dragoon still hits like an absolute truck with its LB. When you bring two of them and they LB… it doesn’t matter that you only have two seconds to deal your damage.Having multiple line AoE abilities also helps mitigate the enemy spread afterward if you position correctly.
Reaper Double DRK
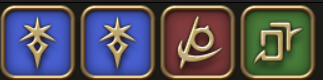
By bringing an extra Dark Knight, you once again mitigate the inconsistency caused by Reaper LB spreading enemies out.This can introduce a bit of a damage issue, so I recommend pairing it with an Astrologian to close that gap. That said, other damage dealers like Dragoon or Summoner can work as well.
"Off Meta" Comps:
These comps function a bit differently than the standard burst-focused playstyle. They aren’t necessarily recommendations so much as rogue options that can steal wins from unprepared teams, but will generally fall short against the more consistent strategies outlined above.
Pressure Comps

Pressure comps focus on applying stacking debuffs to enemy alliances, gradually rendering them unable to fight effectively. This example stacks Scholar’s healing reduction, Gunbreaker’s spike damage, and Summoner’s splash AoE to create a scenario where enemies may not instantly die, but they’re unable to meaningfully fight back.Sometimes, you don’t want a comp that wipes enemies as quickly as possible. Large, repeated wipes can cause enemy teams to hard-focus you or actively throw against you later in the match. Pressure comps aim to avoid that by slowing the rate of death, making it feel like the enemy simply lost the fight rather than being outright outclassed.These comps are definitely worth experimenting with if you want a more relaxed, control-oriented playstyle. Instead of putting all your eggs into a single burst window, your team acts as the first domino to fall, setting up momentum rather than forcing it.
Double Engage

This comp forgoes a Dark Knight in favor of running two Sages. The idea is that every job in the comp operates on a 20-second burst timer instead of a 30-second one. This allows you to engage the same team twice in a row before their Guard comes back off cooldown.The result is a more momentum-based playstyle, where you repeatedly KO small portions of the enemy force rather than relying on a single, massive pull.On the downside, each pull yields fewer rewards than a full Dark Knight engage, and when you go in a second time… you likely won’t have Guard available either.Another issue is that many of the points you gain can be easily lost during the retreat. The comp also loses much of its value if you’re unable to re-engage the same enemy team twice in succession.
Gunbreaker Hypercarry

By utilizing Bravery, Rampart, and Scholar support, a Gunbreaker can reach close to 90% damage reduction. When combined with the increased healing and damage provided by the comp, this turns Gunbreaker’s spike damage into something extremely potent, effectively giving them a near-permanent Guard while they tear through enemies.These Gunbreakers are incredibly hard to deal with… unless you ignore them.The strength of this comp relies on enemies choosing to hit the Gunbreaker. If they don’t, you aren’t generating much value.That said, ignoring the player directly in front of you is often easier said than done. In many situations, enemies are forced to attack them anyway, which is where this comp consistently finds its value.
Scrub Killer
A straightforward comp that focuses almost entirely on damage and shock value. The lack of guard break limits its effectiveness against stronger players, but in the average match it’s more than effective.Replacing the Dark Knight with an additional Astrologian for even more damage is sometimes preferred, as a Dark Knight engage can tip players off that a burst is incoming. You may also choose to swap in a Warrior instead, using its short stun to lock in pulls and briefly prevent healing long enough to secure kills.This comp also excels as a finisher—coming in after the main team engages and cleaning up weakened enemies. It’s likely the most viable option for teams that don’t listen to calls or won’t reliably burst together.Be aware that this comp can be shut down fairly easily, as it lacks direct protection against strong interference from jobs like Monk, Reaper, or Dancer.
Baha Blast
An off-meta option that leverages the range and raw power of Summoner LB to decimate enemy teams from a distance.This can be used before a major push to soften enemies ahead of an engage, or during a mid-fight sweep to finish off weakened targets.That said, this comp is all offense and no defense. You’ll struggle to engage successfully outside of LB windows, and if your team is weak or unprepared, they may be unable to capitalize on your burst.
Paladin Quartet

Paladin offers strong damage, excellent survivability, and unmatched utility... so why not bring four of them?
They can engage reliably, and while they lack the sheer shock-and-awe of a standard comp, they remain consistently effective. If a fight drags on, Paladin’s sustained damage and self-healing allow the team to keep pressure without collapsing.
If an enemy manages to weaken one Paladin to near death, the others can simply cover them, preventing picks.On defense, the comp becomes especially oppressive: by staggering limit breaks, the comp can maintain up to 40 seconds of accumulated invincibility while holding a point.This creates a highly versatile comp that steadily grinds opponents down and is hard to punish.
Spike Maxing

Most of Gunbreaker's damage comes from getting hit. By stacking them on top of each other you create a massive swing in advantage as these near unkillable tanks reflect damage back at enemies that are drastically weakened by rampage and scholar dot+diabrosis.This comp doesn't have a lot of burst damage, but it's also very hard to deal it. You can trade out 1 gunbreaker for a dark knight if you want to make add a little more consistency.
Seal Rock
Basics:

Seal Rock is arguably the most complex Frontline map currently in rotation. It also remains one of the best maps to command on, benefiting enormously from clear leadership and coordination.The map suffers from non-symmetrical starting positions, which place the North spawn at a consistent disadvantage while granting a noticeable advantage to the West spawn. In addition, its RNG-driven node spawns can occasionally hand victories to teams that did not truly earn them through positioning or execution.The advice in this section assumes all three teams are of roughly equal strength. Adjustments for situations where your team is stronger or weaker than the opposition will be covered later in the Tactics section of the guide.
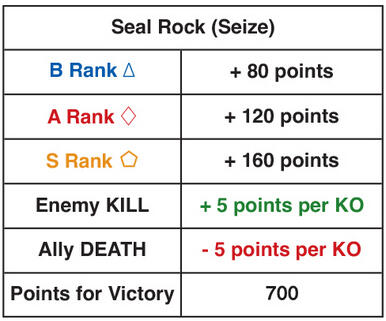
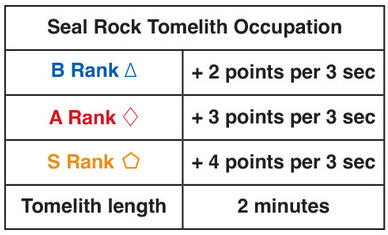
Take a moment to study these charts closely. Pay attention to the point values of each node tier, how much score is lost on death, and how much is gained per kill. Seal Rock has a relatively low victory threshold, which makes its scoring extremely volatile.It is very easy to surge ahead early only to collapse into third place later... or to fall far behind and still claw your way back to a win. Every decision compounds quickly on this map.-
Four tomeliths will be active at a time until the 10-minute mark, at which point the map transitions to three active nodes. Higher-rank tomeliths tend to appear more frequently as the match progresses, but they are not exclusive to the late game and can still spawn at the start.
Objectives by Place:
1st Place:
DO NOT DIEThis is the single most important rule when holding the lead. You have a target on your back, and both enemy teams should be looking to kill you.Give up contested objectives. Disengage from unnecessary fights and avoid brawls that aren't in your favor. Your priority is safe play that may be slower than your enemies, but maintains your lead.While temporarily losing the lead can sometimes be advantageous, losing it through deaths is not. Dying hands your enemies points, and Battle High while taking away yours.Instead, watch for opportunistic openings to close out the game. When another team overextends, splits, or commits too hard, be ready to collapse decisively and end the match.
2nd Place:
Don't let 1st win.Do not let 1st place win. You are the only team in a realistic position to stop them. From 3rd place’s perspective, they are often out of the race and under no obligation to help you. This is especially true when your score is close to 1st place. In many cases, it is actually in their best interest to wait for you to engage 1st and then attack you afterward.If you want a chance to win, the responsibility falls on you to deny 1st place their victory. This may require giving up objectives that would normally be yours, taking inefficient routes, or committing to suboptimal fights. These decisions are not ideal, but allowing 1st to score uncontested is worse.Position well and third place will naturally team up with your team to deny 1st place points, which will bring you into the lead instead.
3rd Place:
Catch UpYou aren't here to be cannon Catch UpYou are not here to be cannon fodder, and you are not here to be a kingmaker. You always have a chance to win.While 1st and 2nd place fight, your goal is to secure as many points as possible. At the same time, you must closely monitor the score. You are in real danger of creating a kingmaker scenario, and it is your responsibility to prevent it.A kingmaker game occurs when 1st and 2nd place are close in score, making any attack on one hand the victory to the other. To avoid this, you must keep 2nd place close to your own score without hitting them so hard that they decide to throw the game. If that happens, 1st place wins uncontested.Maintaining this balance encourages you and 2nd place to pressure 1st together while preserving your own path to victory. It is a difficult position to navigate, but it also offers the greatest opportunity to build Battle High and mount a full comeback.
Early Game:
Battle High is the only thing that matters. You need it, and your enemies do not. In the early phases, do not fixate on nodes or score. Your only questions should be “Who can I attack?” and “How do I avoid dying?”
Points are important, but an early lead often paints a target on your team for the rest of the match. If your team cannot handle a 2v1, that lead will collapse quickly.Kills and Battle High naturally convert into objectives and points over time, so treat early objectives as a by-product of gaining Battle High, not the goal itself.
Nodes should be treated as bait and beacons that indicate where fights will happen. You are not going to a node to capture it, but because enemies will be there to kill. You are not defending a node because it generates points, but because the enemy wants to take it and you want to punish them for trying.Obsessing over score too early will leave your team weak, and in most matches, it will not matter by the end.
Mid Game:
I generally consider the mid-game to begin around the 10-minute mark. This is when the number of active nodes drops to three, and the command structure becomes much simpler, assuming all teams are of equal strength.With only three nodes active, 2nd and 3rd place should work together to pinch 1st place and deny them access to objectives.In an ideal scenario, this results in 3rd place holding two nodes while 2nd place holds one.During the mid game, score awareness becomes far more important than it was early on. Pay close attention to score swings and emerging opportunities to pinch the enemy and move ahead. While Battle High should remain high on your team and low on your opponents, it is equally important to keep the overall scores close to prevent any team from running away with the game.
End Game:
As teams approach the 560-point mark, the match enters the end game of Seal Rock. This is a chaotic phase where mistakes are punished severely, and closing out a win often requires a bit of luck alongside good execution.There are several strategies you can employ at this stage. Most of them revolve around generating a sudden burst of points that denies the enemy teams enough time to react or recover.These strategies are not guaranteed to succeed. In some situations, your only remaining option may be to camp spawn and rely on outkilling your opponents. While far from ideal, the approaches outlined here are significantly more favorable and should always be attempted first when possible.Option 1: Winning Nodes
There are two primary “winning” nodes on the map, along with a few less optimal but still viable alternatives. These secondary options should only be considered when you are desperate or when the situation specifically favors them.
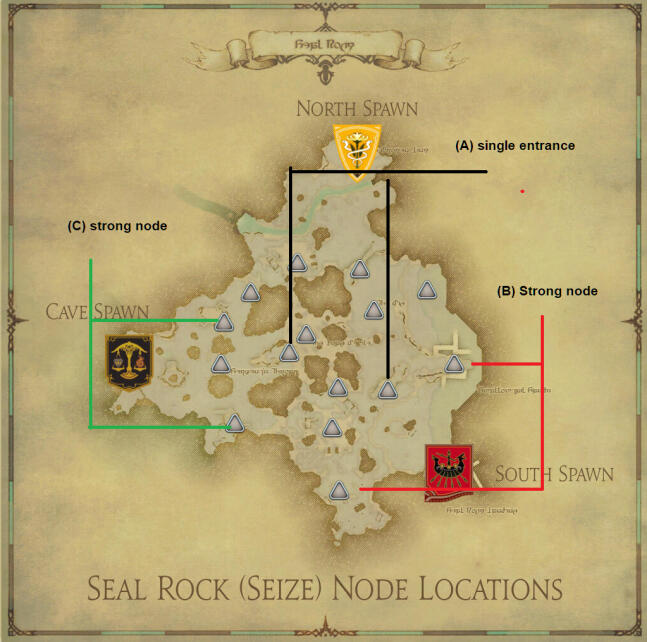
The Black Lines indicate nodes with only a single entrance. These are the strongest nodes to hold in the end game. Once your team is established on one of these, the enemy is forced to funnel through a narrow approach, often pinching themselves just to reach you.Holding one of these nodes at roughly 550 points is usually a guaranteed win, provided your team can consistently burst whichever enemy commits to the push.The primary risk is another team controlling two nodes while farming the third team. This can outpace your node’s value over time. While you should play safely and force enemies to come to you, do not allow the game to slip away through inactivity.
-
The Red and Blue Lines indicate strong nodes to hold when the optimal options do not spawn. These locations are difficult to access, highly defensible, and provide multiple escape routes while limiting enemy attack angles. In some situations, stalling at these nodes long enough can secure a win before the third team is able to reposition and contest you.The remaining nodes can also become “winning” nodes, but only if you set them up properly. As 1st place, it is critical to keep fights and enemy pressure as far from your spawn as possible. When a node spawns deep in your territory, guardians and mavericks can secure it quickly while your main force threatens another capture, disengages to stall for points, or prepares one final burst to close out the match. big burst to close out the game.Finally, note that all of these strong nodes are positioned far from the North spawn. This is one of the key reasons North is the weakest starting location. More than any other team, North must rely on early pre-positioning in these areas to have an easy way to win.
Option 2: 2nd Place King Maker
By trailing slightly behind 1st place, you generally avoid drawing the full attention of 3rd place. If 3rd commits aggressively into 1st, you can afford to wait and observe the outcome of their engagement before moving in to clean up. When executed correctly, this often results in securing the kills, the node, and the win in one motion.
This option does rely on 3rd place still playing to win rather than resigning themselves to the outcome or misplaying the situation, so it is not always available. That said, this strategy can also function when you engage 1st from a weaker node position. In those cases, the optimal response for 3rd is often to pinch 1st rather than turn on you.Be wary of engaging 1st while 3rd is off map or close to you. They may choose to simply attack you instead.Executing this correctly may not immediately win you the match, but it places you in a strong position for the next node cycle while leaving the former 1st place significantly weakened.After the cleanup, disengage quickly. Your goal is to leave 3rd place fighting the weakened former leader with no opportunity to counterattack you. At this point, the target shifts onto your team, but it takes time for the enemy to adjust. That delay is your window to secure the next objective and close out the game.
Option 3: Sneaky Node WinThis strategy is almost exclusively a 3rd place option. When 1st and 2nd place become locked in a prolonged fight, you can close out the game by quickly securing two uncontested nodes and converting them into a large point burst. Endgame point swings are massive. It is entirely possible to gain 240 points from an A and B rank node while 1st and 2nd fight over an S rank node on the opposite side of the map.With a well-timed burst on an enemy team, you can add another 50 points while preventing that team from winning long enough for your nodes to tick you to victory.This works best from 3rd place because you are operating under reduced scrutiny. Higher placement draws more attention and makes this play far harder to execute.As with holding winning nodes from 1st place, you must ensure the other teams do not outpace your score. You need to stall them through a burst, an uncap, or any disruption available to you. Your greatest advantage in 3rd place is that the enemy should not be focusing you. Do not waste that advantage.
Option 4: Kill Win:
Is your score above 650? Then it is time to end the game through kills. At this point, the enemy teams are chasing you, which means you control where fights happen. Do not waste that advantage. Choose a strong position and commit to bursting enemies down.Capturing a node is helpful if it is free, but clean kills on fleeing or desperate enemies will usually outpace a 2nd place team sitting at 600 points or less.AND MOST IMPORTANTLY, DON'T FEED.Stay calm, wait for a clean opening, and end the match decisively. The longer the game drags on, the more likely you are to get pinched and driven back into spawn. You only need one good engagement to close it out.
Common Mistake:
Feeding
Pointless deaths must be avoided at all costs. Too often, players get themselves killed without securing kills, objectives, or meaningful pressure. Do not be that player.Your life is your most valuable resource. Staying alive preserves Battle High, denies the enemy free points, and keeps pressure on the map. If an action risks your life without a clear payoff, it is not worth taking

Here is a common scenario. Your team, Red, is holding a node on the east cliff against Yellow. If you die during the fight, that is normal and expected. Once you respawn, you can quickly rejoin your team and continue applying pressure.Now notice that Blue is positioned far too the south, holding a node close to Red’s spawn. At a glance, this might look harmless. Blue is not involved in the fight, and they don't have intentions to do so...But what happens next?
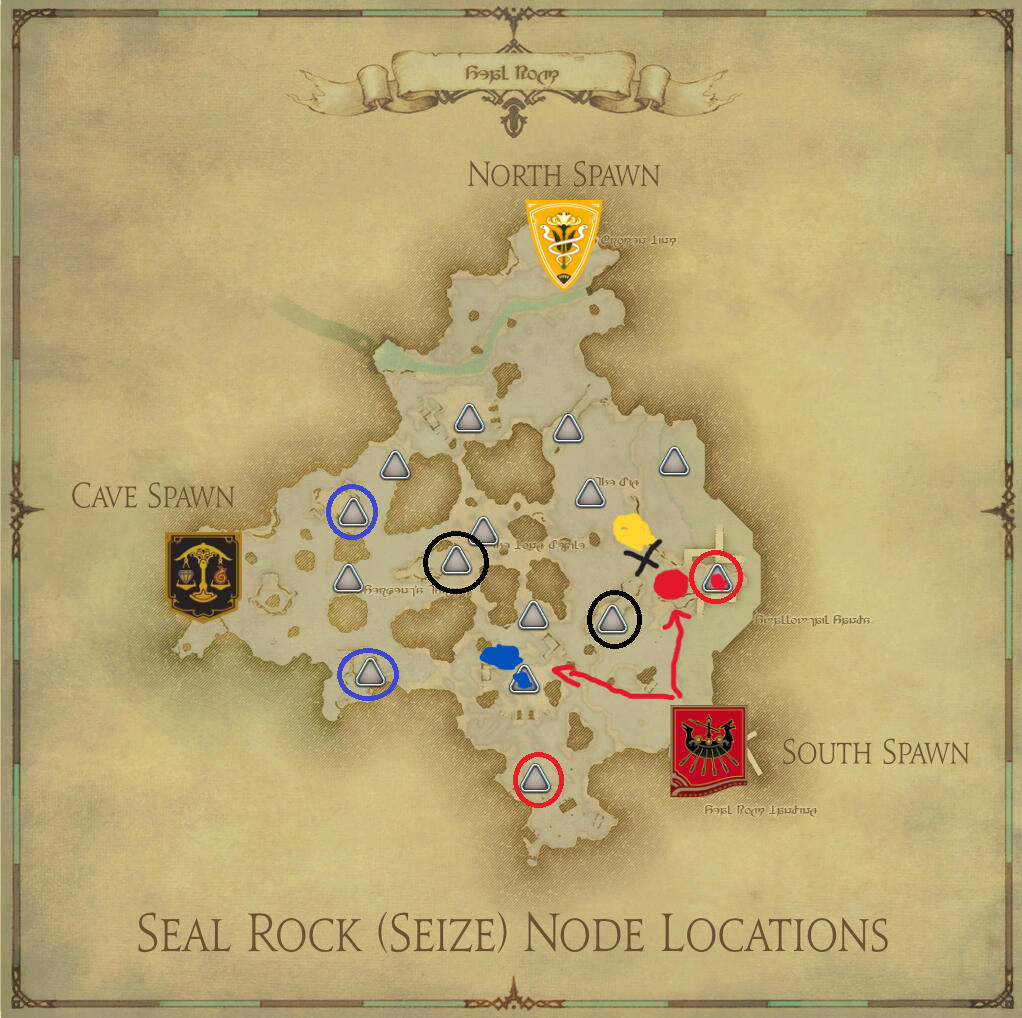
Exactly. The respawners run to the “closer” node, walking straight into a full team of 24 with only a handful of players. They die immediately.Those deaths accomplish nothing. Your team loses points, the enemy gains Battle High, and the situation snowballs further out of control.Because now, beacuse those people didn't return to the fight against Yellow, the people still there become outnumbered and are killed as well. Resulting in more Battle High and points lost.What started as a recoverable fight turns into repeated feeding simply because players chose proximity over awareness.
Getting Camped
Are you getting spawn camped? The answer is usually no. More often, you are pushing too far into one team while exposing yourself to the other, which then collapses onto you. If two teams are pressuring you near your spawn, you need to be aware of the angles of attack. Move your team out from between them. This may mean taking a side route, hard pushing through the center, or splitting briefly to distract and pull enemies away from your main force.You can also choose to huddle directly next to your spawn, or even inside it, and do nothing. Enemies are very unlikely to engage into spawn invincibility.Remember that this pressure usually happens because you have the lead. Stay patient. Wait for the enemy teams to turn on each other, for one of them to disengage, or for your team to build enough Limit Breaks to eliminate one team cleanly before turning on the other.Losing the lead early or mid-game is fine. Losing your Battle High is not. Protect it!
Shatter
Basics:
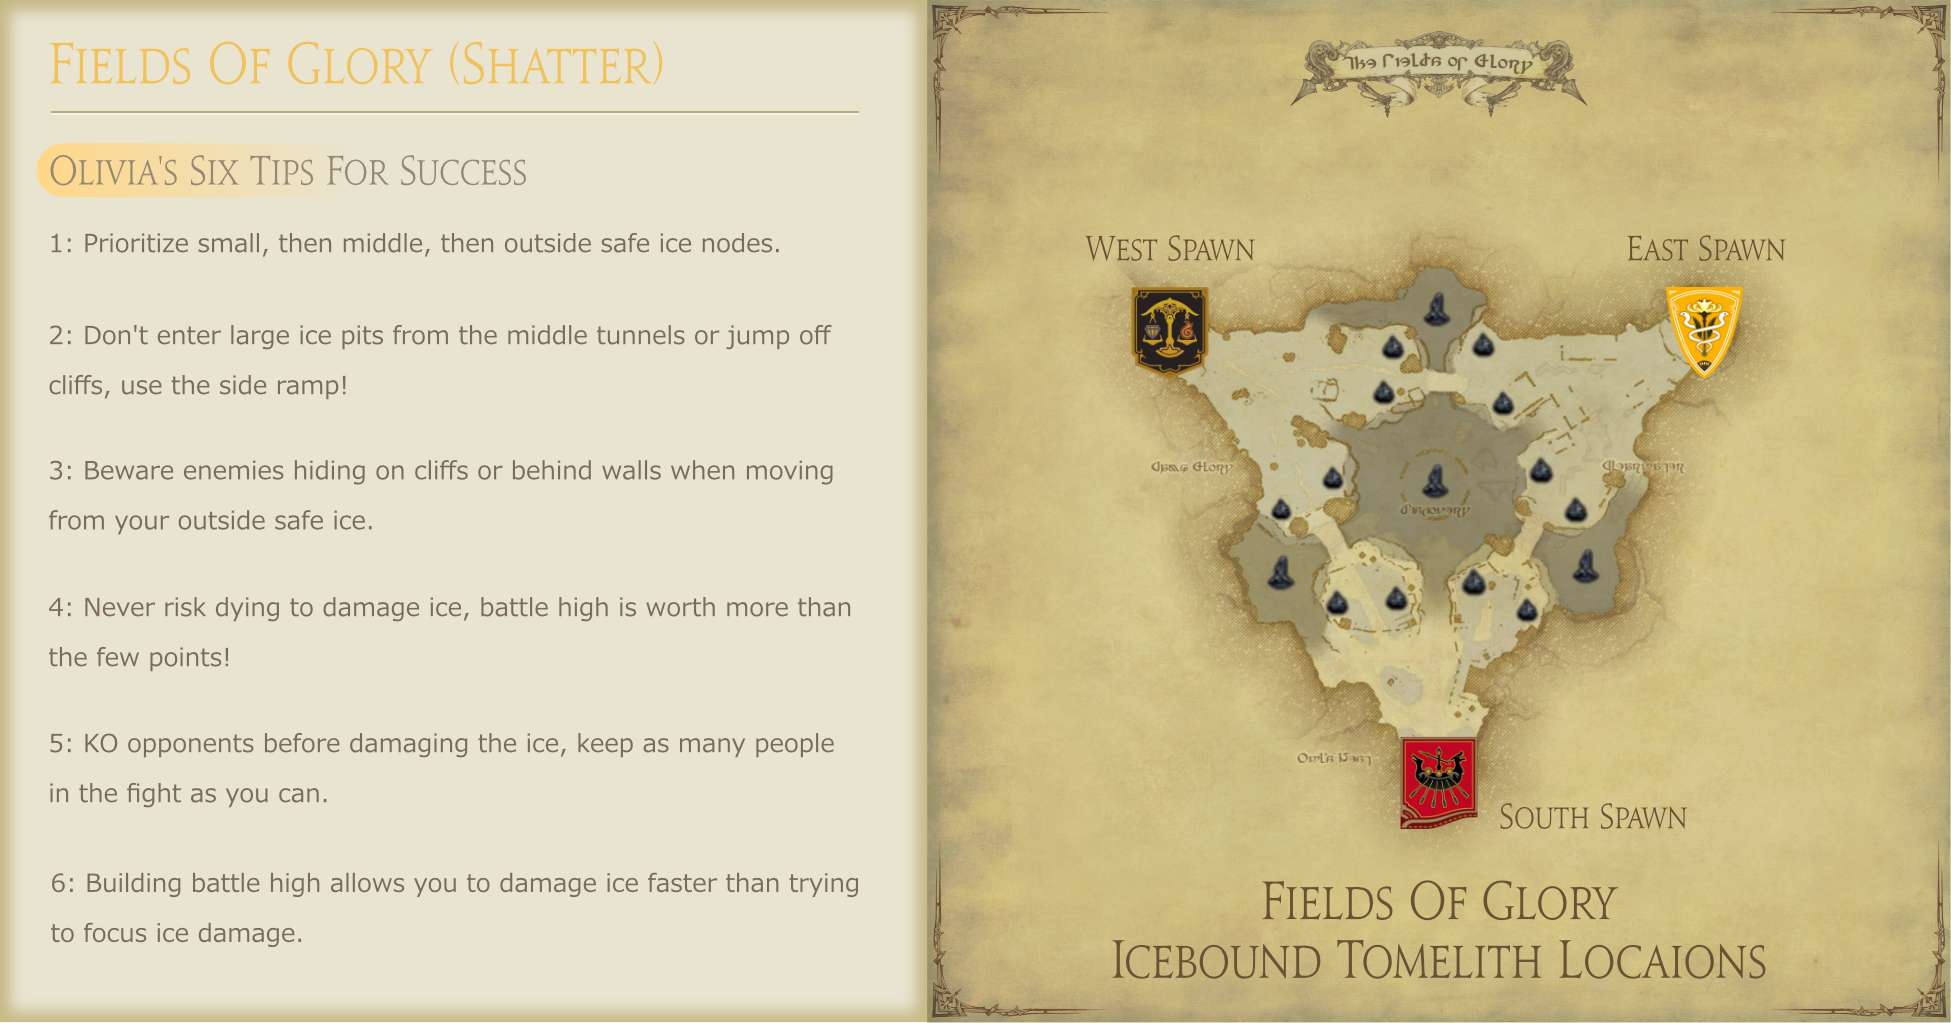
Shatter has a complex and well-designed map that is largely wasted after the ice rework. Unlike the other Frontline maps, objectives must be actively damaged to earn points. This strongly favors teams that perform well over the entire duration of the match rather than those relying on large point swings in the final moments.Comebacks are still possible, but they require significantly more effort, and it is much easier for a team to build an insurmountable lead through consistent play.Gameplay on Shatter is not cleanly divided into early, mid, and late game phases like Seal Rock. Instead, the flow of the match is dictated by the current position of the Big Ice and whether Small Ice is active. Success comes from maximizing your own ice damage while denying the enemy the same opportunity.Simply put, hit as much ice as possible and prevent the enemy from doing the same.
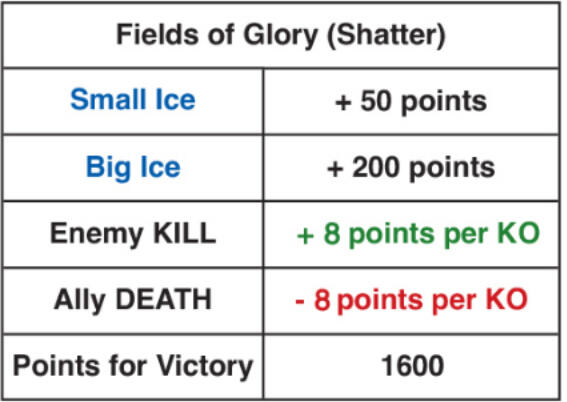
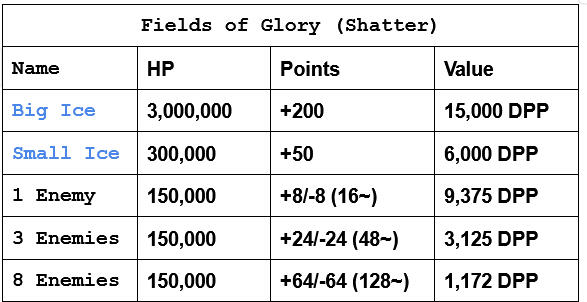
DPP = Damage needed per Point, Enemy Health is an estimate based on avg. health, mitigation, and 4 recuperates.
Priority
Burst > Small Ice > Middle Big Ice > Safe Big Ice > Single Enemies > Nothing > Enemy Big Ice
Why this order?
"Burst" remains the most effective way to create value. It not only generates points directly, but also builds Battle High, which amplifies your ability to gain even more points through the other options.Also, a dead enemy cannot earn points for their team.In addition, most jobs’ burst tools are AoE. These abilities gain no additional value from hitting ice, which makes using them on objectives a significant opportunity cost compared to using them on groups of enemies.
-
Small Ice comes next because, even when accounting for travel time, it consistently outperforms Big Ice in terms of value. It also only spawns twice per match, which makes each appearance extremely important.When Small Ice is active, it is usually your top priority. Opportunities to burst enemy teams during these windows are rare, as players tend to spread out to maximize ice damage. As a result, the value of uninterrupted ice uptime often exceeds the value of forcing low-quality fights.Efficient pathing is critical here. Maximizing how much ice you can hit during each Small Ice window plays a major role in winning Shatter, and it is something we will cover in detail later.
-
The Middle Big Ice is your next priority. It is the only neutral Big Ice on the map, which means it is always contested. If it is active, you should almost always be there.Enemy teams are very unlikely to attack your home Big Ice while the middle one is up. Doing so would be inefficient unless they are severely misplaying, taking a desperate gamble, or your team is already too weak for it to matter. Choosing to hit your safe ice while Middle Ice is up is effectively costing your team 66~ points you could have had for free.Do not forget that the Middle Big Ice is also the most likely location for enemy teams to clash and stay engaged. That makes it the best place to spend your burst, where it can hit multiple targets and generate maximum value.
-
If you cannot reliably secure a kill, your effective value is zero. This is why fighting remains a worse option than hitting ice in most situations.If you can guarantee the kill, eliminate the enemy quickly and move on. Otherwise, prioritize ice for consistent, repeatable value. Consistency wins Shatter.
-
“Nothing” is often the correct option after that, unless your team is both strong and well-commanded. Pushing into enemy ice is one of the fastest ways to lose points and Battle High.If you find yourself in a situation where none of the higher-value options are available, do not force a play. Waiting is preferable to feeding. Hold position, preserve Battle High, and be ready to move the moment a better opportunity appears.
-
Enemy Ice is the final option on your priority list. You only choose it when you are overwhelmingly stronger, the enemy is clearly weaker, or you lose the game if you don't.
Ice Positions:
In the next section, I will go into greater detail on how to react based on the currently active Big Ice spawns. It is not possible to cover every scenario, but each subsection will provide enough for you to make smart calls.These sections are ordered from the strongest positions to the weakest.

Safe Ice: Clockwise from your spawn. Has a ramp leading to your spawn. Also called "spawn ice" or "our ice."
Cliff Ice: Counter-clockwise from your spawn. Has a cliff close to your spawn. Also called "close unsafe ice."
Far Ice: Ice directly opposite of your spawn. Also called "far unsafe ice."
Mid Ice: The ice in the middle of the map.
Safe/Far Ice:
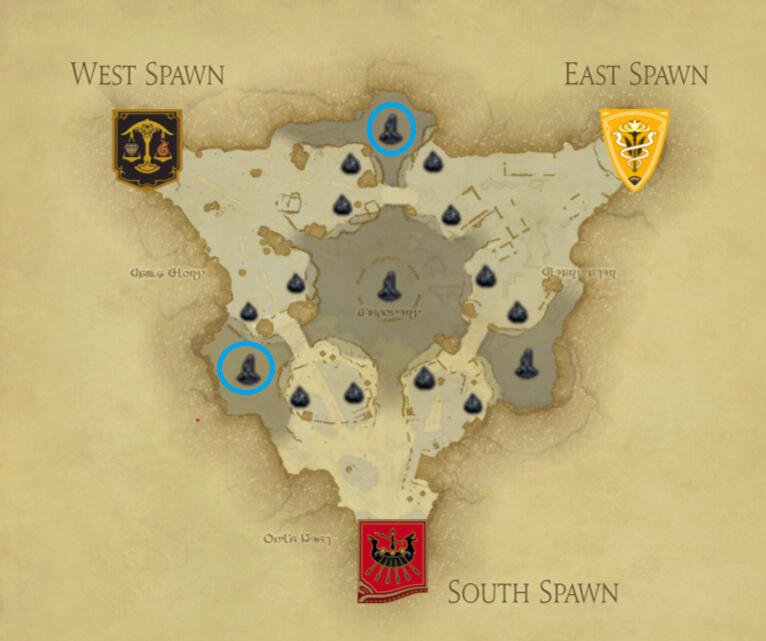
Probably the strongest start and usually a strong position, if not the strongest. What you do here is based on how the unsafe ice team reacts to the situation.
Yellow Funnel Attack:
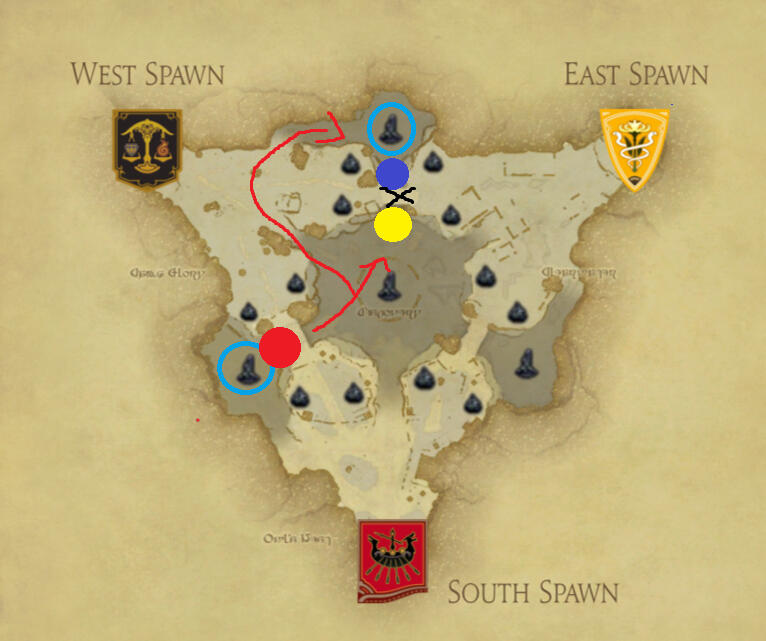
Most of the time, pinch Yellow and go back to your ice. Long rotations are risky, but can result in more value if you play well.
Yellow Cliff Attack:
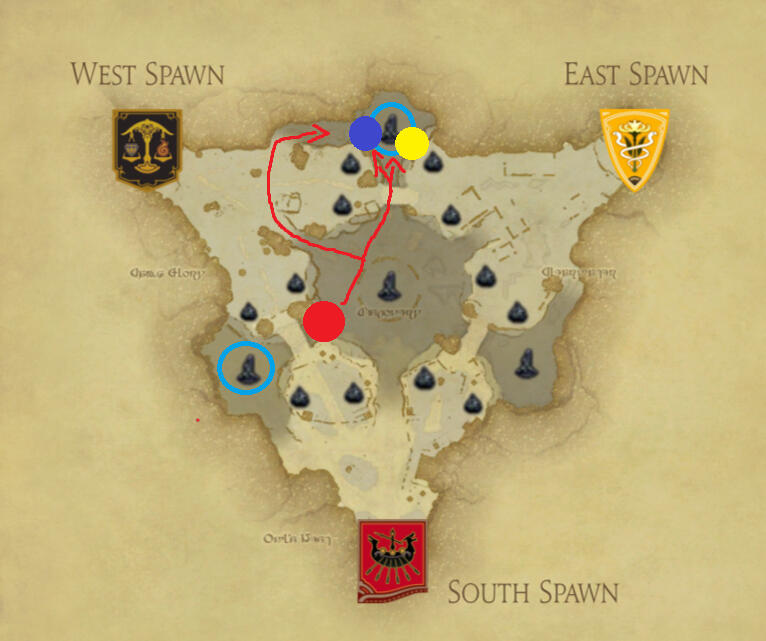
This will usually end up even better for your team. You want move up into the Far Ice Areana and join the fight, but make sure to burst the Safe Ice team first!(In this case, blue)Once you help Yellow secure space inside the ice arena, they have no meaningful escape route except through you. At that point, they are effectively banked points. You can leave them for later while focusing on bursting Blue players and damaging Blue’s ice.Keep an eye on the Safe Ice team to ensure they do not rotate toward your ice. If they do, it is usually only a small group, which your guardian or ice-parser style players should be able to handle without issue.
If you suspect all of them to go toward your ice after the burst, you can disengage immediately. Yellow in this situation will usually leave you be and steal Blue's ice.Even if you're slow, Blue has no way to escape and you can kill them to get the points they got from breaking your big ice back.
Yellow Far Attack:
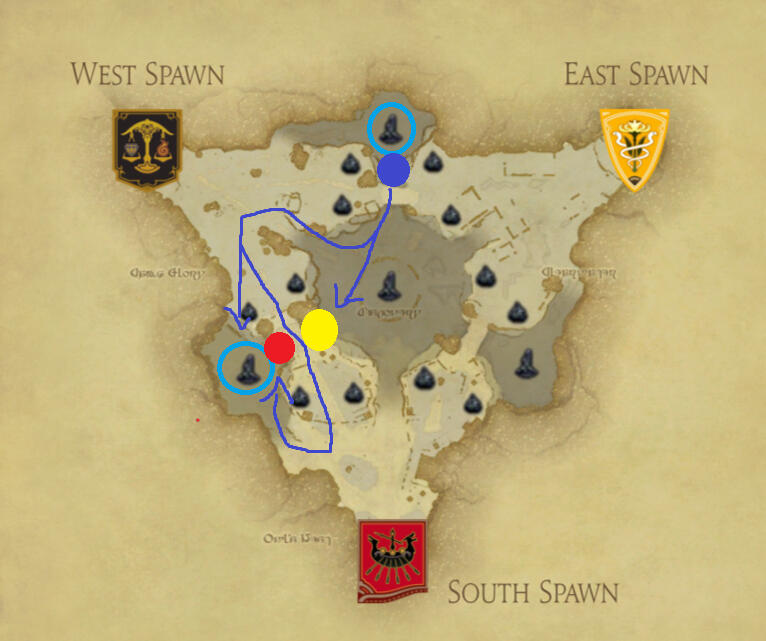
This attack is unlikely unless you already have a solid lead. Bursting Yellow in the funnel is usually free value, but you must stay aware of the Safe Ice team at all times. Watch whether they are actively attacking ice. If they are not, adjust immediately and confirm they are not positioning to kill you.If the Safe Ice team commits through a cliff dive or a flank, the best response is usually to use the Return action and then pinch them while they are locked into fighting the unsafe-ice team.
Yellow Back Attack:
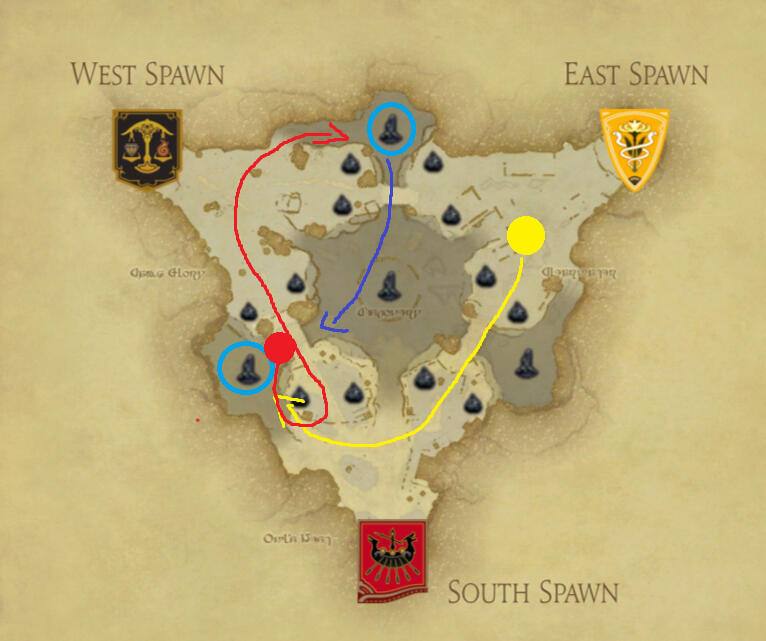
This is a slightly smarter attack from Yellow, especially if you do not spot it immediately. If you see Yellow attempting to flank around the back, your first step is to check the other Safe Ice team.If the other Safe Ice team is also moving in, the best option is usually to use the Return action and then re-engage the flanking team from a safer angle. If returning is not possible, fighting your way back toward spawn is typically the next best option.If the other Safe Ice team is not coming, you can rotate around the ice to deny easy pulls and burst setups, then engage Yellow normally. If they cliff-dived, they will already be at a health disadvantage. If they used the ramp, they have funneled themselves and can be punished the same way as a central funnel engage.If you are being hard 2v1’d, another viable option is to rotate to the opposite Big Ice while the enemy teams are still repositioning. Be ready to use Return here as well if pressure shifts back onto you.
Yellow Funnel Sneak Attack:
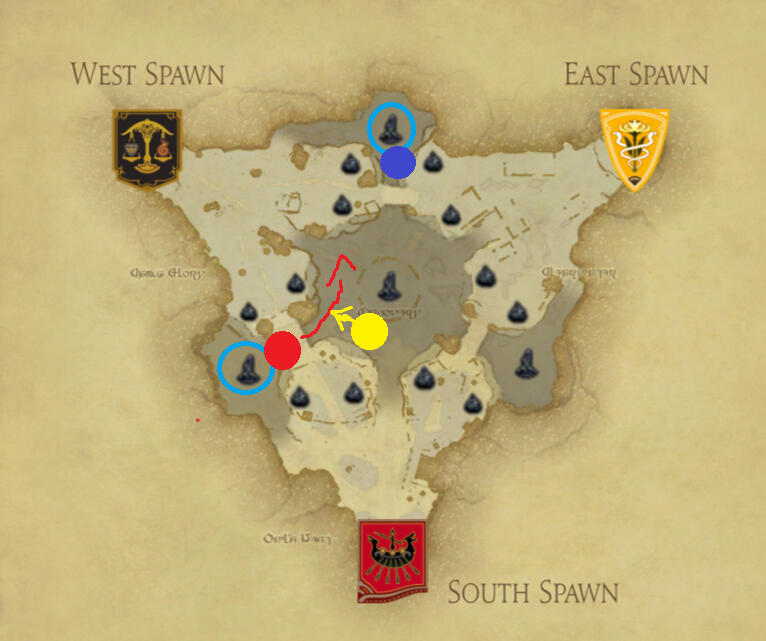
Sometimes the unsafe-ice team will wait outside the Big Ice arena and let another team break the ice before collapsing into the funnel for an easy burst. You can avoid this entirely by exiting through your spawn ramp.Unless you are deliberately setting up a quick pinch, there is very little reason to leave through the middle. It exposes you unnecessarily and gives the enemy exactly the engage they are waiting for.Rule of thumb: If you cannot see both enemy teams on the map, leave through spawn or use Return.
Yellow Cliff Sneak Attack:

If, instead of waiting outside your middle funnel, they have gone to your cliff, unless you want to eat a burst, just use "return."It's pretty much always the best option here.
Safe/Cliff Ice:
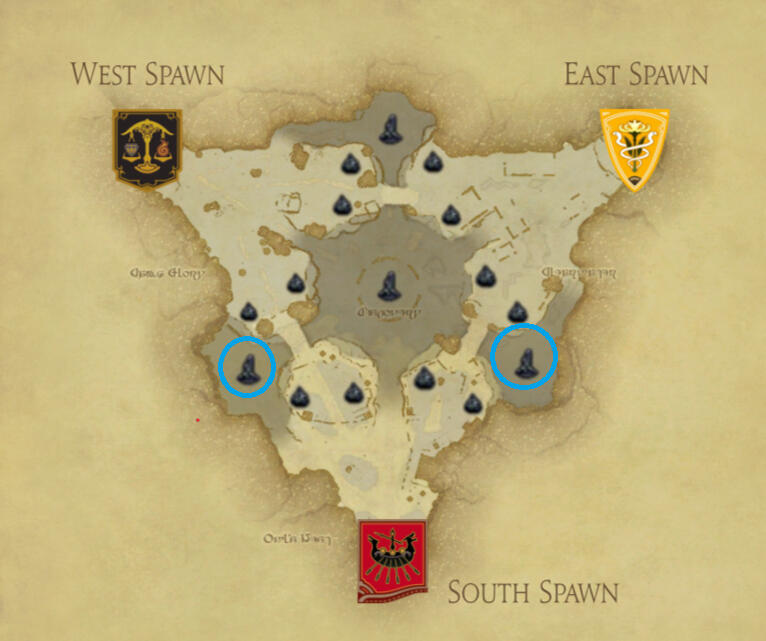
This is another strong position that offers clear opportunities to gain an advantage. You do need to be slightly more mindful of the other Safe Ice team, but overall, you are still relatively secure here.As with the earlier scenarios, most of your decision-making depends on how the Unsafe Ice team reacts. If they choose to do "Nothing", simply continue hitting the ice and take the free value.
Blue Funnel Attack:
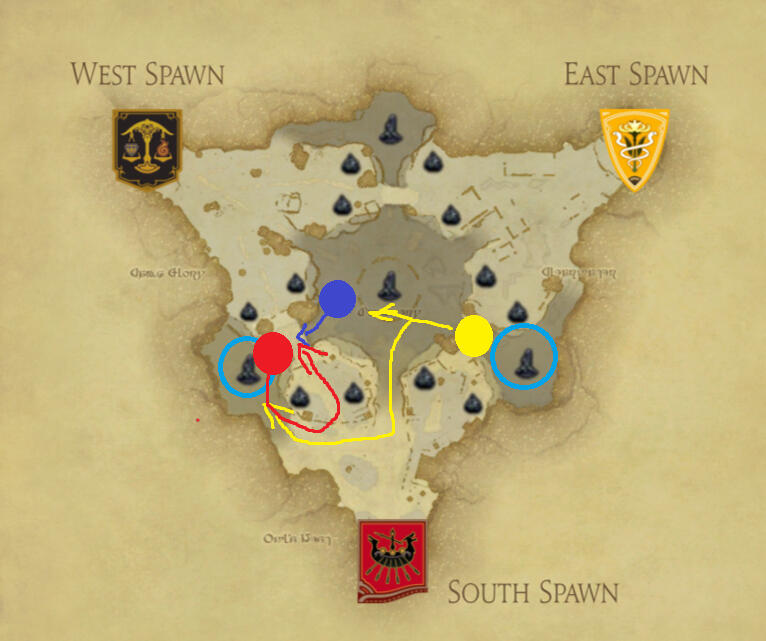
In most cases, this is free value. Allow the Unsafe Ice team to move as deep into your funnel as possible without letting them actually reach the ice. Once they are fully committed, burst them down quickly so the other team has no opportunity to pinch.If the other team begins moving to pinch you, disengage immediately. Retreat toward spawn, then rotate northwest toward the Unsafe Ice team’s spawn. This denies the pinch and puts you in a strong position to threaten either team.
Blue Cliff Attack:

If Blue jumps off the cliff, this should mean free kills. Make sure they lick as little of your ice as possible. Do not let them gain anything from their stupidity!Once again, you need to worry about the other Safe Ice team pinching you, but only the full flank attack as long as you're smart.If they hard commit to going through the middle funnel, you can withdraw from your own ice and dive off your own cliff to take theirs.I wouldn't really suggest this unless you're getting hard 2v1'd or Yellow has a significant lead.
Other Scenarios:
If Blue does anything against the Yellow team, you can refer back to the "Safe/Far Ice" scenario to make the best choices.As before, if Blue chooses to do nothing, you can simply lick ice.
Safe/Mid Ice:

Finally, a position where you get to decide what is the best way to earn points.The last thing you want to do here is lick your ice (unless you win by doing so).You'll want to try your luck at mid pinching enemies or licking ice. The enemy teams should be trying to stop you, but that doesn't mean they'll succeed.
Teeter Totter:

If both teams are fighting in the middle or actively hitting the ice, this creates an excellent opportunity to secure kills.I usually position on the cliff to get full vision of the engagement, but the most common line is:
Burst team furthest from your Safe Ice.
Lick Ice while waiting for burst.
Burst team closest to your ice.
Lick Ice while waiting for burst/retreat to your funnel.
You're in such a strong position that you can make use of both choke points to dodge enemies and use the high ground to get in for free on them instead.You're only really in danger if both teams are going after you, and if they are, then you should go back to your ice and finish it up.
Ice Burst:

Sometimes... you let them fight. If the enemies are being ineffective and trading points with each other, you can just go in on the ice and steal as much of it as possible.If the enemies are waiting to burst you, you can quickly escape before they can position correctly. This will still net you a decent bit of points as long as you don't get caught.
Blue Steal Attempt:
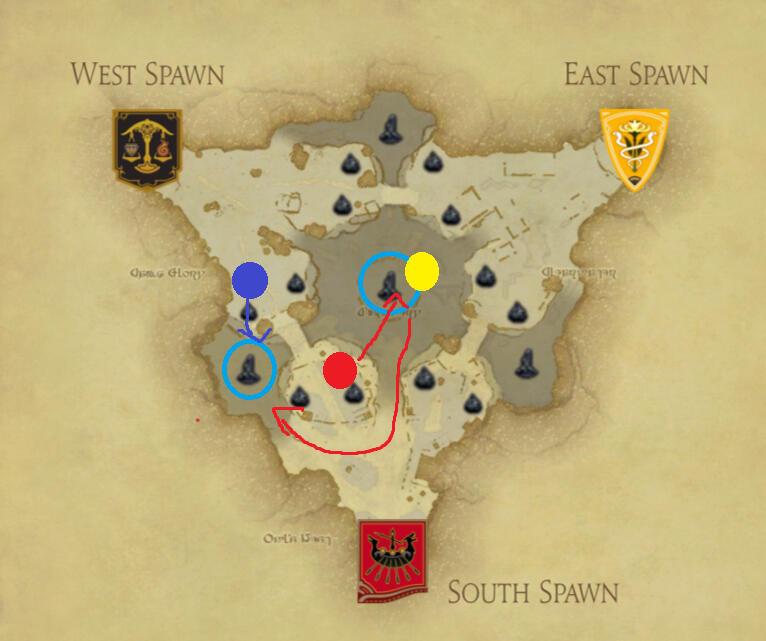
If you overcommit to mid, there is always the possibility that an enemy team rotates to your Safe Ice. Your response depends on positioning and pressure. If there is a risk of Yellow chasing and pinching you, it is usually safer to go all the way around rather than cutting straight through mid. If that risk is low, moving directly through the middle is acceptable.
Against strong teams, expect them to use Return before you arrive, regardless of which path you take. Because of this, unless they are already in 1st place, better to prioritize mid value.This same situation can occur if Yellow makes the play instead. In that case, your responses remain the same.
Mid/Cliff Ice:
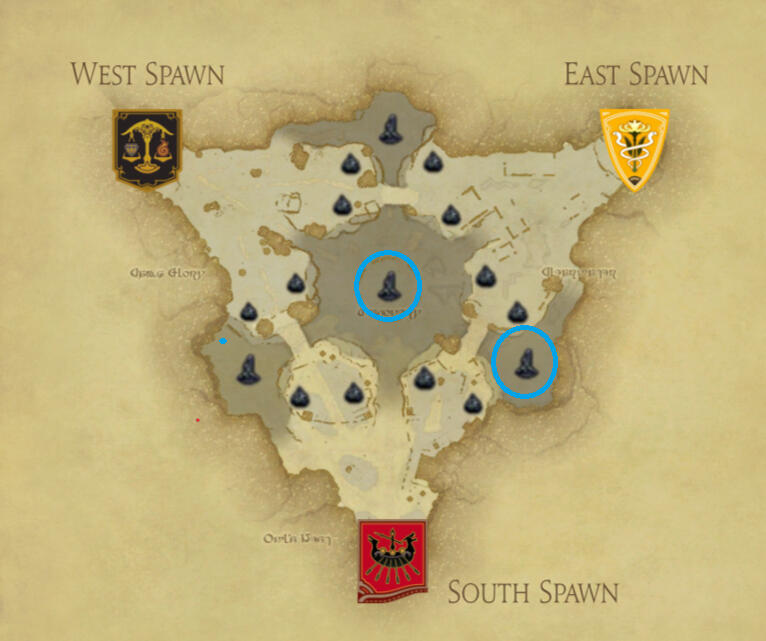
You no longer hold a strong position for upcoming ice spawns. While this is not yet a bad position, your overall point potential is reduced.Your decisions here should be guided by the current scores of the other teams and by how heavily the Safe Ice team commits to mid.
Full Middle Battle:
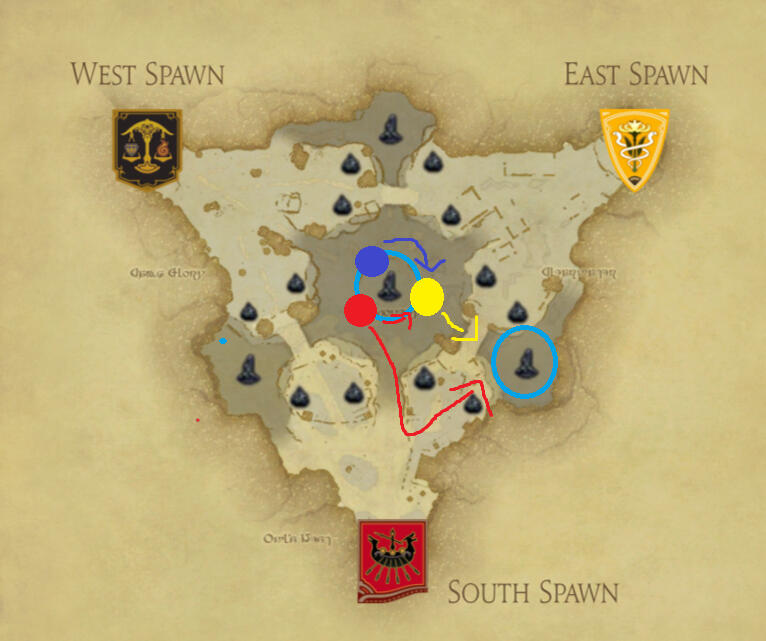
If all three teams are contesting the middle and scores are roughly even, the team holding Safe Ice must be pushed out of mid. They should not be allowed to damage middle ice uncontested.If a different team holds the lead, even after accounting for the 200 points Safe Ice represents, then that team becomes the priority target and should be forced out by the other two instead.If the team without Safe Ice is not contributing, or is being consistently beaten by the Safe Ice team, you may choose to steal Safe Ice yourself. If you do, make sure to Return early or that you can reliably burst the team scrambling to contest you.If you are the team being boxed out of mid, your best options are to rotate around for a cliff dive on a vulnerable team or to pull enemies deep into your funnel so the third team cannot reach you in time.
Double Unsafe:
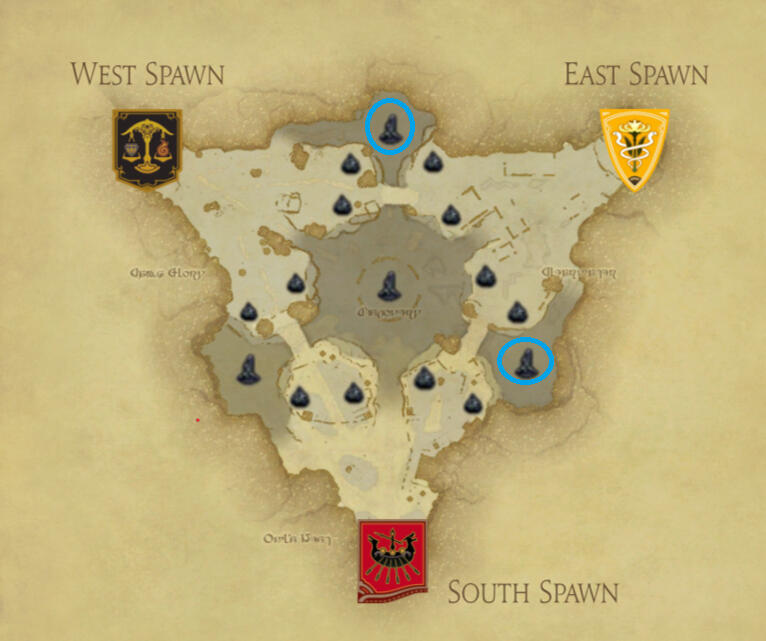
This is a bad position. You should strive to not end up in this situation.Pretty much, unless your team is very strong or their teams are very weak, you should do nothing. You're not gaining any points... but at least you're not losing them.
Double Unsafe Options:
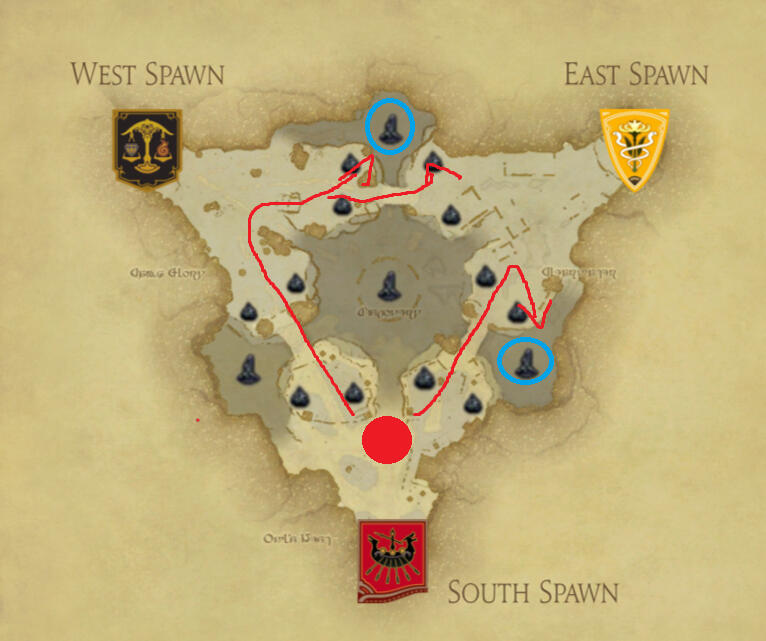
If you decide to force a play from this position, these are effectively your best options. They are the best of a bad situation, but they are still far more reliable than diving off your own cliff or entering through a funnel, both of which are near guarantees of failure.One option is to wait for the enemy to finish breaking their ice before engaging. If they do not spot you, they will usually exit through a funnel, which gives you a cleaner punish.That said, engaging while their ice is still up has its own advantage. Even if the fight is brief, you gain value by damaging the ice alongside any pressure or kills you secure. Choose based on positioning and awareness, not impatience.
Small Ice Spawns:
Small Ice begins to glow at 13:00 and becomes active at 12:30. Based on everything covered earlier, it is almost always correct to drop what you are doing and prioritize Small Ice when it spawnsIdeally, you split into 2 teams and go as far as you can away from your spawn, then work your way backwards towards it.Prioritizing your spawn ice first wastes potential points. Enemy teams are often not yet positioned to hit ice across the bridges or in the middle.If you nab them before they have a chance, then that's drastically increasing your lead.Hitting your spawn ice first limits your point potential and should be avoided!
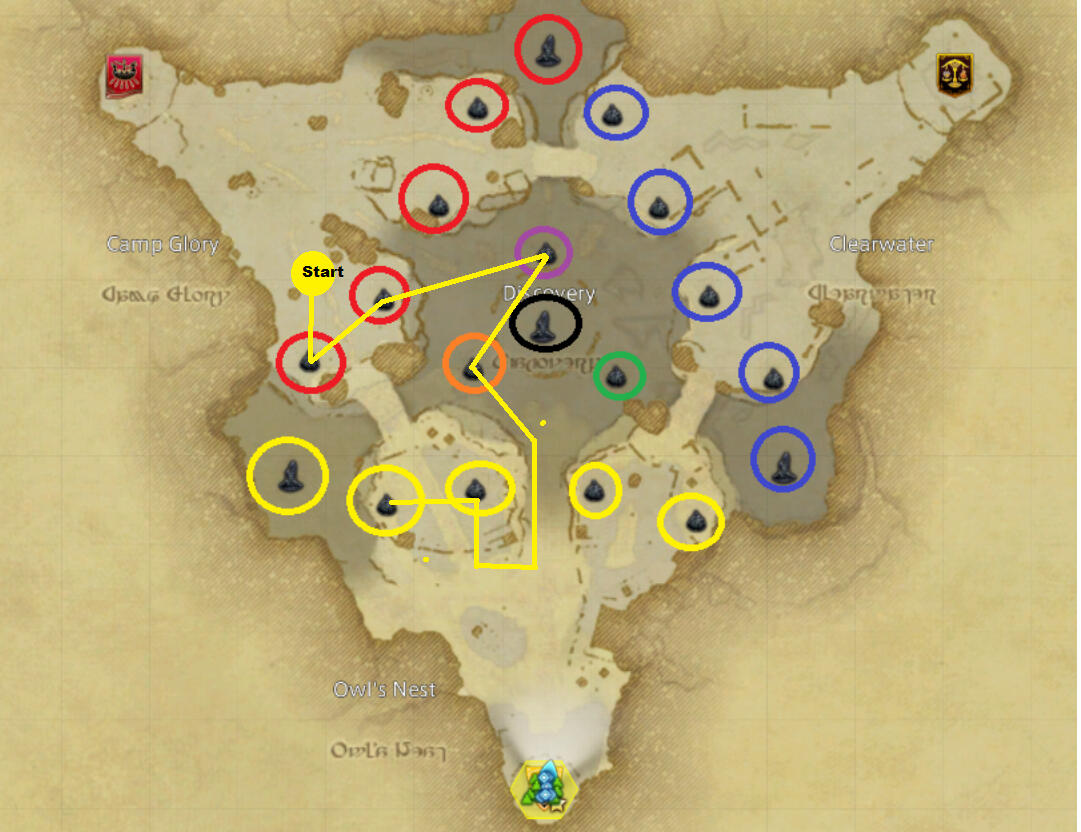
If a team already has a major lead, you may choose to not to split and focus on that team's side of the smalls to ensure that they don't increase that lead any further.
When to skip smalls:
If the middle ice is close to breaking and your Safe Ice is near spawn, you may want to ensure the middle ice breaks first. This can also apply to enemy Big Ice if you are desperate or if the enemy team is heavily split or positioned far away.If an enemy team is about to win off their Big Ice, you must contest and fight them. There is no alternative.If you are about to win off your own Big Ice, Small Ice becomes irrelevant. Secure the win and do not overthink it.If both enemy teams are collapsing onto your spawn-side Small Ice, it may be better to abandon it entirely and focus on breaking the middle ice instead.
Manipulating Ice Spawns:
After an ice is destroyed, there is a cooldown before it becomes eligible to spawn again. Because the next Big Ice is chosen at random from eligible options, taking too long to break your ice or the middle ice can cause them to be skipped entirely. The same applies if enemy teams take too long to break theirs.Conversely, if the only remaining eligible options are enemy ice, you generally do not want to break your own ice. Doing so puts you into a double-unsafe situation, which is always unfavorable.Any ice currently visible on the map is a possible candidate for the next spawn.TLDR: If your ice is a possible next spawn, break other ice as quickly as possible. If it is not, delay breaking ice as long as you can.
Common Mistakes:
Feeding
Your life is your most important asset!Dying on this map creates a 16-point swing. It does not matter what action you were taking. No amount of ice damage will make up for that loss.Whether you are hitting ice or attacking enemies, you should never do so at the expense of your life. Preserving Battle High and denying the enemy free points is always higher value.Too often, players stay on middle ice while enemies are clearly charging toward them. Instead of disengaging, they continue hitting the ice and die for it.THIS IS FEEDING
DO NOT FEED!As a old and wrinkling commander, I beg of you. Please have some self preservation.
Not Being in BalanceThis map requires a careful balance between killing enemies and hitting ice. Overcommitting to either will reduce your chances of winning.Focusing too heavily on kills will cause you to fall behind in score. You simply cannot outpace consistent ice damage through fighting alone.Focusing too heavily on ice, on the other hand, leaves you without enough Battle High to defend yourself or punish enemy pressure.Success on this map comes from smart engagements. Fight when it creates value, disengage when it does not, and use both combat and ice damage together to maximize your overall impact.
SplittingWhatever your team chooses to do, you must do it together. If the call is to hit ice, everyone hits ice. If the call is to fight, everyone fights.Many newer players refuse to do anything except hit ice because it feels safe. Many strong players refuse to hit ice because they believe it is beneath them.Both mindsets are wrong.Fighting is not dangerous when you are with your team, and Big Ice can be destroyed in under ten seconds when everyone commits to it together. Splitting your effort only guarantees that neither objective is achieved efficiently.Working as a team, is what wins games.
Onsal
Basics:
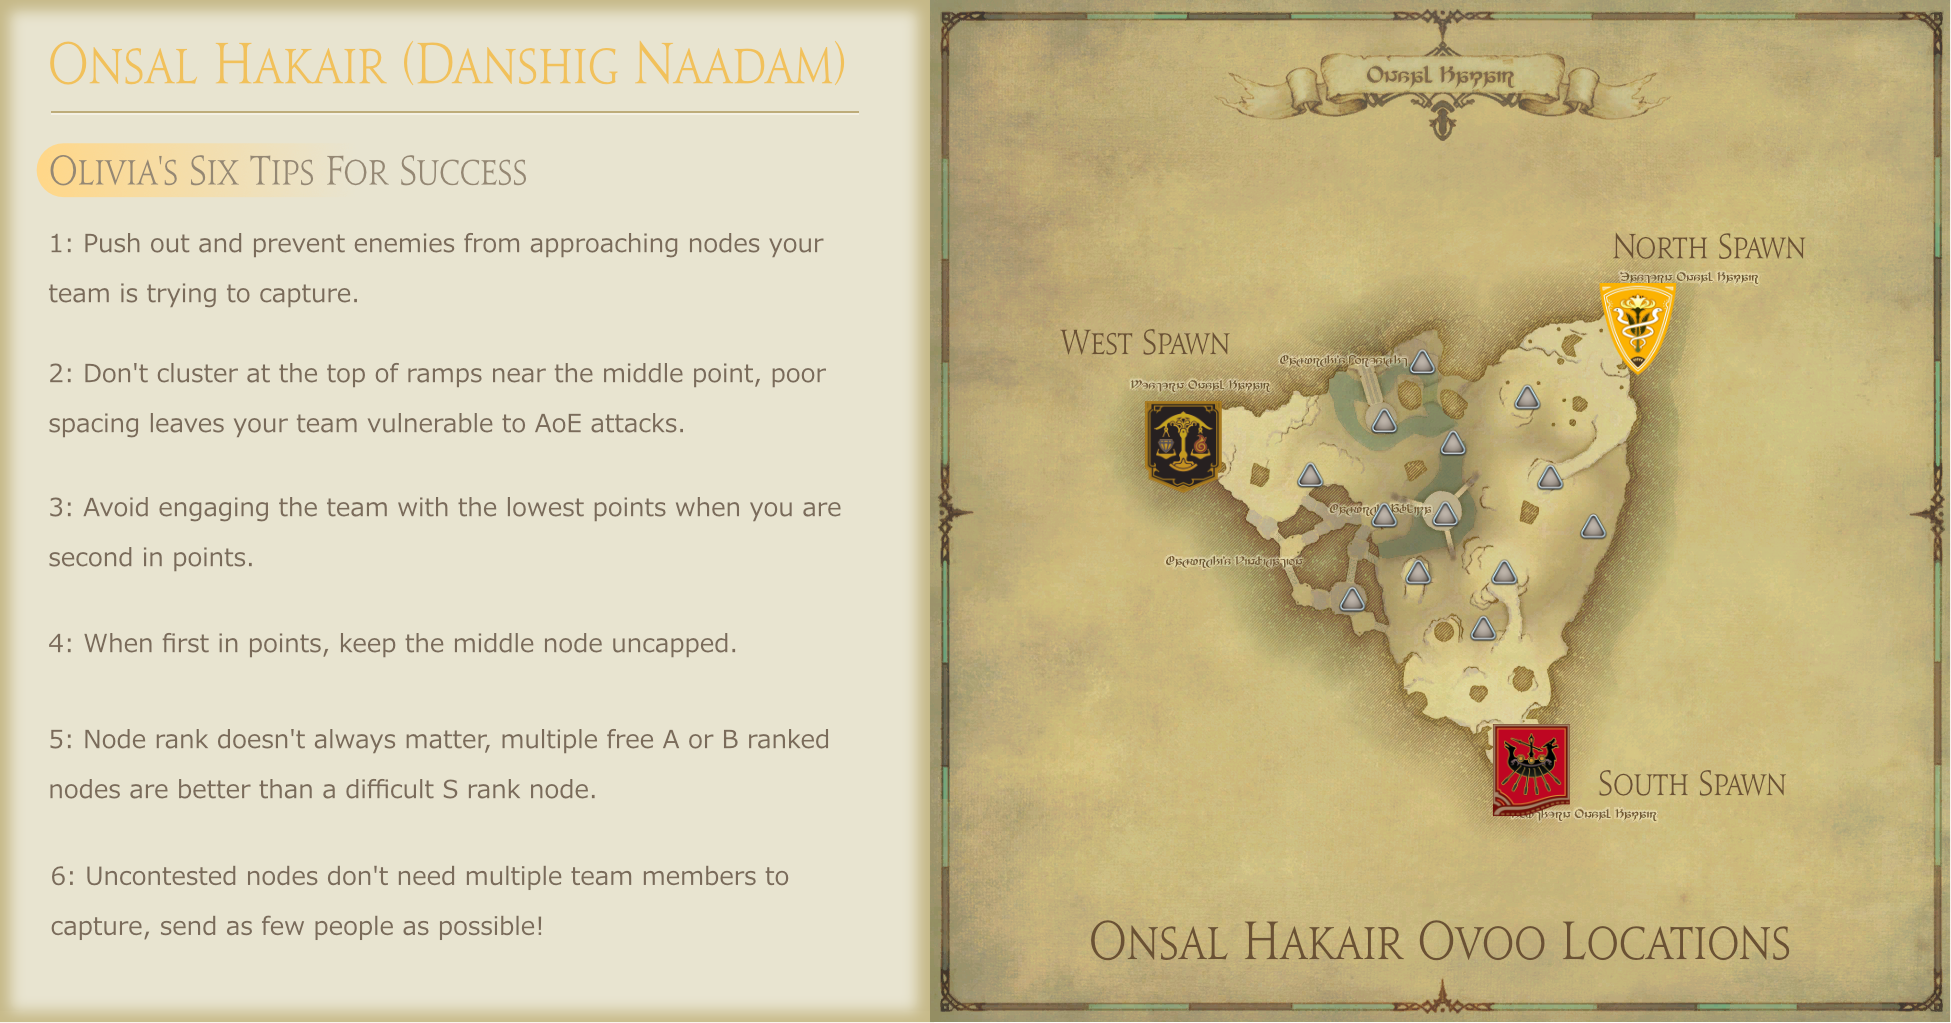
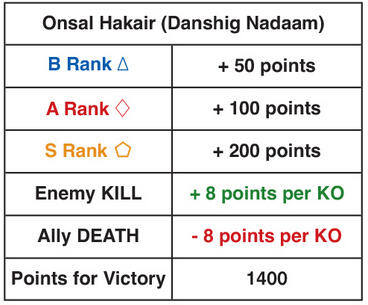
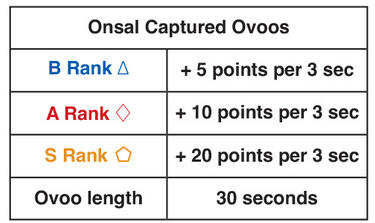

Possibly the most straightforward map in the rotation. Its small size and objective-focused design lend themselves to "crazy comebacks", frequent pinches, and situations where teams can be hard-camped. Together, these factors make the map feel extremely RNG-dependent.That doesn’t mean individual or team play can’t influence the outcome... it just means your impact is smaller here than on most other maps.This mode effectively has three states:
a major first-place lead, all teams even, and middle up.Each of these states is fairly easy to understand and respond to, but as always, we’ll go over them in detail.
Major 1st Lead:
Choices are easy when first place has a big lead...
Pinch them.If they still have the lead, pinch them again.
Then again.If another team gets a major lead, the answer is the same.
Pinch them.If you’re in the lead, don’t get pinched.
Don't Die!
It's fine to lose the lead in the short term. Losing your Battle High is not!
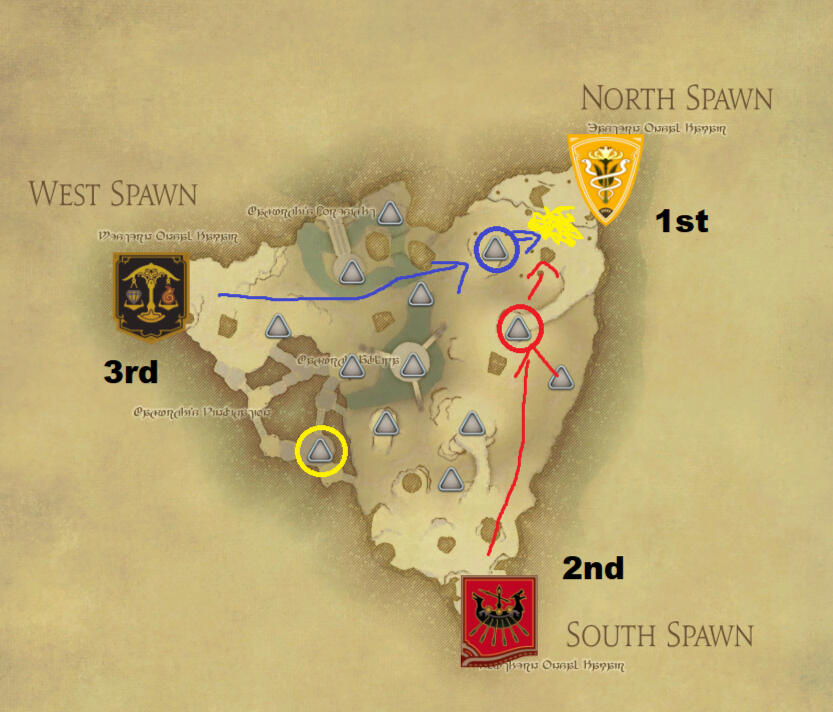
Let us take this situation. There are 3 nodes: the "S Rank" South-West, and then a "A Rank" and "B Rank" North-East. Adders is in 1st, Mael in 2nd, and Flames in 3rd.The play is to pinch 1st. You can send a small team and stall around the South-West node if you want, but the important thing is that 1st suffers. (doesn't get a bigger lead)
-
This is especially true when they're about to win, don't throw the game by going to "S Rank" when another team will win off a "B!"
All Even:
When the scores are close, you have to think harder about what the other teams will do and position to avoid getting pinched.Take points wherever you can, but don't die for them.
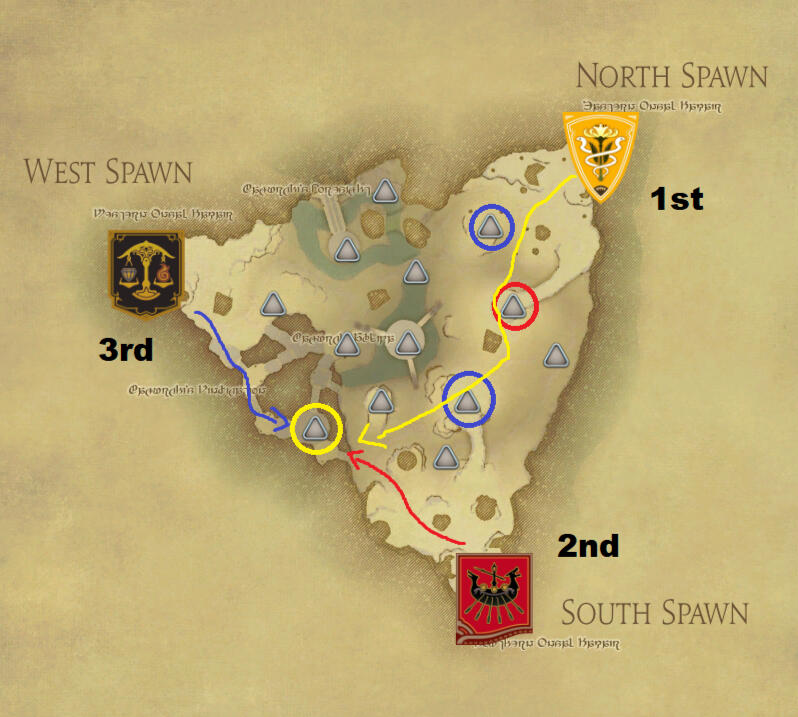
Take this scenario:
The scores are close enough to not matter, so Red goes for the "S Rank".What they've failed to understand is that this gets them pinched by the Yellow team. The active nodes draw a line straight into Red.
-
Now, if Blue is terrible and you can easily crush them, this is a good play. If you can't, do something safer instead.
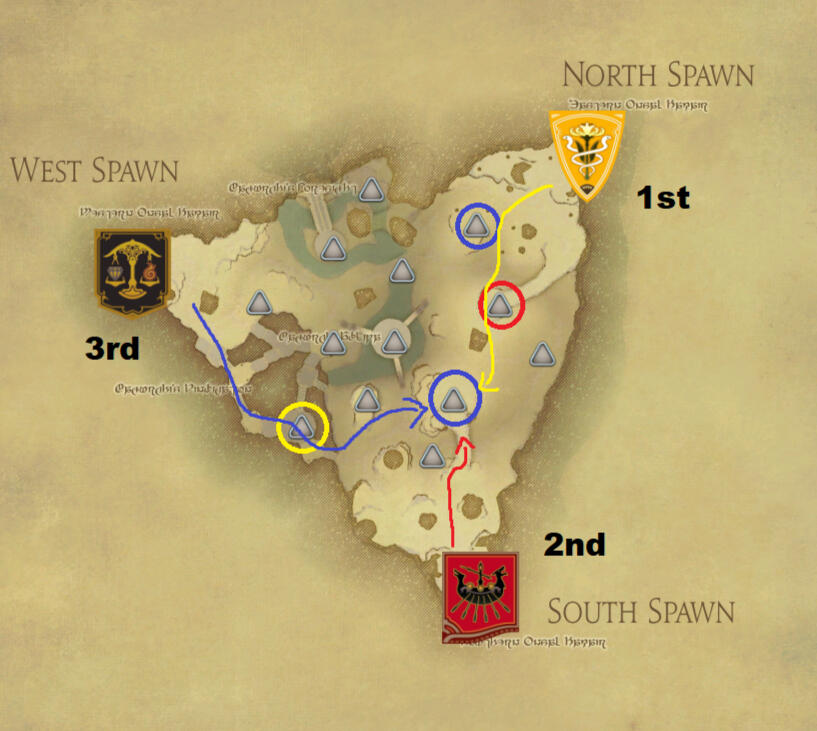
This is a much safer play for Red.Technically, Blue could still swing all the way around and pinch Red, but it’s unlikely. Even if Red doesn’t secure this node, the loss is far smaller than committing southwest would have been.While getting kills is the biggest indicator of victory, not dying is the second.Protect the points you already have, and don't lose your Battle High!
Middle Up:
When middle is up, things get complicated.There’s a lot to consider, and while the ideas are simple, the execution is difficult.Middle is usually advantageous for first place, or for whichever team can consistently secure kills.If you’re in the lead, this is your best opportunity to close out the match.
Do everything you can to convert it into a win.
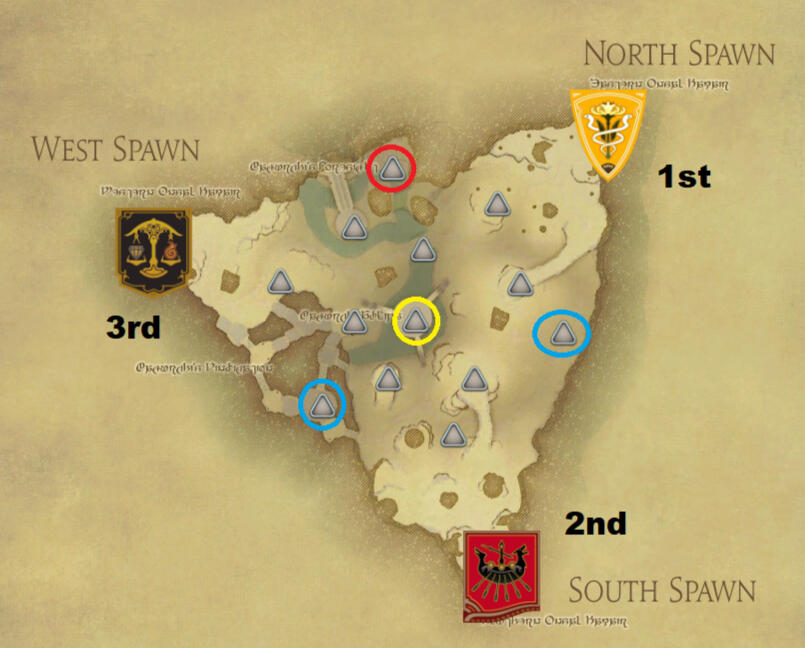
Why does middle benefit first place?Because the ability to pinch is greatly diminished. Players will usually prioritize nodes over pinches, and the middle is simply too tempting to ignore.You can go around an enemy ramp and pinch them, but doing so often causes that team to throw against you later. Psychology matters, and players remember who punished them.Middle also favors first place because the ramps funnel enemy teams into predictable paths, creating easy burst opportunities while offering numerous escape routes. If things go bad, you can simply hop off a ledge and disengage.So, how does middle not benefit first place?First has to make sure that the middle stays up. In fact, they usually don’t want to capture it themselves. Once it’s capped, first place becomes vulnerable to repeated pinches again.Because of this, first place can’t commit as many players to side nodes and has to play more defensively than it otherwise would.
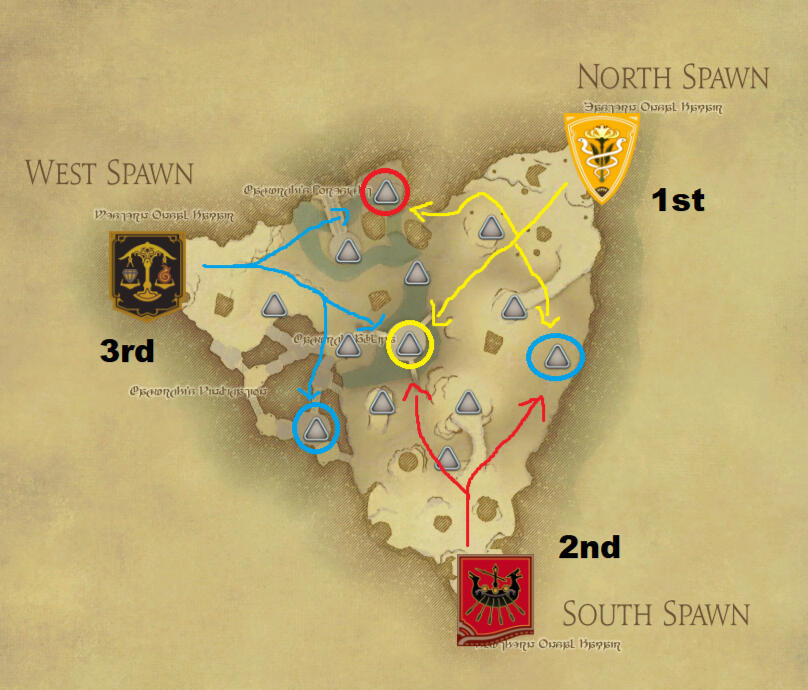
Remember that second and third place generally shouldn’t be fighting in this situation unless first and second are extremely close in score. That isn’t the case here.Let third place take some nodes and focus instead on making sure first place gets nothing.I’m going to throw out some numbers here, but keep in mind that this is mostly theoretical.
1st place - 8 floaters max. Sending more than this greatly increases the chances of mid being capped.
2nd place - 16 floaters max. You can typically crush 1st place and make sure you keep the node. Just remember that... 16 may be the max, but you'll never typically need that many. Putting this many into a node and 1st doesn't show up could mean 3rd getting blasted in the middle.
3rd place - 4/20... If you're going after a 2nd place node, you should really only need to commit 4. (If they're close to 1st place, just send everyone.) If you're going after a 1st place node, you might as well send everyone again. 1st place is typically stronger (that's why they're first), but you can send more people since 1st doesn't want to lose mid.
Regardless of placement, once a node is secured, immediately return to the middle and rejoin the fight.If the enemy teams don’t contest, one person is enough.If you’ve already capped, any further fighting there is wasted effort. Get back to mid.That said, this is still theory, not a rulebook. Adjust based on what your team can realistically execute.And if first place is simply much stronger and your team can’t compete, abandon mid entirely. Don’t give them free kills and Battle High. You’re giving up your chance to farm mid as well, but if you can’t win those fights, there’s no value in taking them.
Control Space, not the Node:
To capture nodes quickly, you must control the area around the node, not the node itself.If you’re standing on the node while someone else is already capping it, you’re being useless.
Stop doing that.Your job is to push enemies away and create space so your capper can cap safely.Here’s what that actually looks like.
Do this.
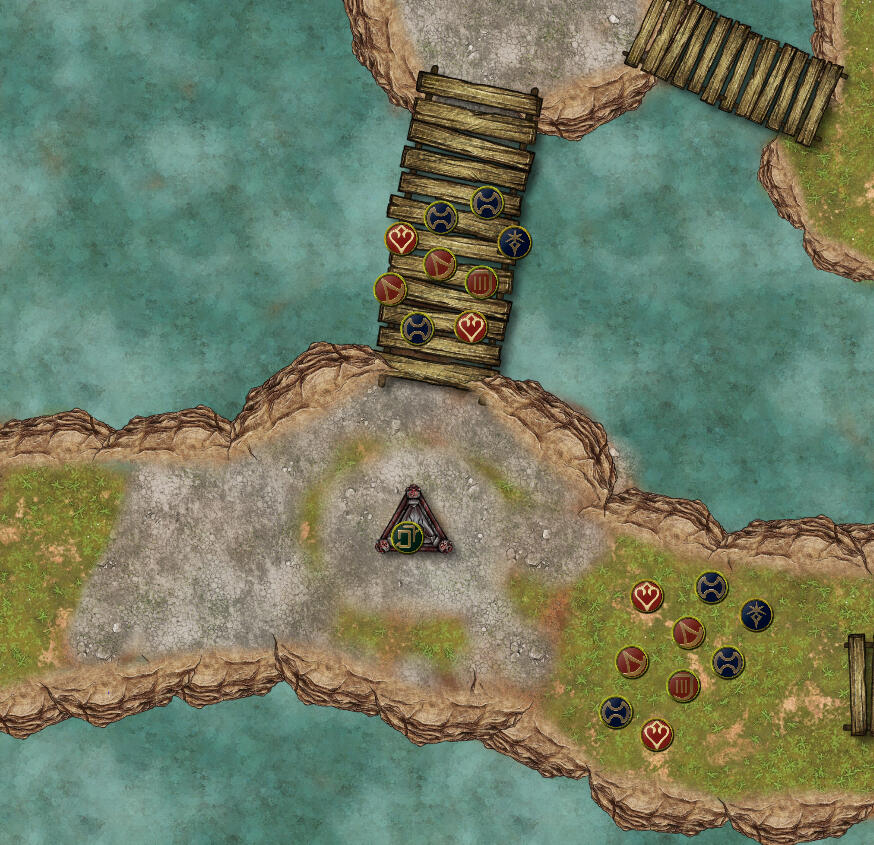
See how one person is capping, while the rest of the team blocks the paths the enemy could use to reach them?
Fan out and use your CC abilities to deny access and guarantee the capture.Once the node is secured, you have options.If another team is collapsing on you, you can withdraw immediately to a safer position.Or, if the third team starts pressuring your enemy, you can push forward and capitalize on it instead.
Triumph
Triumph is… fine. It launched to a fairly negative reception, but how it ultimately settles in the meta is still up in the air.This map heavily rewards coordination and good movement. Teams that can make quick decisions and move into strong positions will win a majority of their games with little resistance.Since Triumph is still new, it’s possible these strategies won’t remain optimal long-term. That said, they’ve been consistently effective in my own matches, and I’m confident enough in the results to share them here.
Basics:
Node Locations
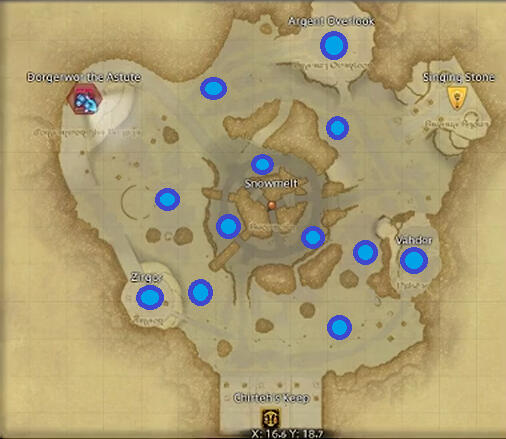
Special Terrain
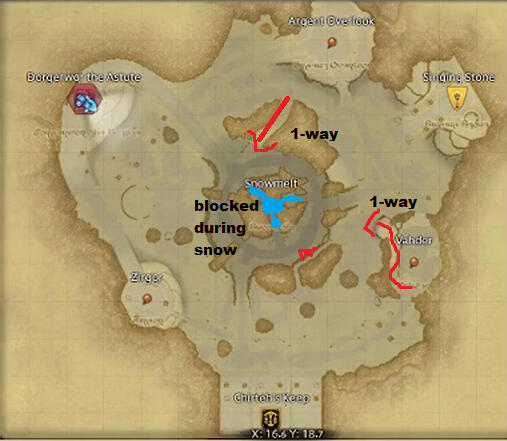
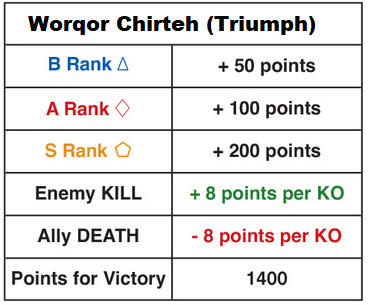
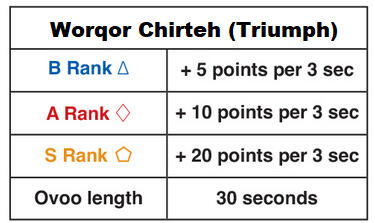
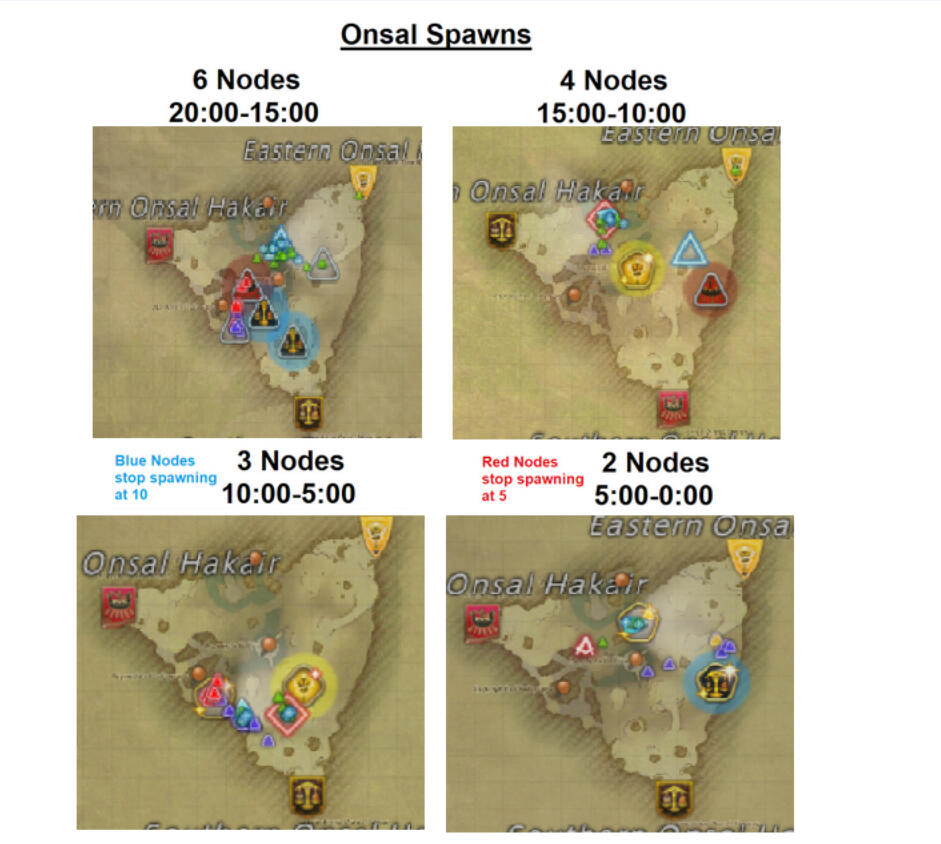
*note: I'm aware this is the onsal map, but the logic is the same.
Weather Effects:
Snow:
Match duration: 15:30 - 10:45During this time, snowman obstacles will appear on the map. They will shoot out blue AoE puddles that grant an extra hefty shield.
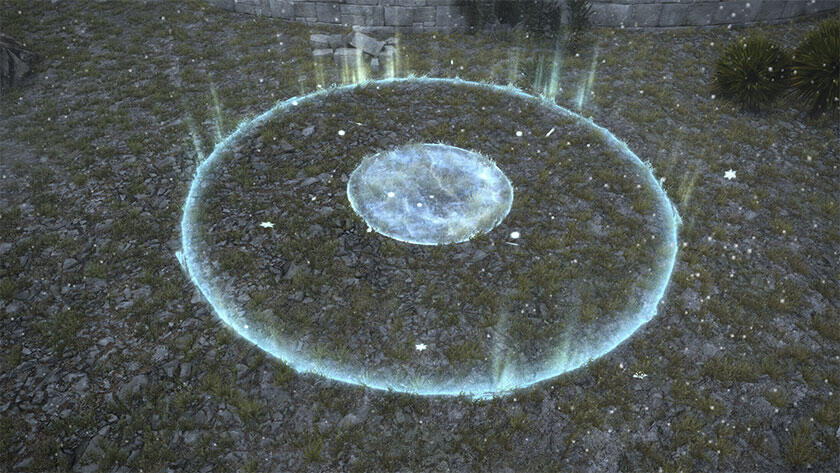
Aurora:
Match duration: 8:30 - 5:15
During this phase, LBs charge faster, and higher-ranking nodes spawn.

Node States:
A node will have a number of pads that need to be stood on to be captured.The number is based on the rank of the node:
B: 3 pads
A: 4 pads
S: 5 pads
B-Rank

A-Rank
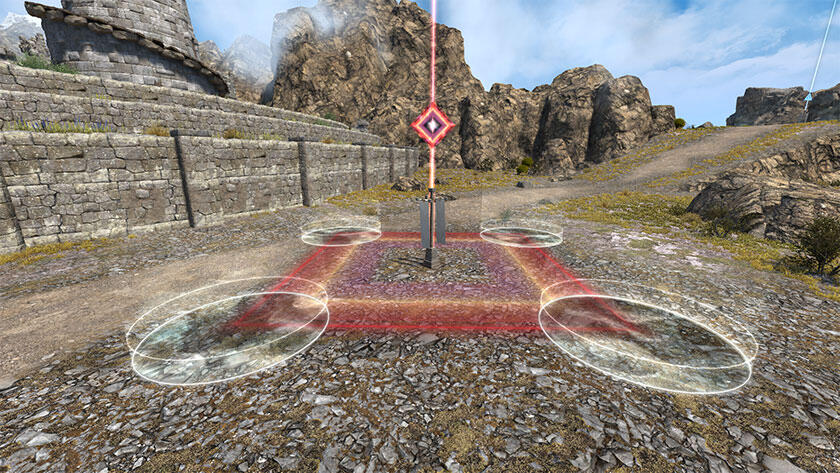
S- Rank
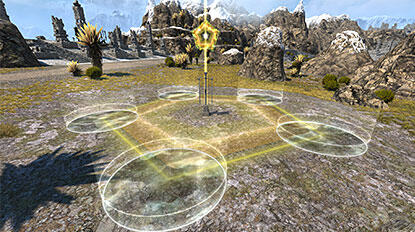
Each pad can be in one of two different states:
Unclamied
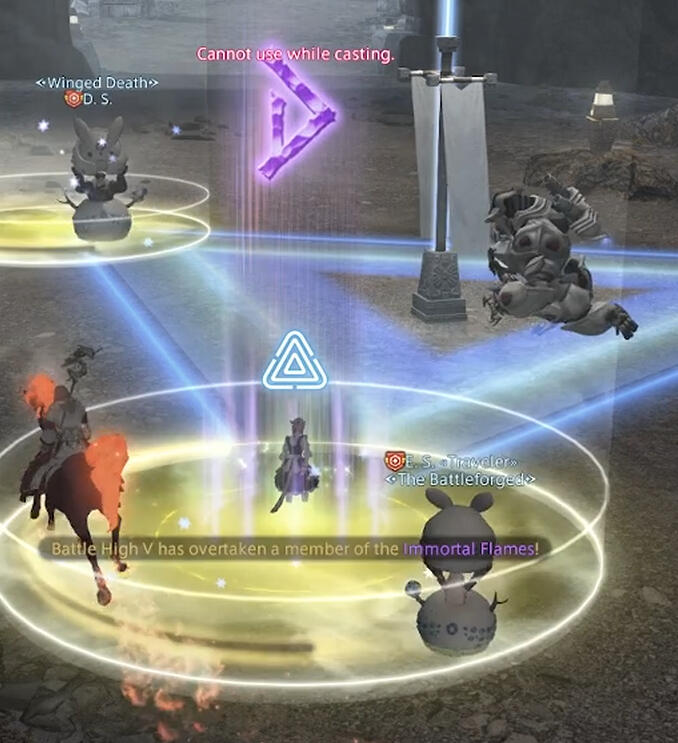
Claimed

When all the pads of the node are claimed by the same team, the node will be captured and start ticking for points.It can no longer be interacted with after it is captured.This means when trying to fight an enemy, you need to go stand on the unclaimed nodes to stop a capture. If you stand on nodes that have already been claimed, you risk losing the node.
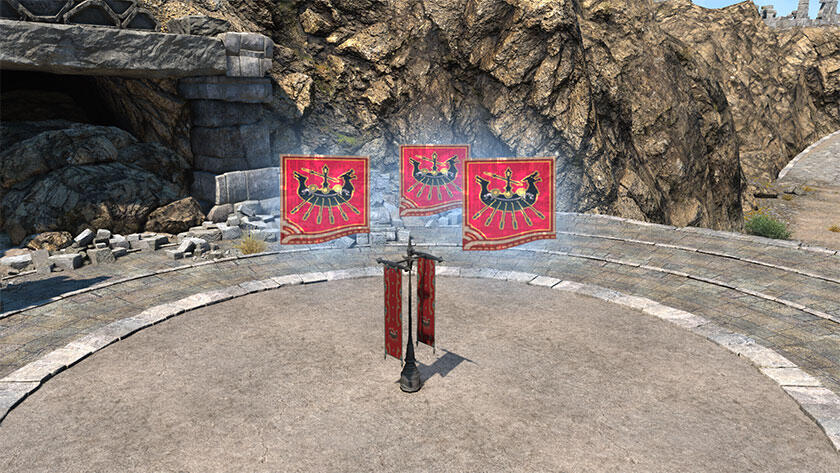
You can see how long it will take to capture the node by standing on it:
In Progress
Getting Stopped
If there is ANY enemy on the pad with you, it will not tick up.
Furthermore: only one person needs to be on the pad to capture it, more people will not make it tick faster
The progress will reset if your team steps off the pad.
It takes about 8~ seconds of standing on the pad uncontested to capture a pad.
Remember:
It is everyone's responsibility to stand on the pads if they are unmanned, even when engaging in a fight. If you see one that is not being claimed by your team, then you need to get on it.
Rules of Triumph:
1. Stay close
You might assume that Triumph’s abundance of nodes makes spreading out more optimal. You’d be wrong.Staying together and keeping your full fighting strength available is still the most reliable way to secure victory. A coordinated group of 24 will overwhelm any detached squad of 4–8 with ease, and once that fight is won, the winning team can immediately push forward and secure additional nodes.This doesn’t mean you completely ignore side objectives. Instead, leave only a skeleton crew behind to capture nodes. That crew should be able to rejoin the main group quickly if your team needs more help, or so that the main force can fall back and assist if the third team appears.
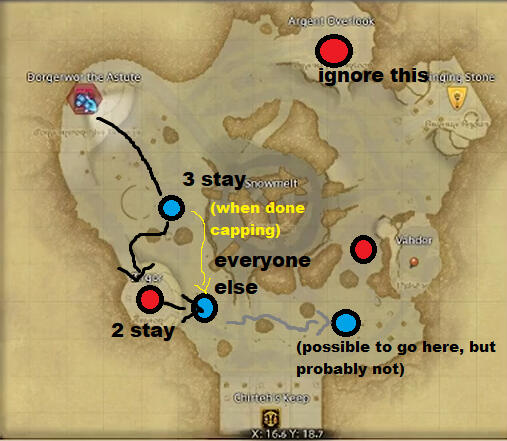
By leaving only the minimum number of people in the back to capture a node, it gives you the greatest chance of capping and securing kills.If a node isn't in danger of getting captured by the third team, then you could leave even fewer people.Push out as far as you can, and if you fall back, fall back towards the previous node in your line.
1*. Spread Out
You only Need to stay close when a possible fight is about to happen. When the enemies are fighting each other, you can safely spread out and capture more objectives.
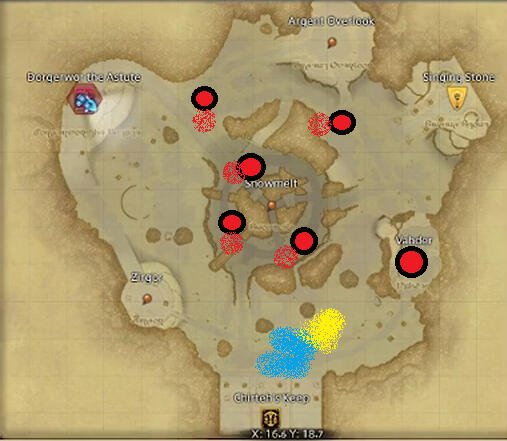
Since Blue and Yellow are engaged in a fight here, Red can safely spread out and capture more nodes here, then regroup.When enemies aren't on the map, it's better to stay together for a possible fight.
2. Get to the Node First
It is hard to push into a team that is wallled up in front of a node.
Getting to an objective first will usually mean getting that objective.
Funnel Locations

This is not only because it's hard to push through an opposing team, but most objectives have natural funnels that will make your team easy to burst if you try and force your way in.If you're not the first team to an objective, think very hard about whether you really want to risk losing a hundred points if the attempt fails.
2*. But be careful in the middle
The middle is a prime position for enemies to pinch you safely. When going for middle objectives, you need to make sure that if the enemies come for you, they will be coming from the same direction.
Not safe to go mid

Safe* to go mid
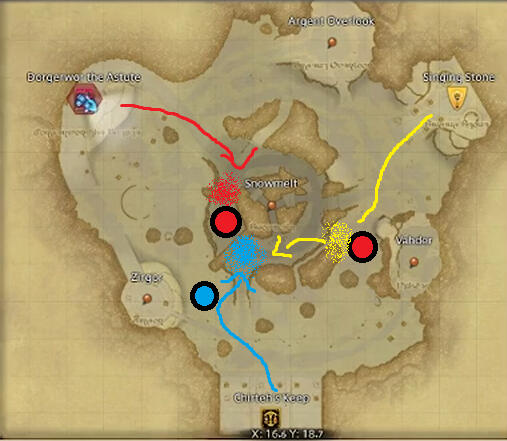
If you have a lot of resources and can captrue the objective quickly, then you can still choose to go middle, but you are playing at a significant risk when you do so.Capture quickly, and move out!
3. Leave After Cap
It is almost always better to leave after a node is capped. The map is so large that starting another fight will almost certainly hand the unengaged team an extra 150+ points.This is simply something you can't outpace in the long term.This only gets worse as the match goes on, as higher-ranking nodes spawn.Starting a fight for no reason will lose you the game.
1st Spawns

Most Likely 2nd Set

If you continue to fight here, maybe blue will run away to get some other nodes, but Yellow is looking at a point game of 300 minimum if you don't go contest.The map is too large to try and contest if you aren't in route the moment a node becomes active.
4. Win and capture quickly
When you do fight, it's important to leave the enemy crumbled. If they take the risk, you need to punish themThe longer you take to win a fight, the higher the chance a viper or a paladin will make it to your capture point and stall your claim.While dealing with them, the rest of their team can push in, and now you might lose the position or worse, get pinched.If you don't capture quickly, then the scenario from above still plays out, and you give the "Farming" team a huge lead.
5. Give 3rd a chance
This mode heavily punishes 2nd and 3rd fighting each other. You have to give up some nodes to the other team and throw them a bone.Even if there aren't better options, as 2nd place, it's okay to sit still and wait for the next spawns if it means getting a chance to fight 1st place.Remember, getting into a fight with another team is giving the non-engaged party 150+ points Minimum
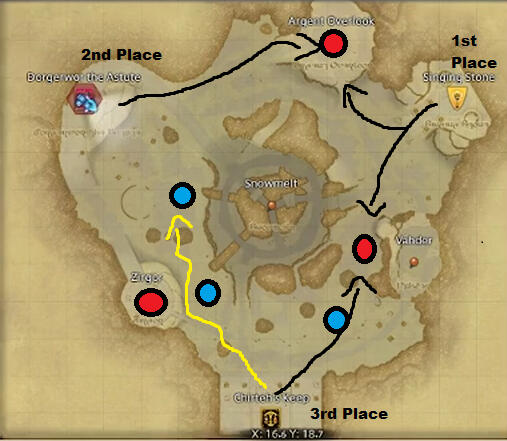
This is the same scenario from earlier, but now with places. See how it changes.If you go and do the same thing you did in the opening, you are fighting 3rd place; blue is likely to split and get killed by 1st place as well.You may walk out with some kills and 200 points.But 1st place will walk away with kills and 250 points.If you don't give 3rd a chance to catch up, you will lose the game.
6. Pinching is Dangerous
Pinching, usually a great strat, is hard to pull off effectively on this map, and doing so will get you punished more often than rewarded.If you choose a pinch absent mindedly, you are choosing to become an engaged team and give up a significant amount of points from nodes.
1st Spawns
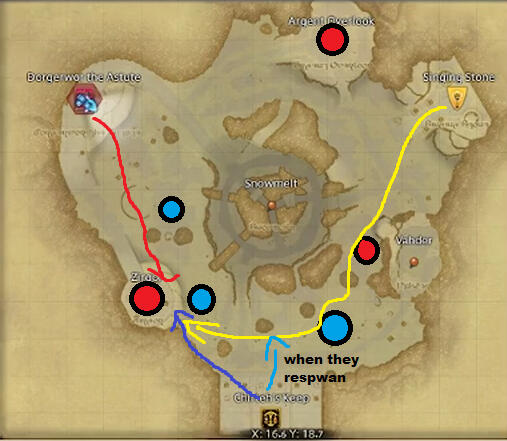
Most Likely 2nd Set

Looking at the same set from earlier, if Yellow decides to go further and pinch Blue here. They miss out on up to 250 points! Not to mention, by pinching, they also give Red another 200 from the 1st set by stopping Blue!In the first 3 minutes of the match, Red would already be 33% of the way to winning, and have decent battle high thanks to Yellow helping them defeat Blue!
Middle is safe to pinch in
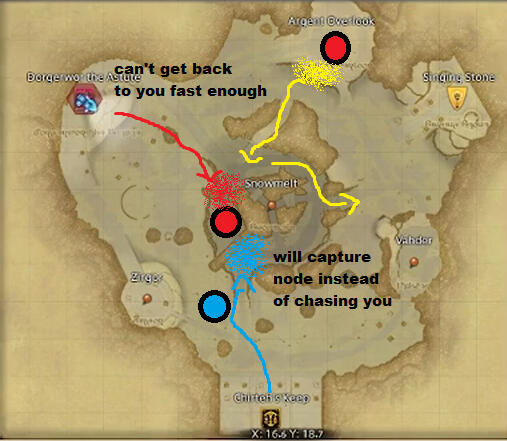
Blue extends into Yellow
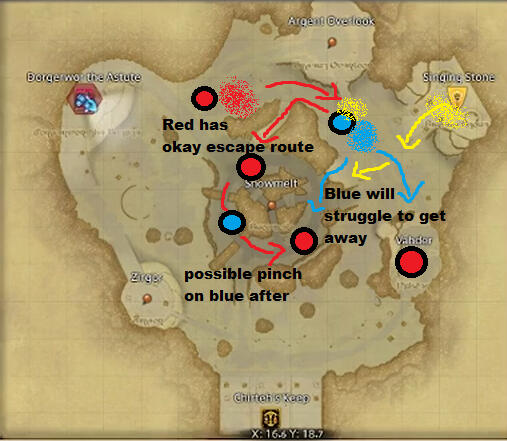
So, if you are going to pinch, pinch when you can safely get away.
Team States:
Engaged
When you are "Engaged," you are actively in conflict with another team or positioning yourself to be in conflict with another team.While in this state, you should be gaining points and battle high, but you are risking losing those points if you lose the fight.And regardless of how well you are doing, you are rarely outpacing the "Farming" team in point acquisition -You want to be in this state when you have resources like Dancer LB, or to contest 1st place, so they don't get in a larger lead.
Farming
When not in conflict, you are in the "Farming State, as in node farming.While in this state, you are gaining points at an accelerated rate and aren't in much danger because the enemies are fighting each other.The main issue with this state is that you are not gaining Battle High... which is not a problem if you already have it.You want to be in this state as much as you can when you don't have resources like Dancer LB, or you have a significant lead, or you are at a significant deficiet.It's also more reasonable to spread out during this state to capture nodes faster, as the faster you capture the nodes, the faster new ones appear, leading to an even larger point gain if the enemies continue fighting.
End Game:
The End Game of Triumph is a game of chicken.Due to the nature of aurora and the distance needed to contest nodes, any action you take can (and will be heavily punished.During this time, engaging in a fight will give the "farming team anywhere from 300 to 500 points. It is that significant.Thus, when choosing to go for a node, you must be very careful that you either capture it uncontested, or can end whatever battle happens there immediately.If you can't do these things, and the enemy does not win off the node, it is better to simply give up that objective.You must wait until your hand is forced by enemy score, or you have a good chance of winning the match when making an endgame play.Once you capture the game-winning node, you should quickly retreat so the enemies cannot close in on you and steal it back.Unlike other modes, you can return to spawn and regain invincibility on foot. If you don't need to fight, simply go back to spawn and watch the enemies helplessly chase you.
Tactics
This section is about various stratagems and theories surrounding Frontline. They tend to be more useful when acting as a commander, but being aware of them can help the average player as well.-
These are not listed in any particular order.
Types of Games:
There are 4~ types of games. Most of this guide has assumed that all teams are of equal strength... This is usually not the case. The way you go about the game is different depending on how many strong teams there are, and if your team is one of them.
Unga Bunga Game - When all three teams are running around like headless chickens and power is pretty low, your chances of winning aren't really in your hands... It's more or less random. The best choice you have in this situation is to start commanding and getting your team into better fighting condition. If that doesn't increase your kill power enough, it's better to aim for objectives and minimize deaths. You'll have to focus on more "fights," which is never ideal, but as long as your positioning isn't poor, you'll eventually come out on top.
Single Team Stomp - One strong team should mean an easy win, but this isn't always the case. RNG still plays a role, or one team could decide to throw against the strong team out of spite. The strong team should make sure not to get pinched, as they'll probably be first. Make use of strong positioning to avoid 2v1s. If you're one of the weaker teams, try not to engage the strong team without the 3rd to back you up. Try not to fight the other weak team unless they have a significant lead. It's important to work together, but you are trying to win too.
Two Commander Game - This is a rough one for everyone. It is somewhat of a who throws for who, but it can still be a full RNG match. To sum it up, you can't attack any team so that they're at such a disadvantage that they decide they'd rather help another team win. For the strong teams, it's all about restraint. Don't bully so hard and keep the scores close. For the weak team, it's all about getting what you can and not getting farmed. You just need to make sure the strong teams are fighting each other and not you.
Gentleman's Game - When all 3 teams are strong, fighting, even bursting, isn't a great choice. It's very hard to kill someone who knows what they're doing, at least without dying shortly after. A lot of what you need to do in these games is pressure, control space, and capitalize on mistakes. The stronger players are, the less useful fighting/bursting is as a means of points. Focus on winning objectives and punishing enemy aggression.
Pressure:
When the enemy teams are strong, even if you're strong, engaging is dangerous. When you're in this sort of situation, you don't necessarily want to attack but "pressure" the enemy. Close enough where if they move to a bad position or get attacked by the third team, you can swoop in and profit, but far enough away that you don't actually start a fight.
-
This Goldilocks distance is about 1 Shatter bridge apart, but it's better to be a little bit too far than a little bit too close.
-
The main use of pressure is to ensure a powerful team doesn't get to burst for free, but it can also be used as a means to get out of a King Maker position. If two teams are close to winning, they should be attacking each other. If you initiate an attack on either one, then the other one wins. Instead, you want to wait and see which of those two teams wins their fight and then attack the team that won. This allows you to gain the points from the team that won the initial fight. It'll end up with 1st and 2nd being in the same position as before, but you will be closer to them.
-
Beware doing this sort of thing as 1st or 2nd, since 3rd is under no obligation to hand you the game. I recommend that they don't.
Piggy Banking:
Sometimes... the enemy is very weak, beyond incompetent... sometimes they just don't have the jobs or the coordination to fight effectively. The JP community has their own phrase, but I have often referred to these teams as "Piggy Banks."They basically have no chance of winning. Any points they have are basically being stored in a piggy bank waiting to be smashed open.It is often good to let these weak teams (usually 3rd place) have free nodes and not bother them in the early and mid-game. Ticking off these teams may lead to an early lead, but unless your team can handle a 2v1 for the rest of the match, letting the other team attack and anger them is a smarter long-term play.Don't let them win, obviously... but letting it seem like they have a chance can keep them off your back while you're off building Battle High for the endgame stretch.
King Making:
Psychology plays a major role in all games. Remember that any team can lock in and have a chance of winning regardless of their current score, but it doesn't always feel that way, and teams will give up their chance to win for a chance to ensure another team loses, thus crowning the third team the winners.This is something you can make use of, but it's very difficult to do. It's far more likely to kick you in the butt, so under normal circumstances, you want to give the enemy a chance to win so they don't destroy yours.
Points Per Second (PPS):
One way to measure and weigh your actions is how many points you, your team, and the enemies are going to gain from it. It works on both a micro and macro scale. "Is hitting this enemy gaining me points?" "Is bursting here going to net the most points, or should we grab an objective instead?"One thought is that if you're earning points, even if it's a single point, if the enemies aren't earning any, then you win the game.Similarly, you don't need the highest "PPS" if you already have a lead; you just need enough to outpace whatever amount the other teams are having.Finally... You can have negative "PPS," so... 0 may not be ideal, but it is sure better than actively losing points.
Two Pronged Attack
Sometimes... you don't want to put all your eggs in one basket. In theory, it does not take a full 24 players to wipe an enemy team. The reality is that most of the work of a burst is done by the top 8 players of a team, with some scraps getting fed to the rest.This doesn't have to be the case, though. If your team is extremely strong and so is the enemy, you can send in a group to eat all the "BS" and group up the enemies, then send the rest of your team to clean up with the "true" burst. This requires even more coordination than we can currently output, so it remains a theory.
The High Ground
The High Ground offers many tactical advantages. It is a major factor in good positioning,it offers a good view of the enemy forces while obscuring yours, and most high ground areas have less entrances forces the enemy to funnel themselves.
Never underestimate the effects it has in an engagement, and don't push out of it needlessly.
Leave them with the Bag
Those familiar with stocks will be aware of this term. When engaging in a pinch or a 2v1, you want to be the first team to leave when the time is right. (I.E., after most of the enemies, or dead or 1st is no longer in a winning position.) By leaving at the right time, you leave the other team that was assisting you with "the bag" (former 1st place). This lets your team have a stronger position, be less likely to be pinched, and will be able to get a jump on the next objectives unabated.
Other Guides:
My previous guide, it still has some useful information and macros that are not in this version yet.
The bare essentials of PvP. If you like pretty pictures and simple directions, this is your place.
A well written guide with lots of good information and charts, (some used in this guide) It's good to have multiple perspectives, so make sure you read this if you're interested.
A guide focused on commanding in Frontlines using idioms from the "Art of War." Definitely a good read for any aspiring commanders.
A mondern guide with full alliance comps and in-depth strategies. A very good read.
Discord Links:
Catch all server for PvP in XIV. Go there for anything PvP.
A server that focuses mostly on PvP events and weekly que syncs. Very wholesome people here to play with.
My own discord for twitch fans. It's still new and growing, so feel free to hop in. Probably the best place to ask me directly.
Glossary
Baiting - Luring enemies into a bad position or force them to waste time.
Burst - The act of using pooled resources to attack an enemy team.
Burst Stoppers - Jobs that excel at locking down key targets to stop a burst from being effective.
CC - Crowd Control, actions/debuffs that hinder the control of your character.
Commander/Shot Caller - A player who tries to coordinate the team
Counter Burst - Retaliating during or shortly after an enemy team tries to burst your team with your own.
Effective Damage - damage that results in a kill or assist.
Feeder - a player who runs into the enemy team to die over and over.
Golfing - using knockback or pull-in moves to hit people off of ledges.
Guard Break - A job that can stop enemies from guarding or end their guard early.
Guard Crush - A debuff that does not remove guard but lessens its effect.
Helpless State - Any condition that takes complete control away from your character.
King Maker - a team that chooses 1 of the other teams to win.
Macro - A series of actions/chats that automatically execute.
Pinch - When two teams approach a third team from two opposite directions.
Pooling - saving resources to be used for later.
Premade - a group of 4 players coordinating together.
Rat - a player that tries to distrupt/harass your team.
Rouletter - a player who only plays one match a day. Sometimes derogatory.
Snapshot - a recorded state such as position, defensives, or other buffs that are used for calculations before an animation finishes.
Throwing - When a person or team takes actions that are disadvantageous to them winning the game.
Special Thanks to:
Korshtal - Map Graphics
Togame Rukino of Exodus - Point Charts and Map Objectives, Proofreading
Alhulari Crystal - Seal Rock Graphics
Mintrea - Proofreading
Masie Kyrou (Masietro) - Proofreading
FireAfrit - Proofreading
Chilla - Proofreading
Alhulari Crystal - Proofreading
About me:
I am Olivia. It feels weird to talk about myself, but I'm just your normal XIV player who has fallen in love with Frontline. 72 players in an open field, battling it out sings to my fantasy. Becoming a commander has only improved my experience.I've written this guide in hopes that people can see what I see in the mode. An extremely deep experience ripe for optimization with personal improvement and team synergy.
Credentials:
Then:
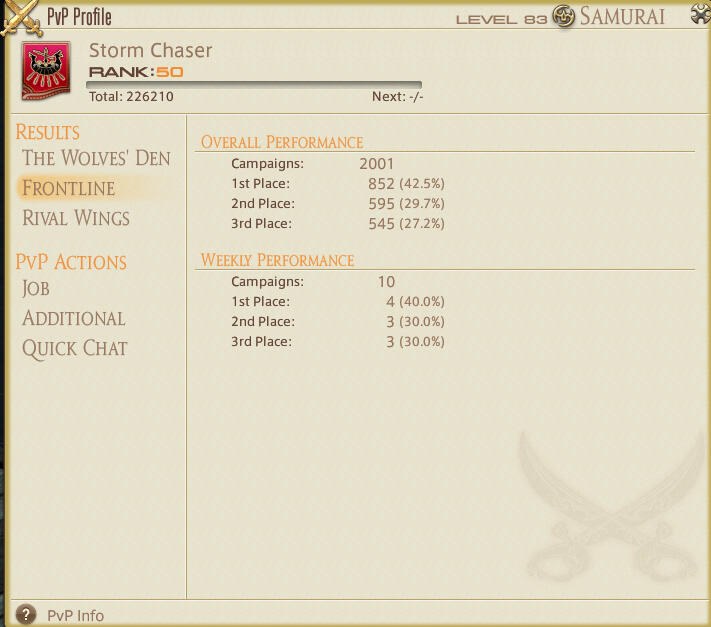
Now:
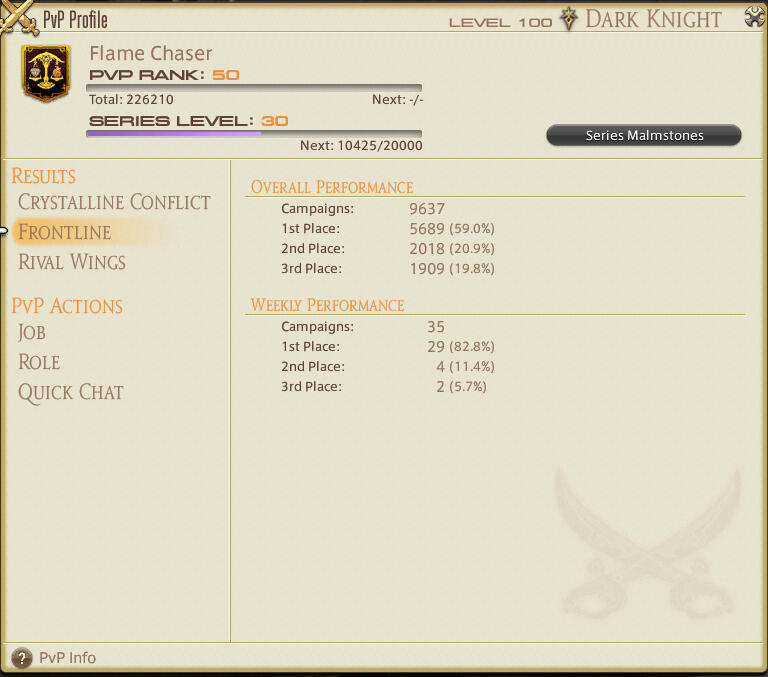
A picture with me in it:
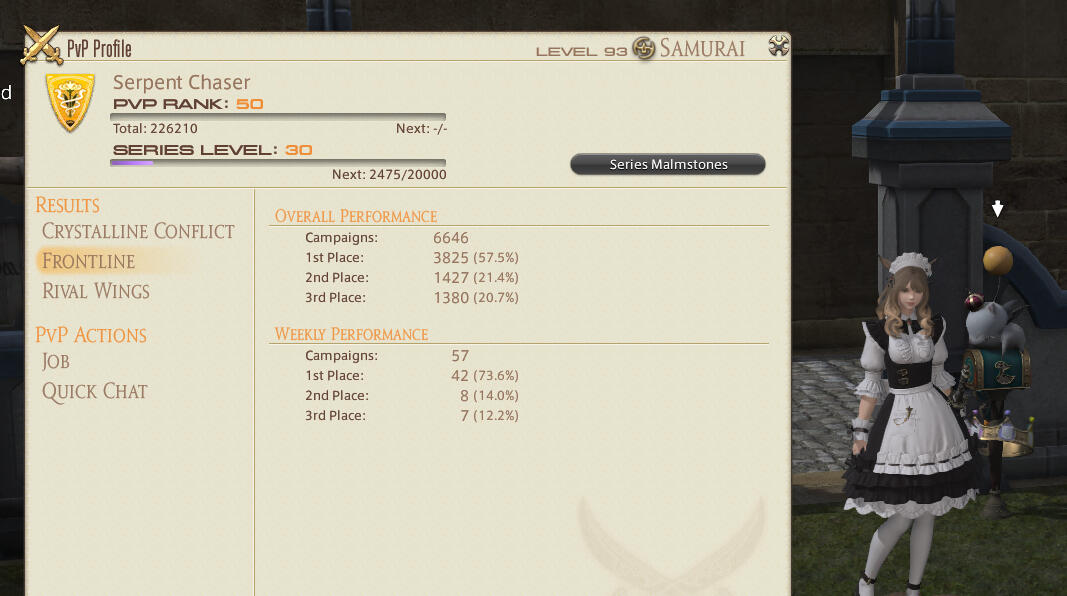
When Shatter got the map rework:
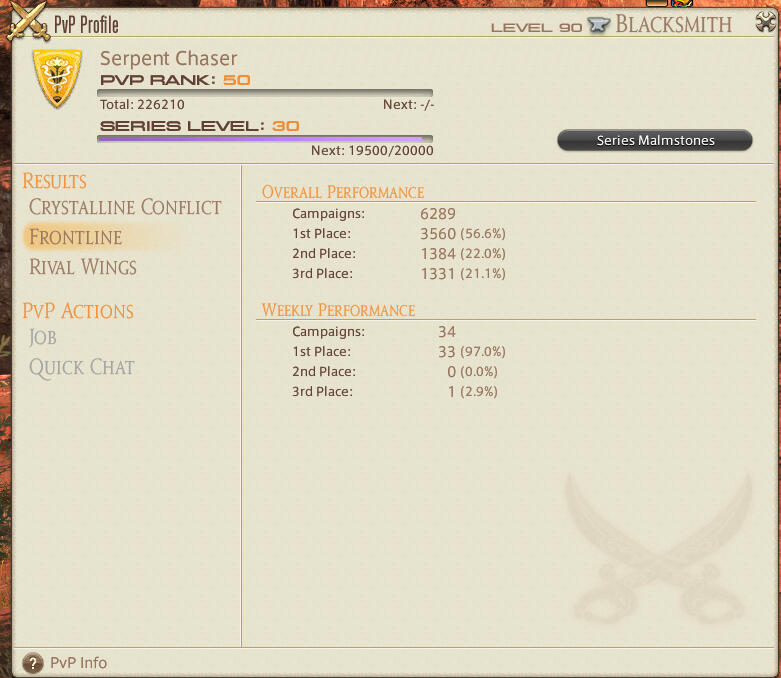
Pulling:
Dark Knight continues to be a staple in coordinated play thanks to its "Salted Earth" ability. Ensuring that this ability is used correctly should be your first priority in this role. Too often I see Dark Knights only pulling 1 to 2 enemies and wasting their potential. This section will take a look at how to get the most out of your most important ability.
Official ability description:
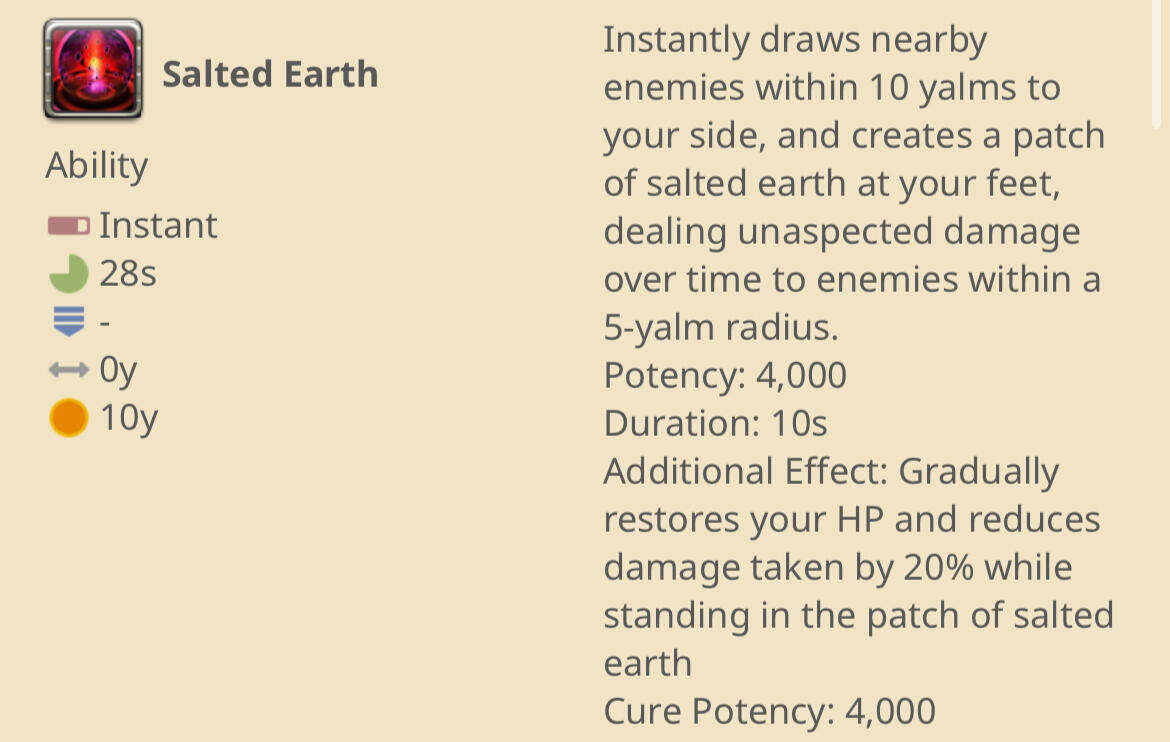
So, you have a 5 yalm salt circle, then you have a 2.5 yalm pull in effect surrounding all sides of it. The best way to visualize it would be to press "Salted Earth," then stand on the edge of your circle and press "Impalement." The edge of your impalement is the max range of your pull effect. The enemies' end location will also be the side of the "Impalement" inside the circle as well.
Impalement Demonstration:

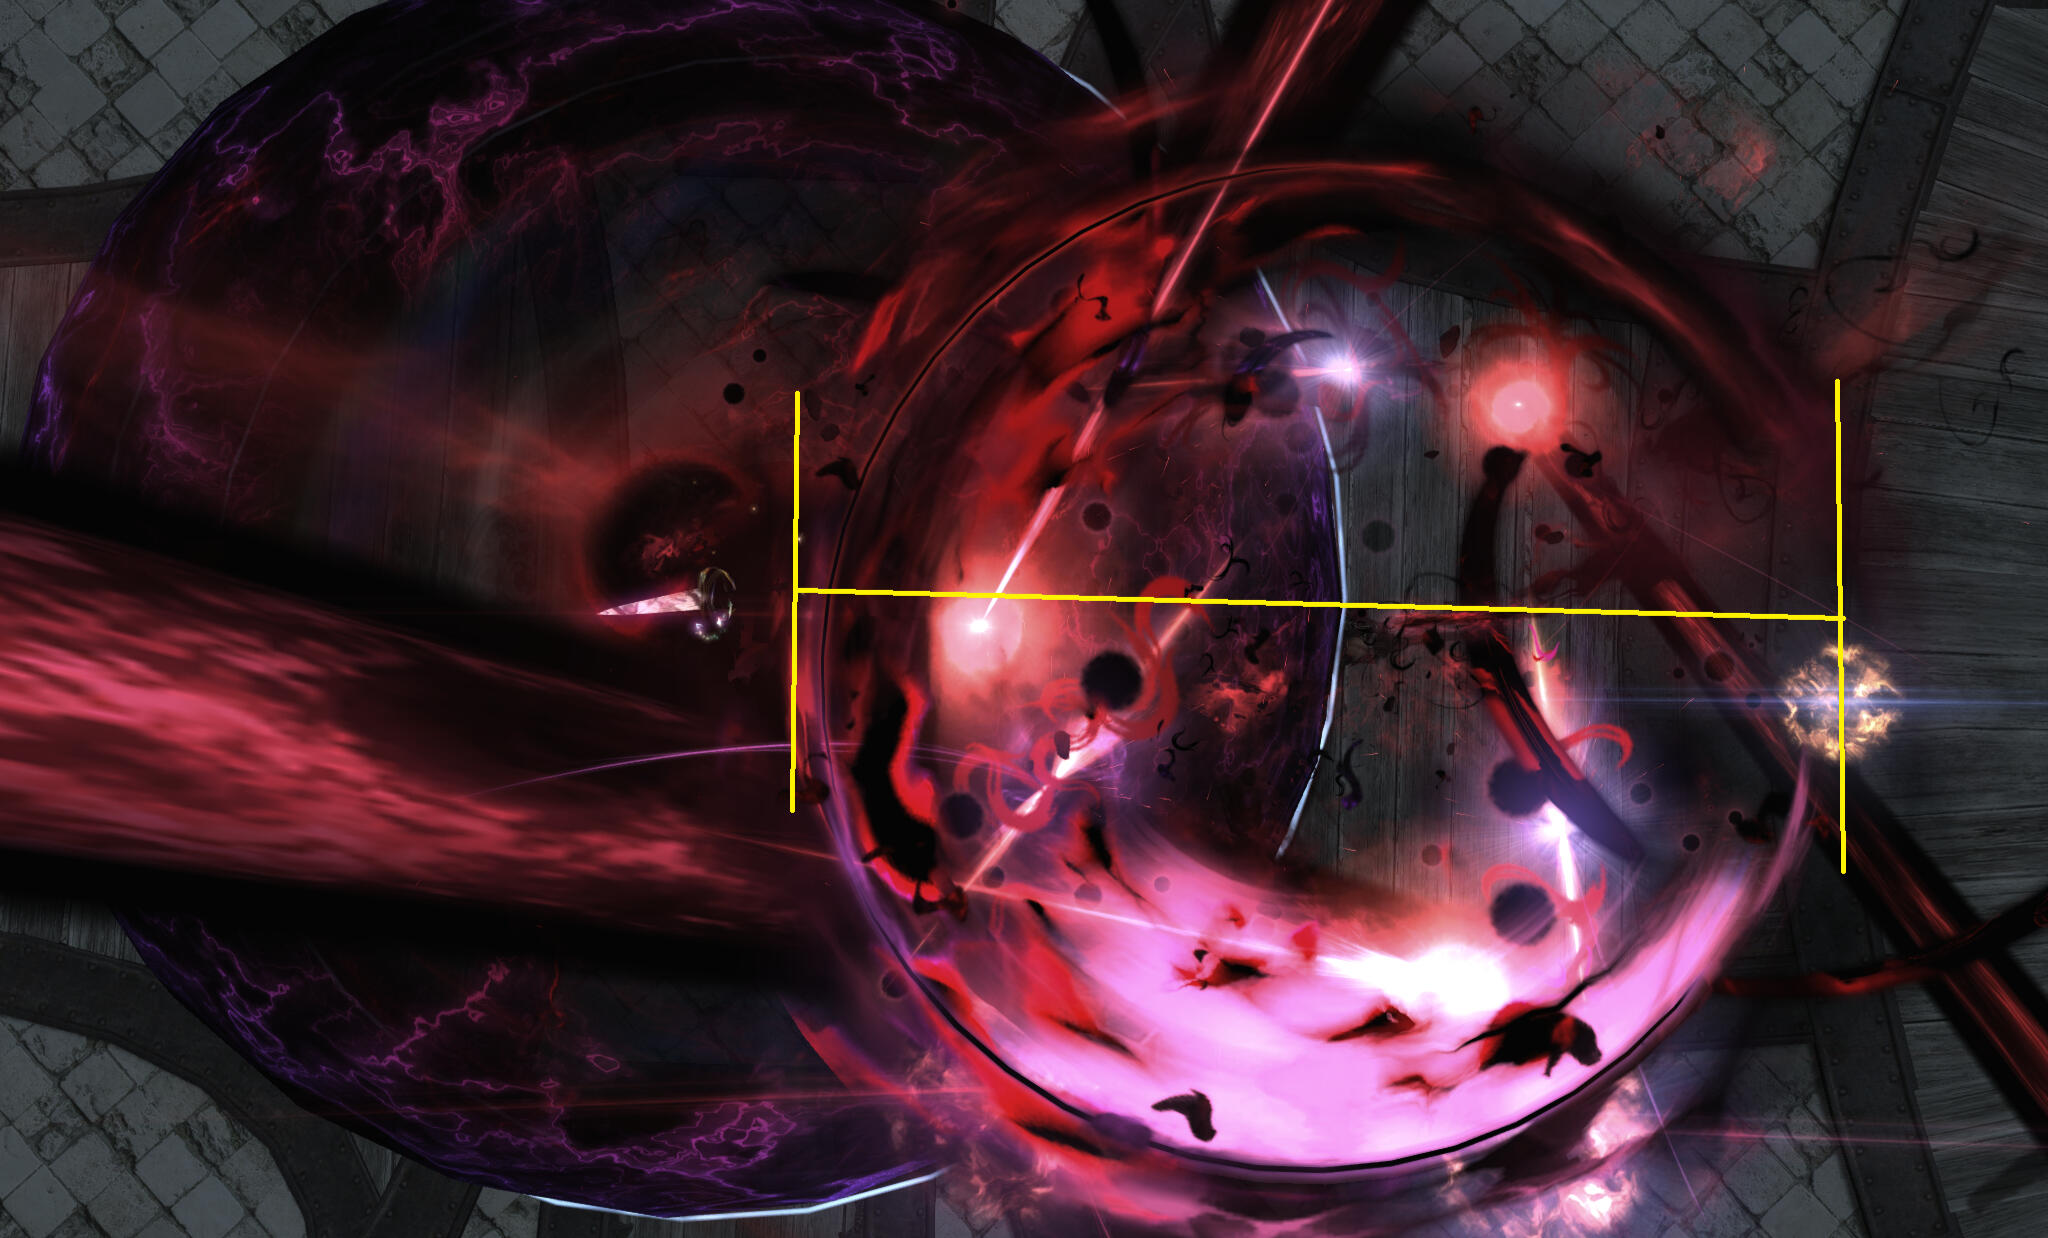
Rough Distance Estimation:

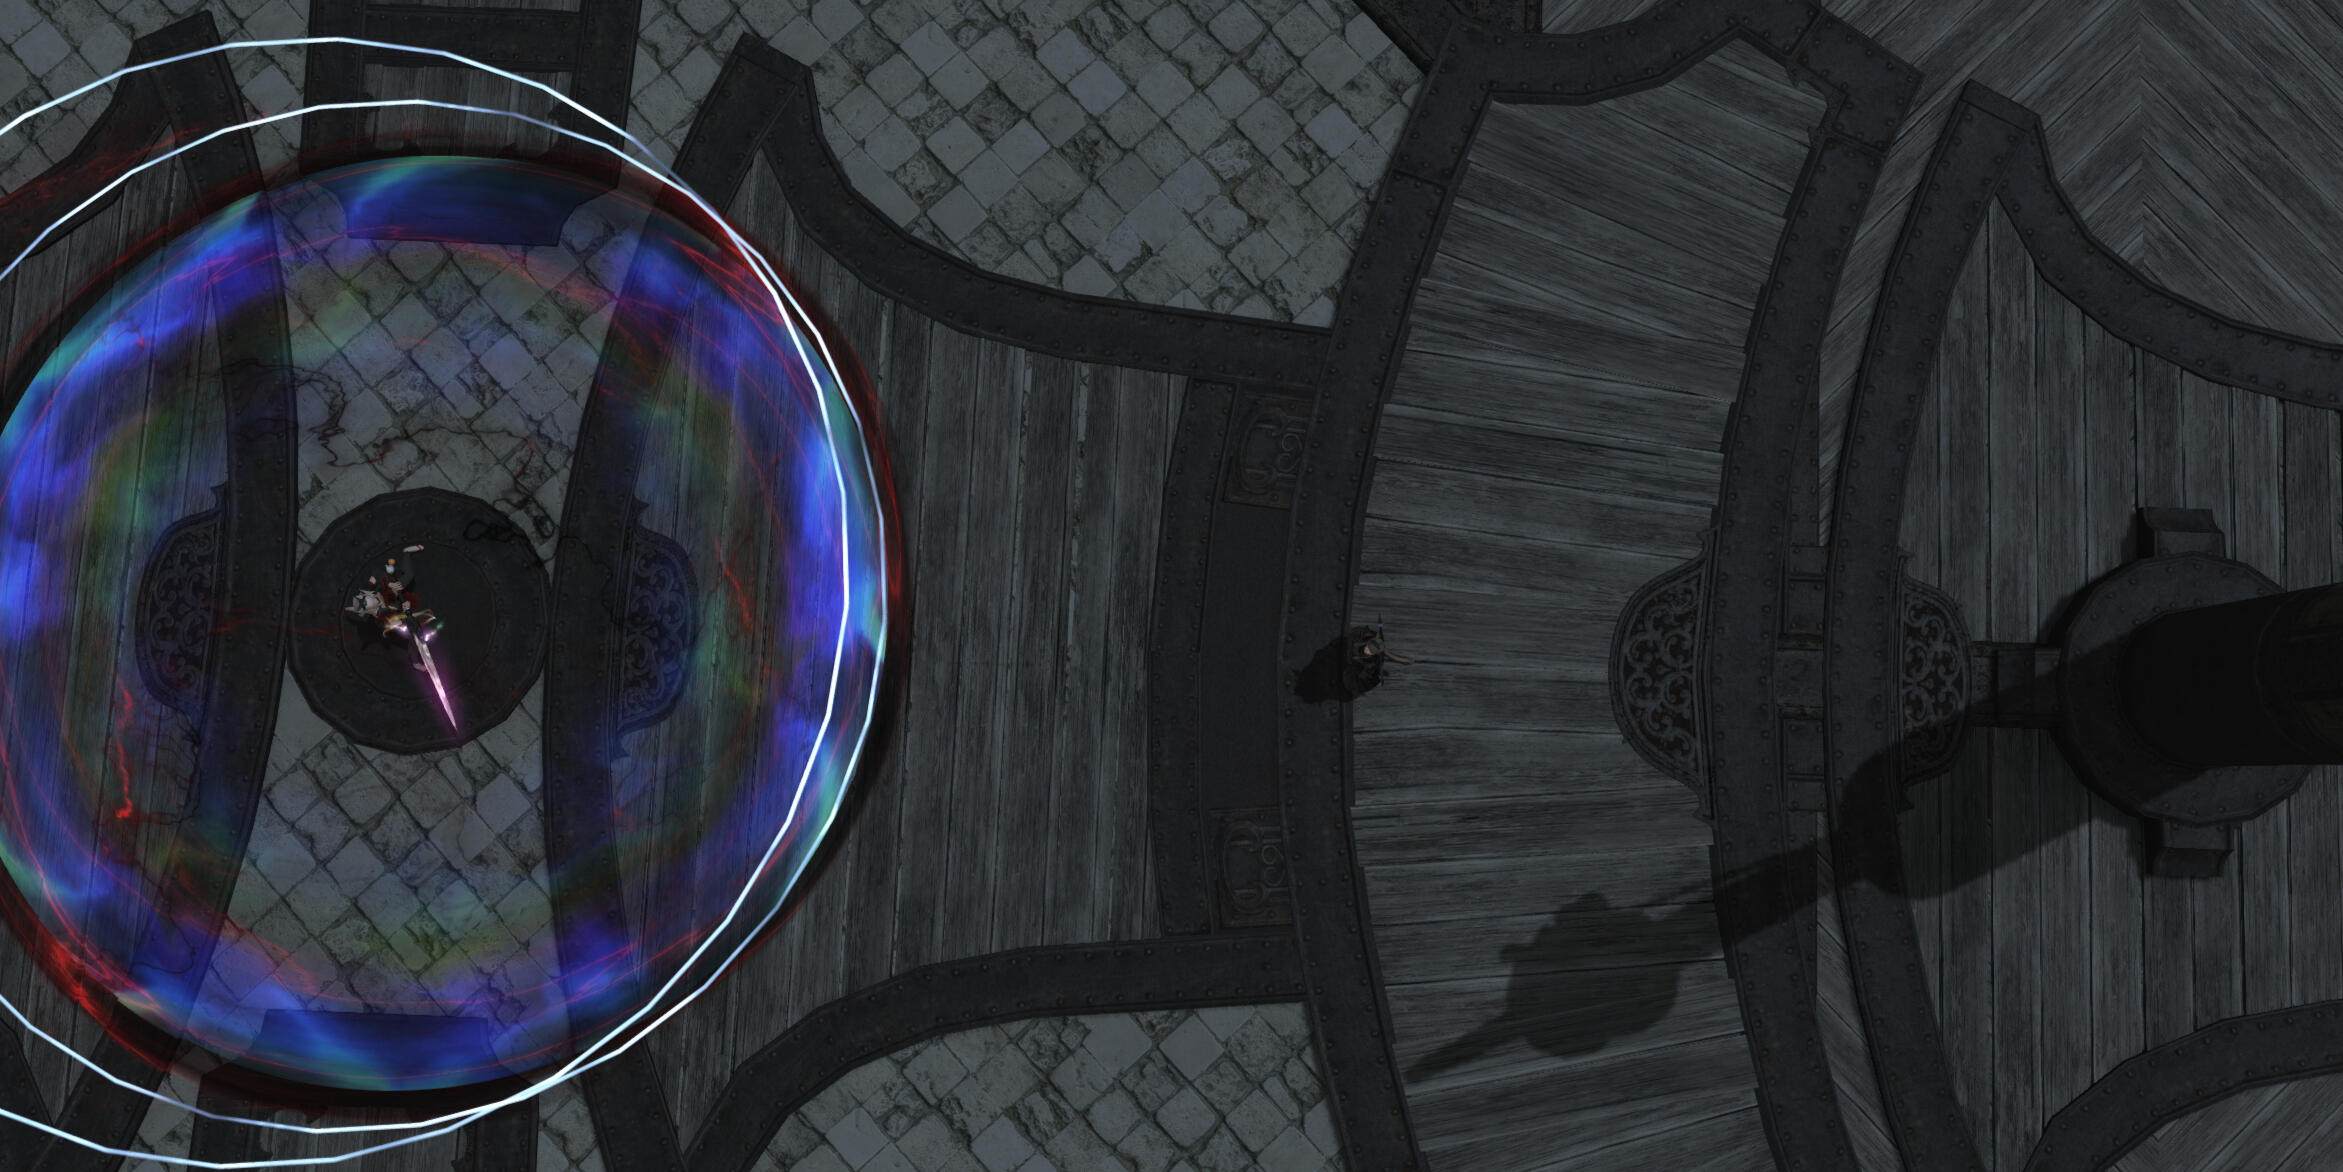
Rough Radius:
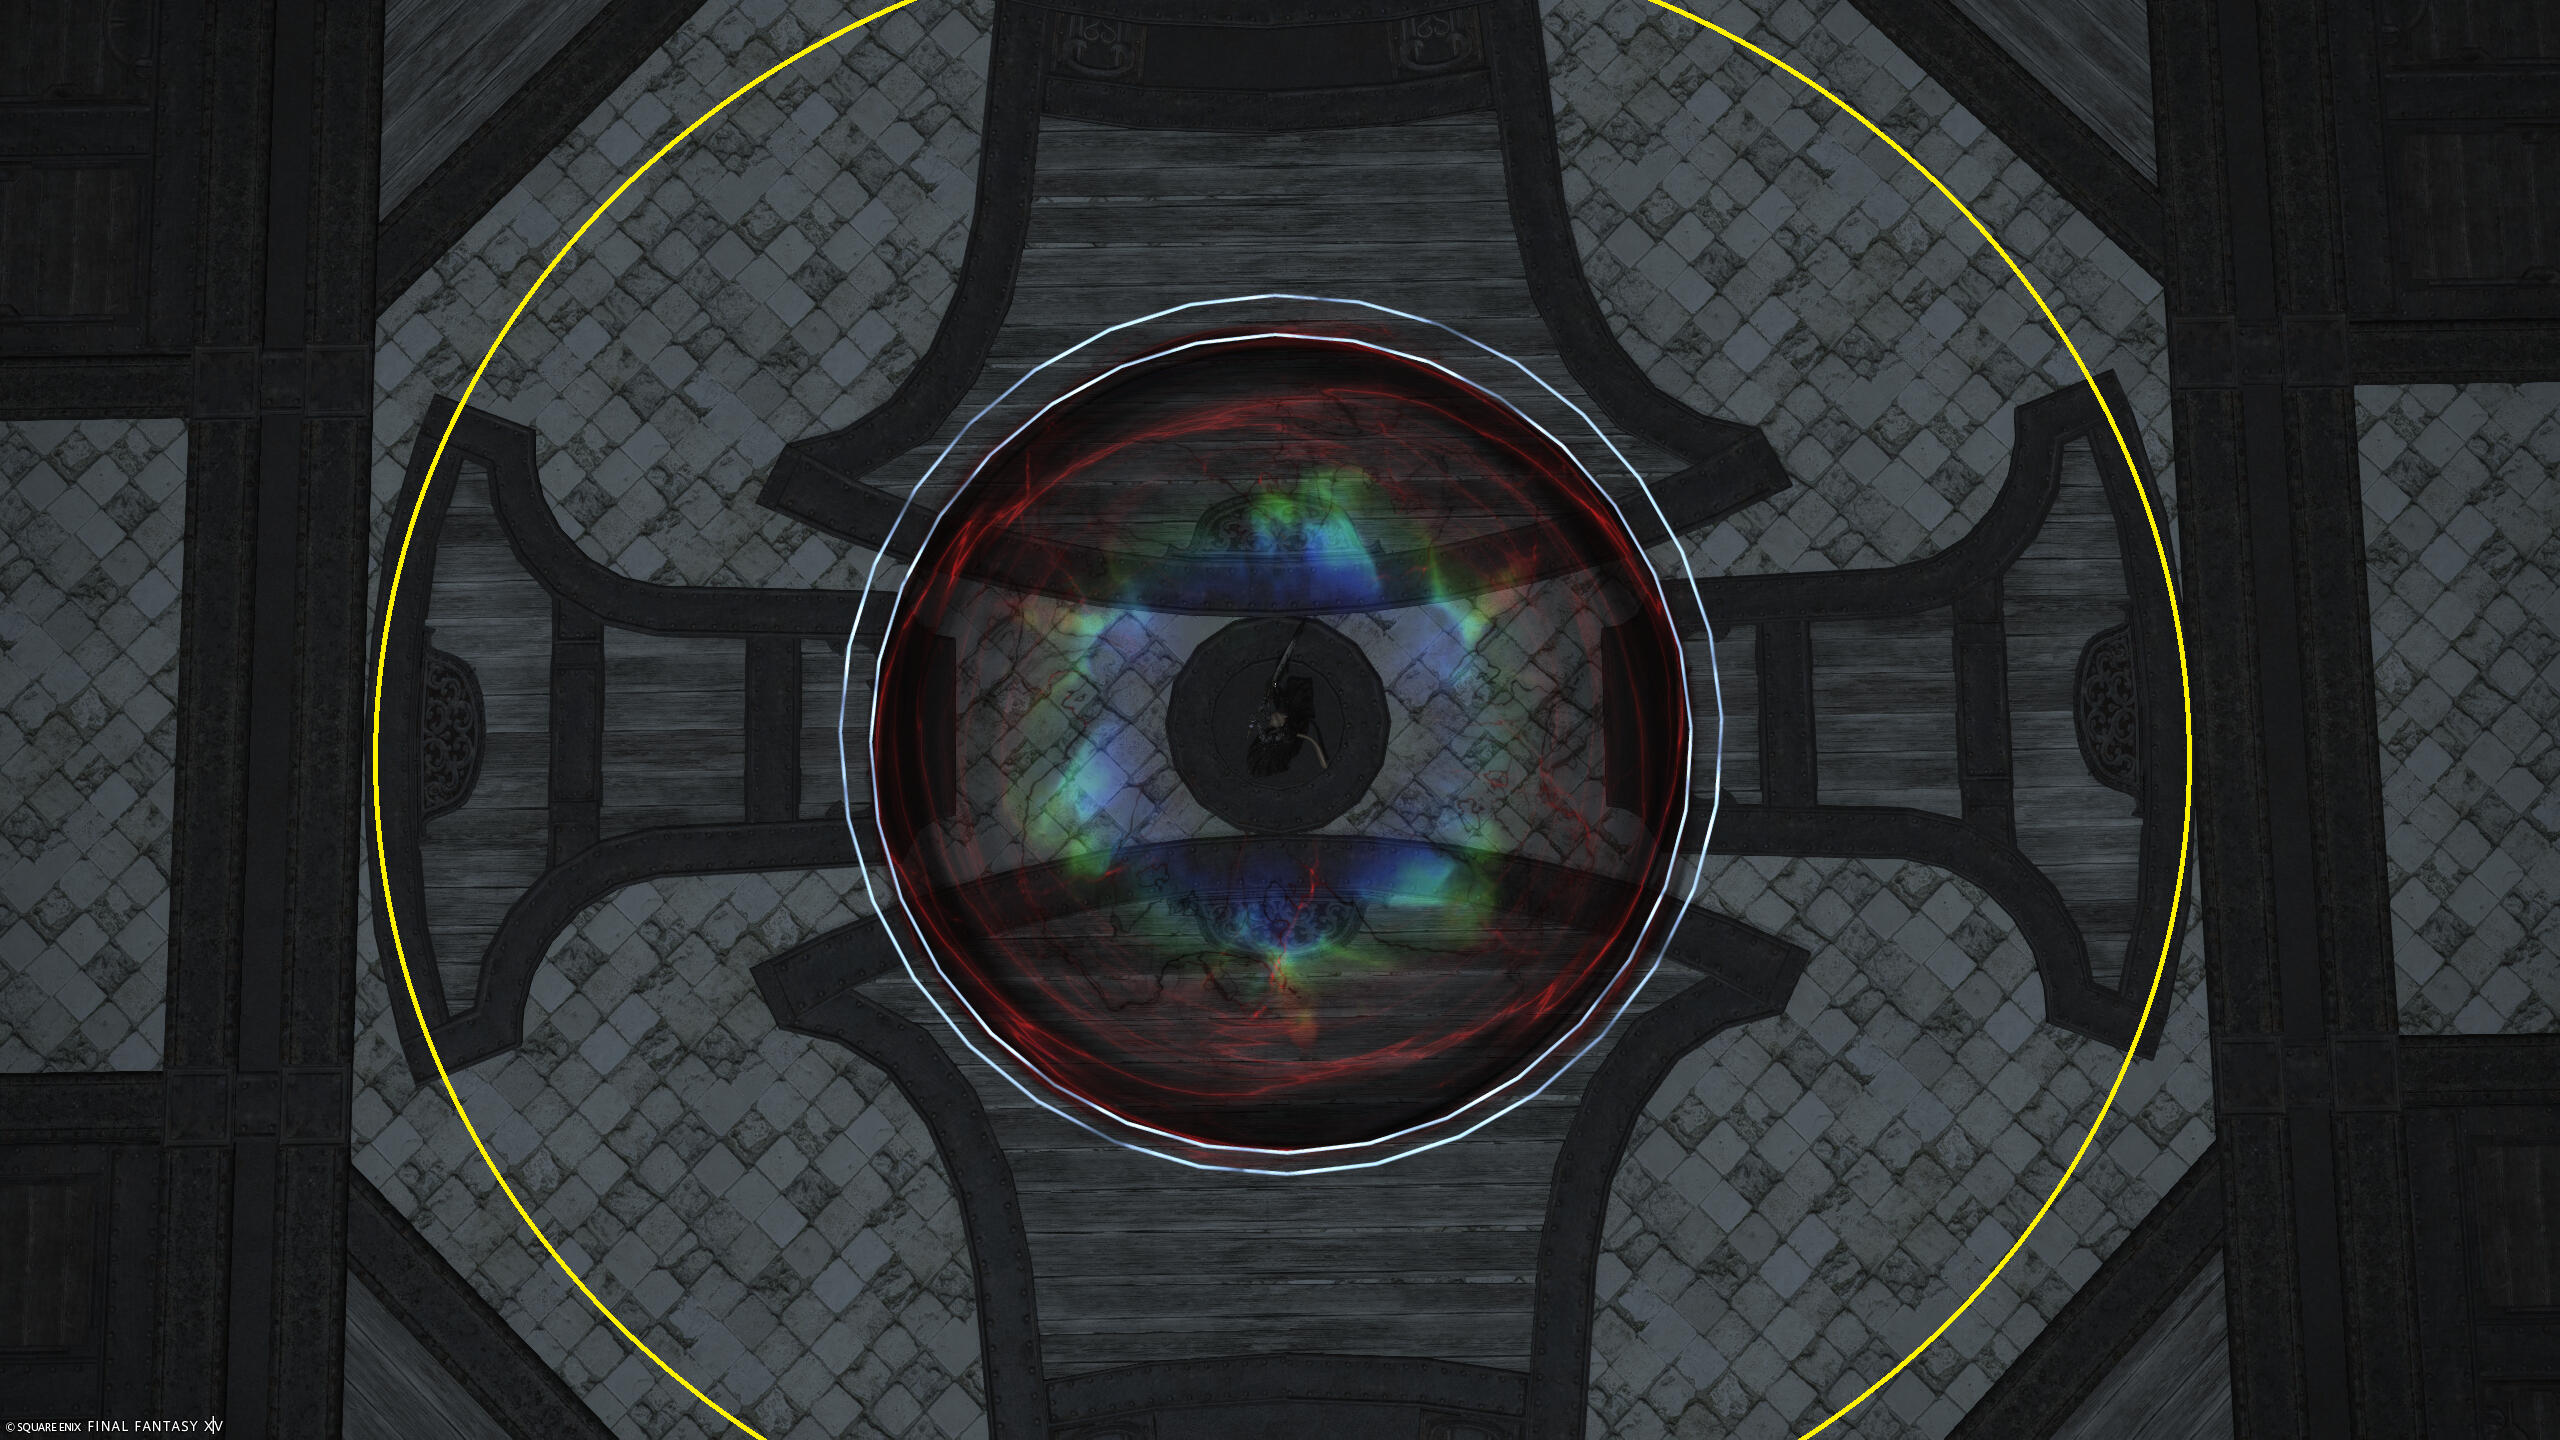
While this is the max distance people can be affected, once you factor in latency, movement, purify, and spaghetti code, the actual range is a little smaller. That is to say... don't be surprised if a person that " should have been caught" doesn't, but also don't be surprised when a person that "was totally out of range" does.
How to do a good pull:
1. Dive Deep
Getting only the front of the enemy team isn't going to help. The backline can easily cover and aren't being hindered by your pull-in anyway. The best pulls are usually the ones that dive past the front-line onto the juicy range jobs. Diving past the front-line will also usually get them to turn around and fight you, drawing them into your pull without any extra effort.Remember that your main source of damage is your team blasting every big damage attack have on your location. Use all your defenses and mobility to get to the right location, then run the hell away and survive!2. Lead Your Target
The changes to how hit detection in PVP function means that enemies have a chance to escape your grasp. Anticipate where the cluster of enemies will be, not where they are currently.This also means getting out ahead of the enemy. If they're heading towards their base funnel. You gotta get there first and salt them so they are faced with 2 terrible choices. 1. Run towards their spawn and get blasted in your pull, or 2. scatter around the map to be picked off after your pull.3. Enter at an AngleMany people struggle with targeting. That is mainly because they're trying to attack head-on. Targeting enemies, even with mouse and keyboard, is difficult when the enemies are in basically in a line right on top of each other.Try approaching at a slight angle, a full side view if you can. That way, you can clearly see the enemy formation and can tab left or right to find the perfect spot.4. Don't be Early... or Late
You must ensure that your team is with you when you plunge in. Too early, and the enemies get away and spread out, negating your pull. Too late, and your team will have already spent their heavy-hitting AOE moves.Pull right when your team is ready for it and not a second sooner, and not a second later.
Dealing with Burst Stopppers (BS):
In an ideal world, someone trying to interfere with your pull wouldn't matter because you have four or five other Dark Knights going in with you and covering you while you get beat up, and if they're getting in beat up, it's you who is getting in and getting the pull done.Sadly... we don't live in an ideal world, and more often than not, you're the only Dark Knight, and the pull lives and dies with you successfully getting in.So, how do we deal with "BS"? There's no catch-all solution. We'll go over some different things, but there's no substitute for experience.
Easy Mode
Get a Paladin to cover you. Now all those little "BS" attempts will fail. This, of course, relies on you having a good Paladin friend who's getting beat up in your place. This also comes at the opportunity cost of not covering your much frailer (and arguably more important) Dancer friend.Early Stun/Knockback CC
You're trying to plunge in, but monks and bards are shooting you away, or perhaps a Warrior is using their blota, or even an enemy Dark has positioned behind you and pulling you back for a counter-pull.Pretty much all of these means to pre-pop purify... meaning, press purify -> plunge -> Salt x2 -> Guard until Dancer LB goes off -> Attack and leave at your leisure.Early Monk LB
If a monk is using their LB on you before you plunge, then your pre-pop purify isn't going to be very useful... in fact, it is actively detrimental to getting in. Instead, try to get out ahead of your team and bait the LB while your team is catching up. Once the LB ends, pop purify to ignore the Monk Knock-back and proceed as above.If they knock you back, then LB, your action you should be aligned with your team and can either save purify for post Salt or pre-pop it should you suspect more incoming CC.Early Reaper/Dancer LB
If your team is eating a reaper or dancer LB, make sure you aren't getting singled out and sent into the enemy team defenseless while your team is getting sent away from you.The best option here is to watch your spacing and delay your pull until after the Reaper/Dancer LB ends. This could be a simple 3 or 10 seconds, or you could go in and do a "light" engage and save your LBs for the next engage, where the Reaper/Dancer won't have their LB.Depending on the strength of the enemy team, this may an enemy attack which is extremely dangerous. Be mindful of this, and it may be better to push past the LB and "BS" the enemy instead of an actual engage.Post Plunge CC
The most dangerous time to be CC'd since you should be in the middle of the team. Pre-pop purify still works here, but it can run out before you get the salt off. Most often, this will be a Plunge -> Purify -> Salt combo. This is usually fine since you want to adjust your footing after you plunge 99% of the time anyway.A monk LB post plunge is the most dangerous timing of the monk LB. Since you are helpless in the middle of the enemy team. Hope your Dancer is on point and gets it off while you're stunlocked, so you can get the Salt off afterwards.Post Plunge Dancer/Reaper LBThis is actually also a little dependent on how good the enemy team is. With luck, your Dancer/Reaper LBs are also going off at this time, so these become a scramble for which side can start recovering and adjust the fastest. It may be your backup Dancer pops their LB after, and you Salt as normal, or the pull may be over as the enemy gets away. You'll have to adjust and play by ear.Post Salt CC
Your job... is already done. Good work! If you can go back in and push out more damage, then great, if you need to dip and elixir, that's fine too!Pull right when your team is ready for it and not a second sooner, and not a second later.
Grid Theory:
In this section, we'll go to the grid and look at some example clusters of enemies and examine where to best place our salt for maximum effect.
Things you need to be considering our which way you should be attacking from, who should you plunge.For best practices, place your mouse or finger on the exact square.
Grid Representation of "Salted Earth":
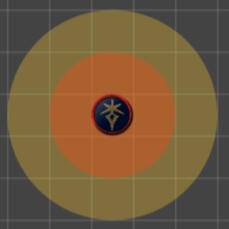
Scenario 1:
For our first example, we have this cluster of enemies. For our first test they're being a bit dumb and standing completely still. So who should we plunge to? Where should we stand to maximize the number of people our pull hits?

Solution 1:
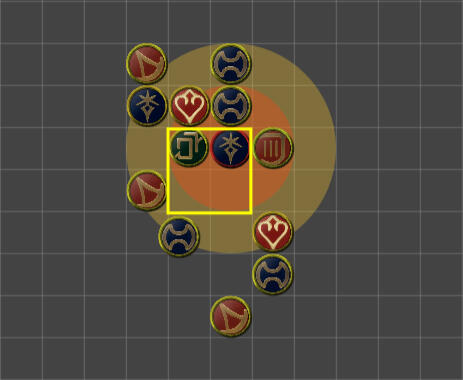
Scenario 2a:
With the changes to how effects and damage is applied to pvp. All players have time to "react" to the Salted Earth. They have a chance to get out of the radius if they're quick enough. You should always assume this will happen. So, assume this time that everyone will be running away from you when you jump in. At least 1 square. Where do you go then?

Bad Choice 2a:
same squares as before. Instead of the 9 you had before. You now only end up with 4 getting pulled. Every additional person in your pull is exponentially increasing your team's damage. Don't be slacking on this!
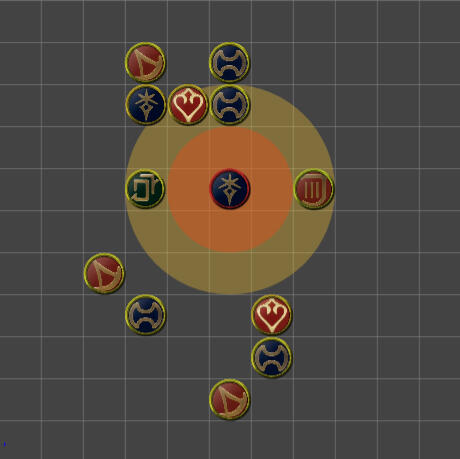
Solution 2a:
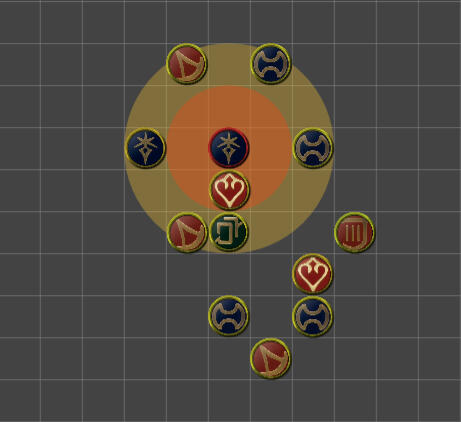
Scenario 2b:
That, of course, begs the question of where the 2nd dark should go? Assume you have a dancer who is using LB. In this situation, EVERYONE is getting stunned by it, so no one is going anywhere. The Dancer LB range is getting marked with the Blue Aura. Don't forget that the people are getting sucked by the first Dark Knight to!The below picture is what it would look like after the 1st dark suction.
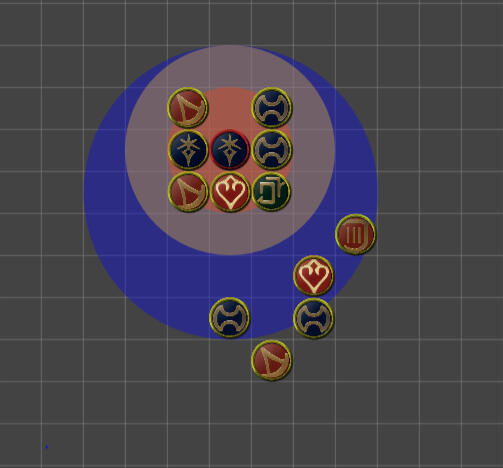
Solution 2b:
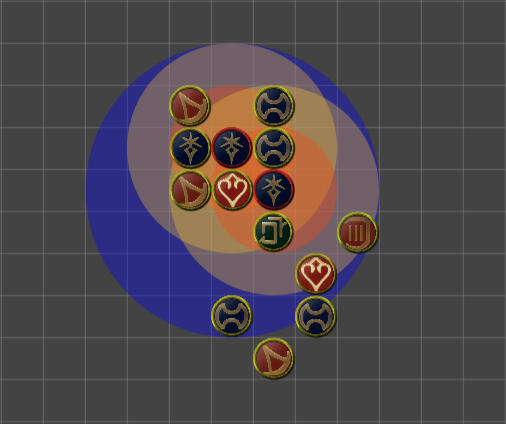
Scenario 3:
In this final example. The enemies are running South. They're not necessarily running away from you, but they are trying to get to a safer location. So when they're all moving South, where should you pull?

Solution 3:
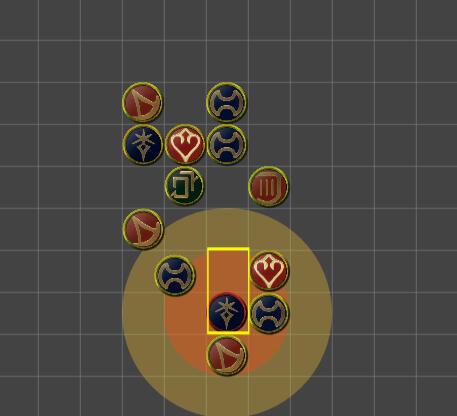
Clips:
Not to toot my own horn too much... I've been playing Dark for awhile and I know some people need more than graphs and pictures to understand. Here are some vods of Dark Pulls. Pay attention to the "good pull" concepts we went over above.
Pinches:
Pinching is a favored maneuver by all. A pinch occurs when two teams implicitly cooperate to trap a third, creating a deadly crossfire. When executed correctly, this usually results in a full team wipe for the pinched side and a massive swing in points and battle high.So how do you recognize and set up pinches?In lower skill matches, pinching is an excellent way to steamroll and capitalize on weaker teams’ positioning and awareness. In higher level games, however, pinching is not just effective. It becomes the primary way to burst and secure kills.
How to Pinch:
1. See two teams "fighting"
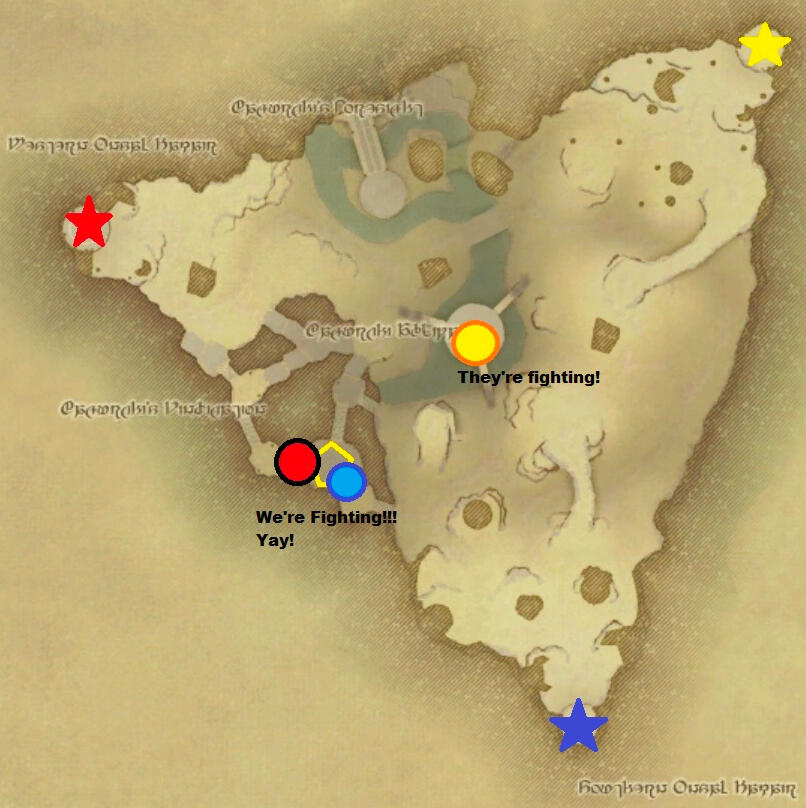
2. Select route that stops escapes
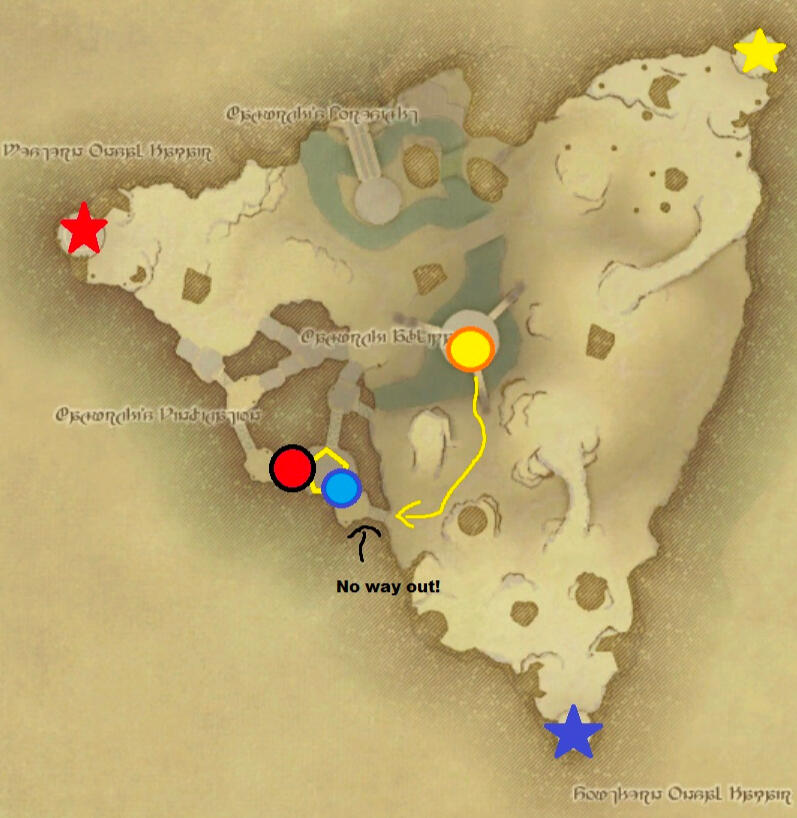
3. Burst!
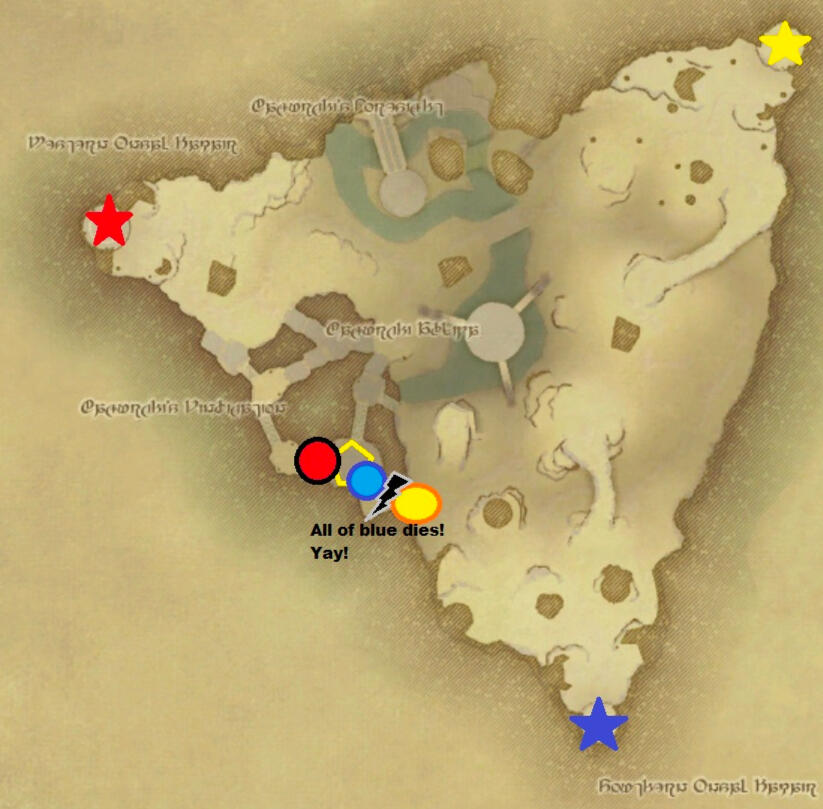
4. Leave
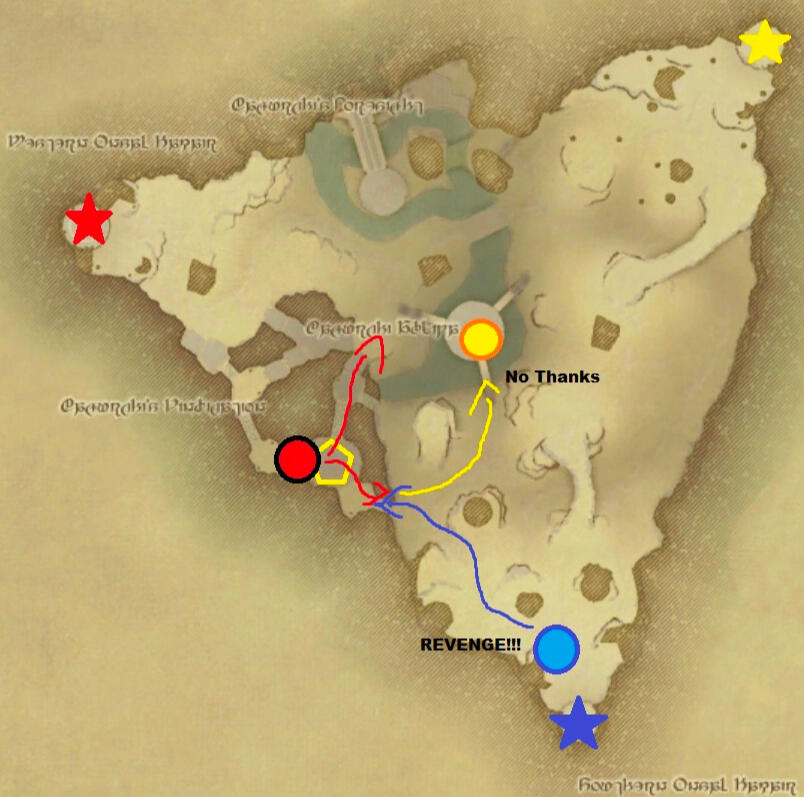
The team that arrives last usually benefits the most from a pinch, while the assisting team typically secures the objective that was being contested. Rarely do you want to engage the remaining team after a pinch. You have just bursted, you lack the firepower for another fight, and you are often left in a poor position.Disengaging allows you to reposition for a possible second pinch if the remaining teams collide again, rotate to newly spawning objectives, and avoid being bursted while your resources are depleted.
Recognizing Pinches:
1. Node CapturesIf the enemy isn't in combat, they won't appear on the map. That doesn't mean you can't figure out where they are. If you see a node captured by a team, that probably means that's where they're at or at least were at. You can actually use this to predict their path before this.
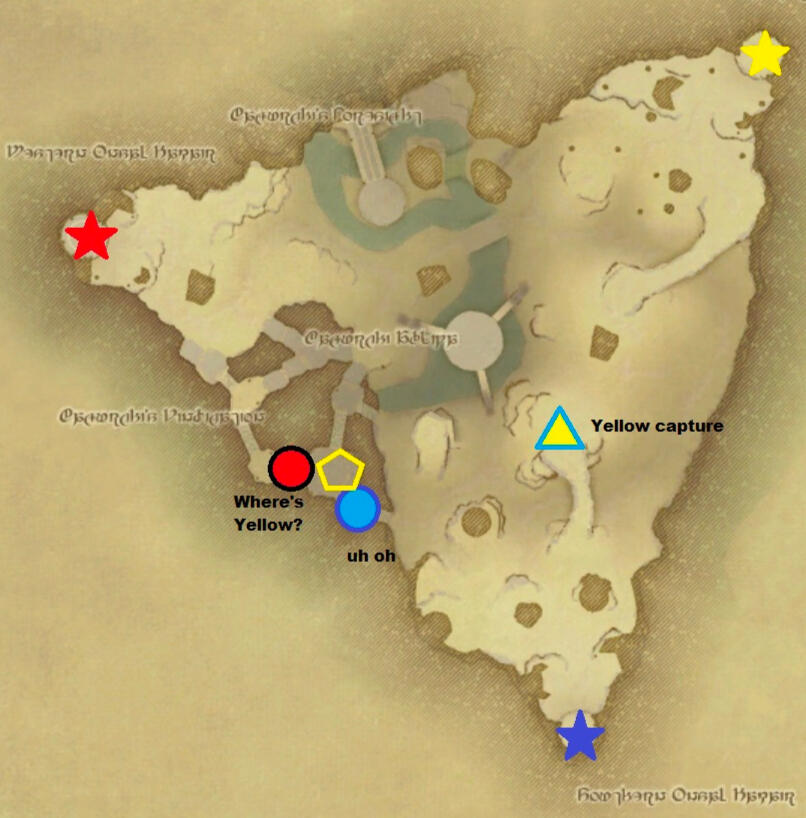
2. Node PathsBy looking at the way nodes spawn, you can predict where a team will go first and where they'll end up if they don't encounter any resistance. It's easier to recognize the paths and give up "trap" nodes instead of engaging an enemy to set yourself up for a pinch.
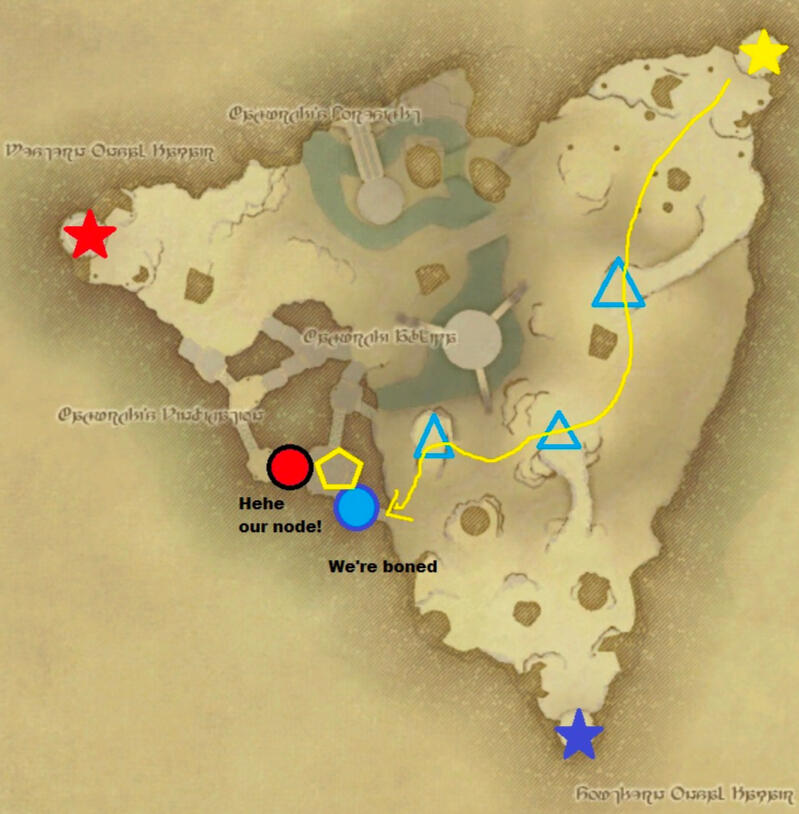
3. Stray Mavericks
One of the Mavericks' jobs in your team is to alert you of incoming attacks and to stall the main force. These brave players are sacrificing themselves to save their team, don't waste it!

4. Early Arrivals
The bane of coordinated groups. Enemies arriving early to an attack are just as much a signal as anything else. Let their impatience save your life.
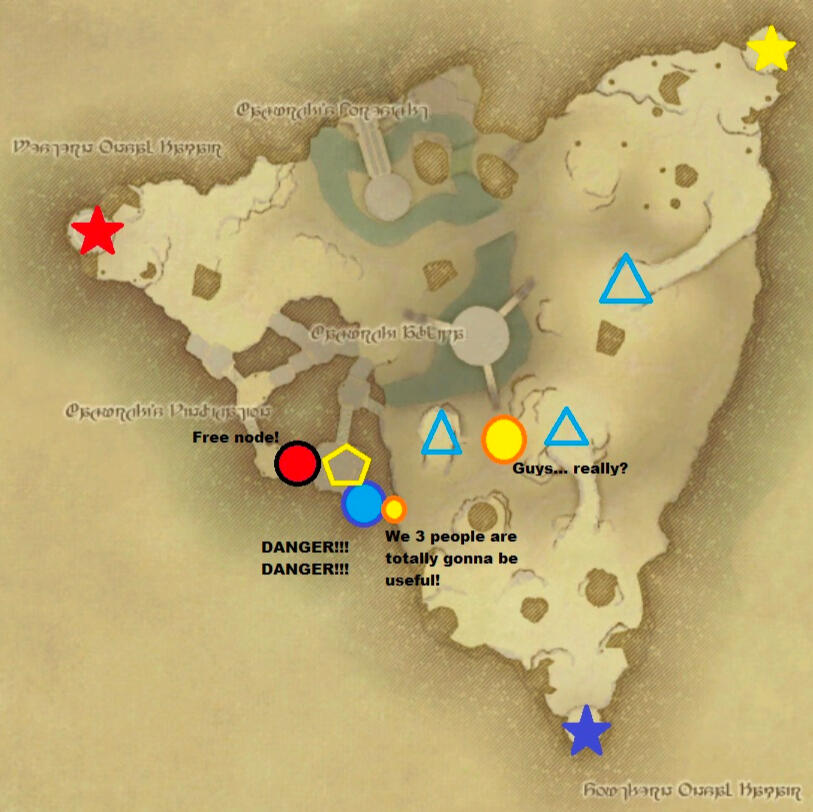
Keeping maps open, moving together, and falling back lets you avoid most pinches. One of these is easy, the other is mildly difficult, and the last is basically impossible without a good team. To avoid a pinch, never be pinned down for too long.
Prolonged fights with a team invite the 3rd to destroy you. The more you move, the less likely you are to get pinched. Should you get into a long battle, here are some signs that a pinch will occur. This is also why I suggest not chasing stragglers for very long after you burst. It’s not worth the risk.
Escaping Pinches:
These are not recommendations. These are band-aids to minimize losses after getting yourself into a bad situation.
1. Push Through
It’s not a pinch if the other team is dead. Go all in and shatter the enemy team you were fighting. While their forces are tattered, escape before the other can get to you.
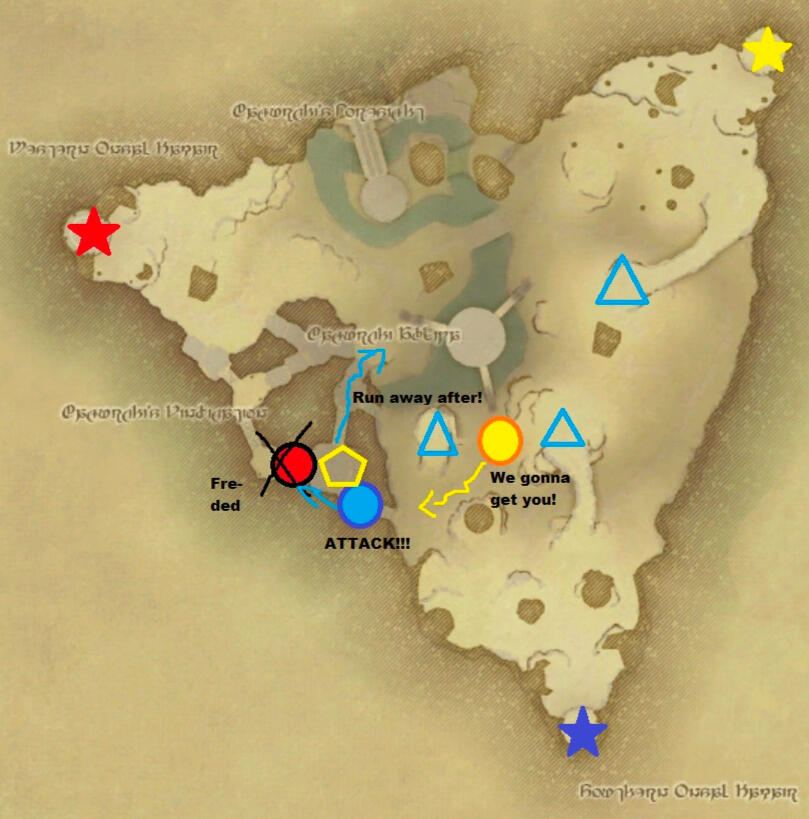
2. Bait and Switch!
Quickly fall back and make the other team the target in the process!
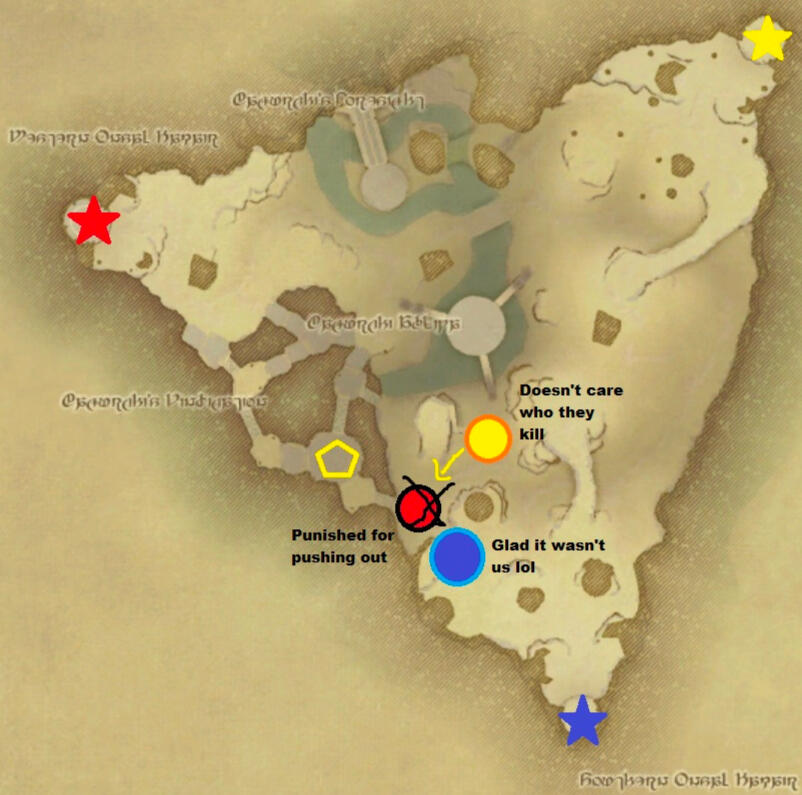
3. Rotate
Stay engaged with the enemy you're fighting, but change the angle of attack. Keep yourself safe by creating a "Triangle formation."
This can be good, as it doesn't mean giving up the objective you were at completely, and still have a chance of capturing it.

4. Return
If you have enough time, you can use the “Return” action to go back to base. Return has no CD, so it’s always an option if you find yourself far from home, and can be used to force the other 2 teams into each other as your team ports out.
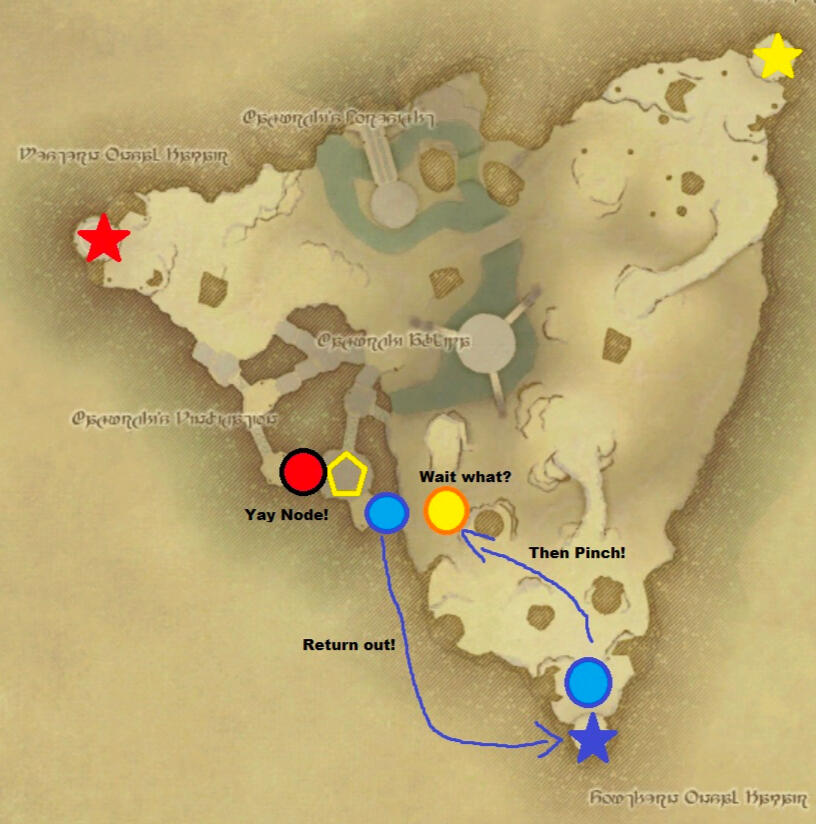
5. Die
Sometimes you have no choice. There may be no way out, but you can choose who to die to. Dying to 3rd place is far more preferable than dying to 1st. While it is a big loss, it is recoverable. This is usually the result of a failed "Push-Through" attack.

Macros:
Macors may have a bad reputation in PvE, but they are an absolute godsent in PvP. A multitude of high-level players have a plethora of macros for every situation, and I don't mean just for commanding, but also for targeting, ability use, and defensive measures.Learning and mastering macros will make you a much stronger player and give you additional tools to make the most out of any situation.
Making Macros:
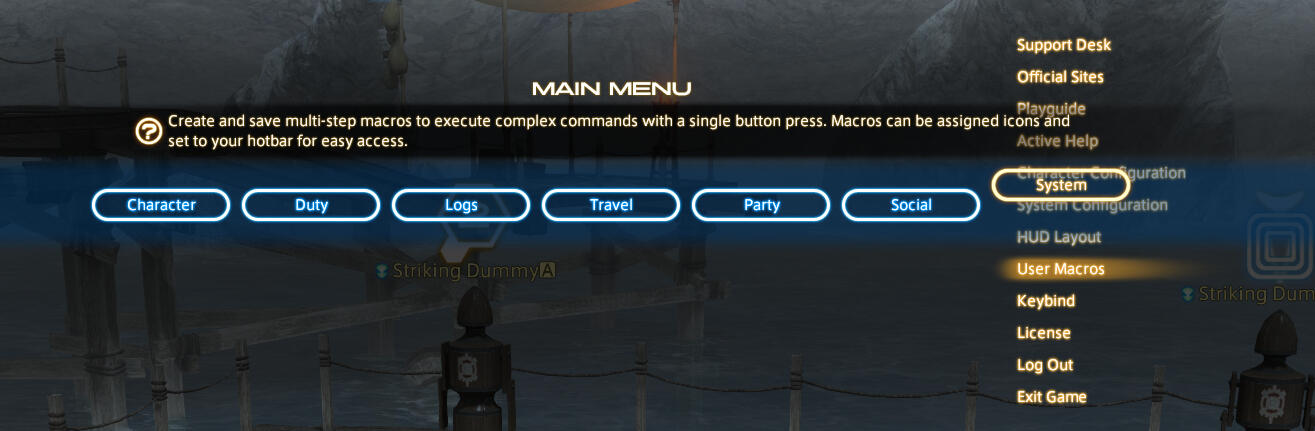
To make a macro, you'll have to go to the macro menu in the system tab.From there, you have the option between individual and shared macros.Individual macros are for your current character only.Shared Macros will appear on all your characters.
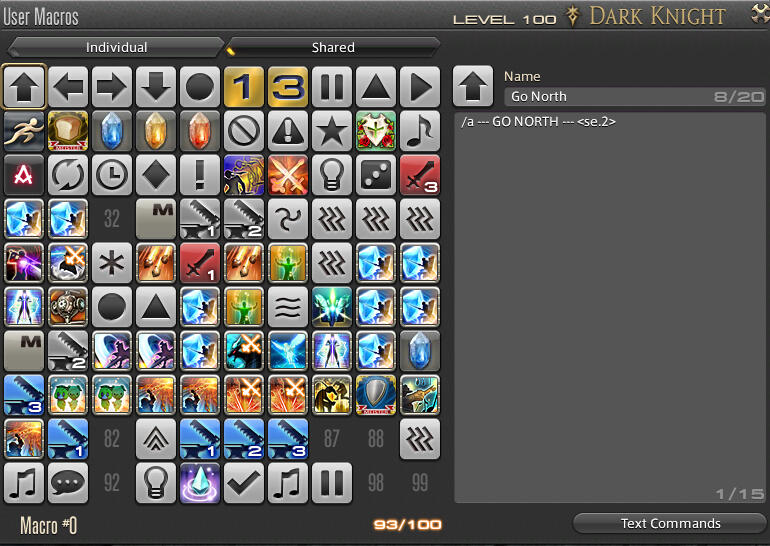
If you used both sections, that means you have 200 macros to work with.You won't need that many... probably, but it is a system most players don't use, so that gives you a lot of space to work with.You don't need every single macro listed in this section. Take what seems useful and leave the rest.
Macro Etiquette:
Unlike other skills. Macros cannot be queued up. That means, if you're early to pressing them, they will not go off if you are still unable to act.This can be very annoying, but you can circumvent this somewhat by repeating lines.A macro can have up to 15 lines, and the game will read one line per frame.So basically, you will have a 15-frame window for your macro to go off if you repeat the line, but only a 1-frame window if you don't.Finally, this only applies to Skills and Abilities!Don't use this on commands, or it will light up chat!I'm not going to write every line 15 times. Copy and paste shortcuts work just fine in XIV(These lines that should be copied multiple times will be underlined.)
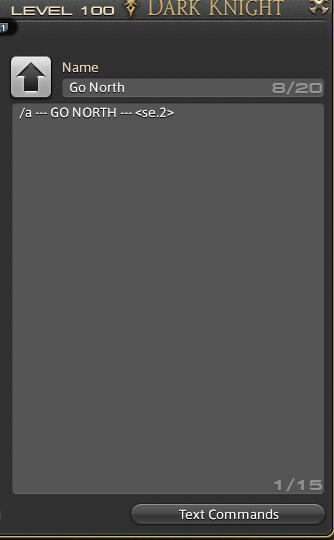
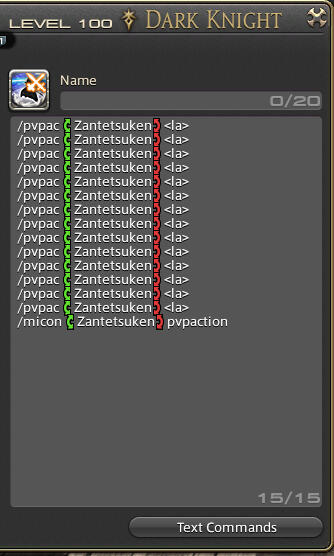
Auto Translate:
The game has a built-in repository of words and phrases that are automatically translated into other languages when used.The phrases are surrounded by green and red "( )."To access this feature, you can press "TAB."You can also start typing a word, then press "TAB" to change it to the auto translated version if it exist.By default, all skills exist in the repository.If you're playing in EU or JP. Switching your macros to use the auto-translated versions will probably benefit you.
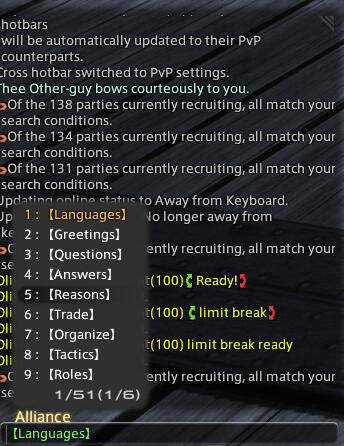
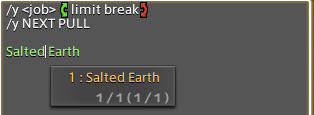
Command:
Using macros to command is the only real way to do it. Having pre-written phrases at the tap of a button will always be superior to typing by hand. Time spent typing is time not spent fighting or moving, and it adds up over the course of a match.To command effectively, you need a wide variety of options that fit your personal style. There is no single correct set, only tools that let you react quickly and communicate clearly.I have copied mine down below into different tiers so that you can slowly build your repertoire and expand it as needed.
Every commander will want something a little different, but we should all endeavor to use similar sound effects and phrases. This consistency allows the community to quickly attune to calls and, over time, recognize them without even needing to look at chat.
Sound Effect Key:
se.1 - Unused
se.2 - Direction and Movement
se.3 - Exclusively used for the start of a Burst Countdown
se.4 - Attack Commands
se.5 - Exclusively used for “Get Objective” macro
se.6 - Immediate Danger macro such as Enemy Burst or incoming Pinch
se.7 - Used for baiting enemies, repositioning with the intention to re-engage
se.8 - Used to call out which team you want to hit next
se.9 - Used exclusively for “Defend Objective” macro
se.10 - Micro Movements, ensuring team doesn’t push to far or put themselves into a bad position
se.11 - retreat or withdraw commands, also used for bad calls
se.12 - Exclusively used as the countdown for burst macro
se.13 - Preparation Macros, Hiding, elixaring, waiting
se.14 - Regrouping Macros
Waymarker:
This macro will put a "D" on top of your character. This is the basis of all calls. You can change the letter by changing the "D" in the line.
DO NOT PUT A SOUND EFFECT ON THIS!
Using any other macro will cancel your previous one, which means to get the marker back on you, you need to press this one again.
/waymark D <1> <wait.1>
/waymark D <1> <wait.1>
/waymark D <1> <wait.1>
/waymark D <1> <wait.1>
/waymark D <1> <wait.1>
/waymark D <1> <wait.1>
/waymark D <1> <wait.1>
/waymark D <1> <wait.1>
/waymark D <1> <wait.1>
/waymark D <1> <wait.1>
/waymark D <1> <wait.1>
/waymark D <1> <wait.1>
/waymark D <1> <wait.1>
/waymark D <1> <wait.1>
/waymark D <1> <wait.1>
Tier I Calls:
These are basic calls to get you started. They all fit on 1 crossbar, so it should be easy to remember where they are.
/a --- Please Follow --- <se.2>
/a --- GO NORTH --- <se.2>
/a --- GO WEST --- <se.2>
/a --- GO EAST --- <se.2>
/a --- GO SOUTH --- <se.2>
/a --- GO MID--- <se.2>
/a --- ATTACK NOW --- <se.4>
/a --- Prepare Attack--- <se.13>
/a --- RUN AWAY --- <se.11>
/a --- PINCH --- <se.6> <se.6>
/a --- TARGET BLUE --- <se.8>
/a --- TARGET YELLOW --- <se.8>
/a --- TARGET RED --- <se.8>
/a --- BAD CALL --- <se.11>
Big Attack:
/a ---THE TIME IS MEOW! ---
/a BurstCountdown <se.3> <wait.1>
/a 3 <se.12> <wait.1>
/waymark D <1>
/a 2 <se.12> <wait.1>
/waymark D <1>
/a 1 <se.12> <wait.1>
/waymark D <1>
/a KILL EVERY LAST ONE OF THEM <se.4>
Tier II Calls:
These are more situational calls to help your team understand your decisions more. Not used as often as the others, but still very useful, and you can incorporate these as needed.
/a --- Give Up Objective--- <se.6>
/a --- Get Objective --- <se.5>
/a --- Defend Objective --- <se.9>
/a --- Gather at 'A' ---- <se.14> <se.14>
/waymark A
/a --- Bait Enemy --- <se.7>
/a --- DON'T CHASE --- <se.11>
/a --- STAY HERE --- <se.7>
/a --- GOING AROUND --- <se.2>
/a --- HIDE --- <se.13>
/a -- LB CHECK? --- <se.13>
/a --- SCOOT BACK --- <se.10>
/a action Return <se.11>
/a Please don't attack.
General:
Macros make your life easier. Frontlines is a hectic gamemode, having to think, move, and target all at the same time is too much.Macros help alleviate that stress.This is not a comprehensive list, but it should have enough to get you started.You should be able to copy and paste these and they will work as intended.
Remove Error Mesage:
If your chat is going off with error messages that your macro isn't working, then type this line into chat:/merror offThat should solve it.
Mount Macro:
By going to the Button Configuration for controller. You can set R3 or L3 to individual macro #98 or #99.By making that macro your mount. You can quickly mount and dismount, and save some space on your hot bar.(You can change which mount you use by changing the name in the "-".)
/mount "Company Chocobo"
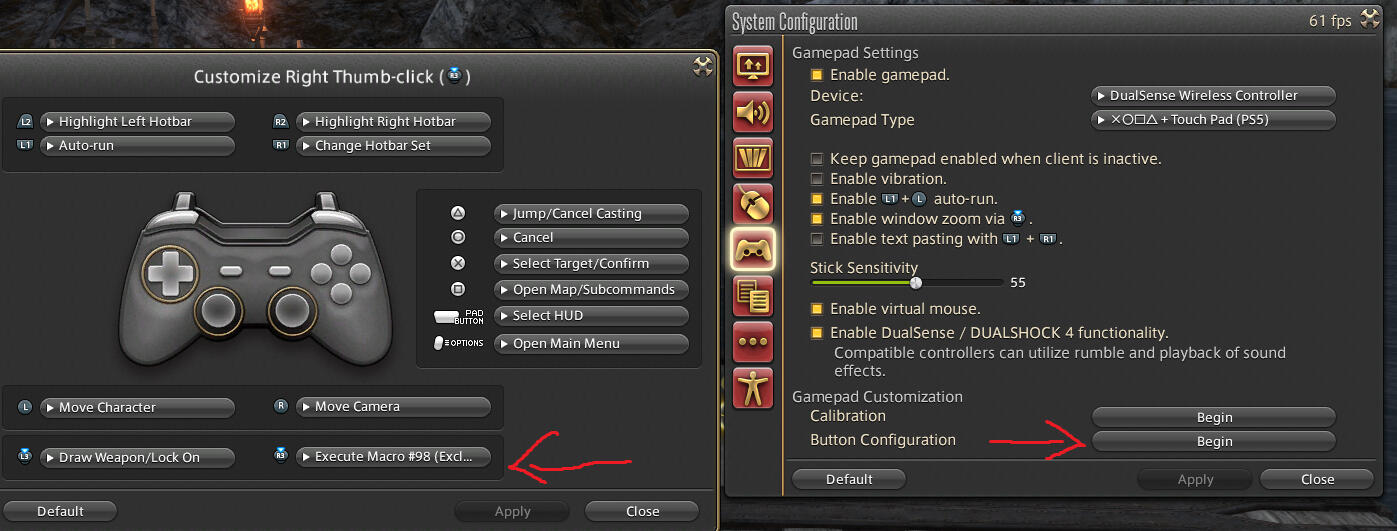
Limit Break Ready:
This macro will tell your team that your limit break is ready. Especially important for dancers, reapers, and warriors to have, but everyone benefits from knowing you have extra firepower for a pull.By default, I put this text in yell chat. This makes it visually distinct from commands and sections off the chat to make it easier to read.
/y <job> Limit Break Ready
Pinch:
A commander can't see everything. If you think you're savy enough, you should have a pinch macro on your bar, even if you do not have any other calls.This will save your team, and save your points.
/a --- PINCH --- <se.6>
Cloest Enemy:
This macro will target the closest enemy to you. You can combine it with other skills, or use it as is.
/target enemy
Party Targeting:
These macros help you target party members quick. You can use them with other lines to quickly throw skills onto your party members.
/target <1>
/target <2>
/target <3>
/target <4>
-etc
Symbol Targeting:
These macros make it easier to target allies and enemies that are marked with symbols.Marked players are usually high priority, so it's nice to have a button that can pick them out of a crowd.
/target <attack1>
/target <attack2>
/target <attack3>
/target <attack4>
-etc.
/target <bind1>
/target <bind2>
/target <bind3>
-
/target <stop1>
/traget <stop2>
-
/target <square>
/target <circle>
-etc.
Focus Targeting:
These macros make it easier to help (or hinder) your focus target.
/target <focus> (targets your focus target)
/assist <focus> (targets whoever your focus target is hitting/helping)
Job Macros:
These macros are job or role-specific
Tanks:


Cover Macro:
These macros allow you to quickly use your guardian ability on party members.Remember to copy down the /pvac part of the lines to fill up the page!
-
/pvpac "Guardian" <2>
/micon "Guardian" pvpaction
-
/pvpac "Guardian" <3>
/micon "Guardian" pvpaction
-
/pvpac "Guardian" <4>
/micon "Guardian" pvpaction
-
-etc.
-
/pvpac "Guardian" <focus>
/micon "Guardian" pvpaction
-
/pvpac "Guardian" <triangle>
/micon "Guardian" pvpaction


Bloata:
These macros ensure you can bloat the right targets effectively.You can also add the (/target) line after to continue to hit them after.Leave it out if you wish not to do that.
-
/pvpac "Blota" <bind1>
/target <bind1>
/macroicon "Blota" pvpaction
-
/pvpac "Blota" <bind2>
/target <bind2>
/macroicon "Blota" pvpaction
-
-etc
-
/pvpac "Blota" <attack1>
/target <attack1>
/macroicon "Blota" pvpaction-
/pvpac "Blota" <attack2>
/target <attack2>
/macroicon "Blota" pvpaction
-
-etc
-


Plunge:
Plunging to the right target is critical to geting a good pull. These can help you do that:
-
/target <attack1>
/pvpac "Plunge" <attack1>
/macroicon "Plunge" pvpaction
-
/target <bind1>
/pvpac "Plunge" <bind1>
/macroicon "Plunge" pvpaction
-
/assist <focus>
/pvpac "Plunge" <t>
/macroicon "Plunge" pvpaction
Salted Earth Timer:
This will send a message in chat showing how long until your next salted earth is ready. Very important for re-engaging enemies. Also, usually a sign a dark knight knows what they're doing.-
/y Salted Earth <recast.Salted Earth>
Additonals:
Additionals are extremely powerful abilities introduced in Patch 7.2 that can drastically impact a match when used correctly. This section breaks down each action row by row and outlines their general use cases.
Tanks:

Ramage is an absolute game changer for burst focused play. An alliance wide damage increase comparable to an Astrologian LB every other pull is massive. Enemies will melt when paired with a Dancer LB, Reaper LB, Warrior LB, or even raw burst damage.If you can use this, use it.

Damage across the board is much higher now. If you cannot safely use Rampage and survive, use this instead. It makes you nearly unkillable in most situations.

A niche ability. If there is a particularly strong enemy you need to either pull into your team or force away from it, this is the skill to use.
Healers:

This sucks. Don't use.
(Unless you're pocketing someone.)

A decently sized shield every pull for your party. If your group has frequent engages, this can be a solid pick. If they are mostly ranged, the other option is usually better.

A large area of effect attack with solid potency and a powerful debuff. This is the standard pick if you are not using Stoneskin.
Melee:

A general-purpose tool that increases both offense and defense. A solid pick for boosting your damage during pulls.

Another powerful defensive option that helps ensure you can either commit to an engagement or disengage safely. It is particularly useful for Reaper when setting up their LB.

A single-target execute that works especially well for Ninja and Monk. Useful for eliminating high-value targets or securing kills during a chase.
Physical Range:

A party-wide sprint and haste buff sounds strong on paper, but its application is hard to justify. It is always appreciated, though it is usually not the optimal choice.

Your go-to option. It increases both offense and defense with roughly 50% uptime. This is an excellent ability for every job, and it can also be applied to allies.

A strong choice that lets you kill confirm very consistently. It's better in solo or selfish play than bravery.
Casters:

Finicky to use, but it offers excellent damage over a wide area and can be used for area denial, something rarely seen in Frontline.Used incorrectly, it can be detrimental to your team by clearly telegraphing an incoming push.

Lowering enemy damage and healing every pull is a powerful tool. Consider this as a less versatile, but more consistent alternative to Comet.

A strong ability for taking out high priority targets, kill confirming, or licking ice.
Commanding:
Prelude:
“All you need is a small taste of success, and you’ll find it suits you.”
Being a leader is never easy. By taking up the role of shot-caller, you are asking your team to trust your judgment to bring them victory. There will be many who do not like being told what to do, who bemoan your presence, who will tell you “it’s not that deep”, “stop trying so hard”, or “your calls are stupid”. But there will also be many who cheer at the sight of you, who would follow you on the wildest of plays, and push till the very end.I will not say it is not hard or frustrating. It is, but becoming a commander has been the most fulfilling part of this game for me, and what keeps me subscribed long past when I would have quit. I hope I can share what knowledge I have accumulated so that you, too, can find the joy I see in the mode and help lay the groundwork for a thriving community of commanders.
Regardless, you should command.Commanders boast the highest win rates in the mode. A decent one can easily climb to 50%, while a great one can reach 70%. While there is a lot that can be done as a solo player, directing your team while maximizing your own performance is one of, if not the most engaging ways to play the game.This guide is built around the idea of maximizing your chances of winning. Understanding how this mode works means nothing if your team does not act on these concepts. You can be the person who brings order to the chaos. There are millions of players in this game. The chances of them stumbling upon this guide are very small, but you have. If you truly, truly are trying to win, then the onus is on you to step up.
And you should bring your friends.
As a commander, you are tasked with a lot. Your main job is to initiate attacks, but often your team lacks the proper tools to actually accomplish what is set out in this guide. You will almost always be lacking either the amount of suction your team can provide through Dark Knights and Sages, or the Guard Breaks that Dancer and Reaper provide. It is usually both. While you can ask and hope your team will switch jobs to cover these important roles, it is far more viable to simply bring three people willing to fill them every time.Similarly, partying up with three others means you have three people willing to follow you. Much of commanding is getting out ahead of the team and being the obvious target to follow. Most players realize they shouldn’t split up, so if you are in front of everyone moving in a direction, and three others are behind you, the most likely result is that the rest of the team will follow as well.Furthermore, if you have three more people seriously invested in winning, the success rate of your attacks drastically increases. There is nothing worse for a commander than calling an attack that ultimately gets everyone killed. Bringing friends you know will assist you in getting those attacks started leads to higher team morale and better cohesion, which in turn leads to stronger attacks for the duration of the game.Finally, having three others you can trust means more eyes to spot potential pinches, enemy attacks, node spawns, strong positions, and so forth. You can rely on your friends to confirm your thoughts and be more confident in your calls. There have been plenty of times when I’ve been bringing my team in for an attack, only for my fellow Dark Knight to notice an incoming pinch and save us from what could have been a disaster.
But be in the right mindsetNo one is obligated to follow your lead. You need to quickly earn your team’s trust and ensure you don’t lose it. It is very easy for a team to fall apart the moment things go wrong. When things don’t work out, in-fighting begins and the chat will light up with insults and doomium. Do not make it worse. Be a shining pillar of sportsmanship and play nice with your team. Call in your team’s best interest and keep morale high. You can express your disappointment and your dreams of victory, but there is no point arguing with people in chat or calling out underperforming players. Just don’t be a jerk. You can’t force the team to follow you, and being rude is only going to cause your team to check out and give up.This is very hard to do. Being able to keep a clear head as you watch people act against their own interest in infuratiing. I do not manage to keep my own words in check from time to time.Regradless, I find a lighter, softer touch is what is needed to bring them over to your side.
Earn their trustBuilding trust with your team is a persistent process that never truly stops. One of my reasons for making and advertising this guide is not only to inform others of how deep Frontline truly is, but also to have people recognize my name and trust in my calls. As a newbie shot-caller, you don’t have that same luxury, but I hope this illustrates the importance of trust. Don’t waste an opportunity to show your sincerity or to show off your skill.Name: Yup, your name plays a role. People are going to see it linked to every call, to the end-game scoreboard, to the CC charts, or even when passing by randomly in the overworld. Your name is going to gain fame, or infamy, as you continue your journey. While my own name can inspire my allies and strike fear in my enemies, my alts with zero notoriety do not do the same. Earlier, I mentioned that this game has millions of players, but that does not mean you are not going to run into the same people again and again. Your successes and failures will carry over into the future, so always be mindful of that.Appearance: Yes, people judge based on appearances and gear as well. One of the reasons for using ultimate weapons as glam and wearing the latest raid gear is so that people looking at my gear can determine my skill at the game. My maid outfit is not only cute, but also subconsciously places me in a service role. Maids, after all, are there to help and assist. Despite being called “Commanders,” we can truly only ask our team to follow us. And it doesn't have to just be raid gear. A popular item to wear is the Commander's Coat from Seal Rock or the mounts from PvP to show others that you've put time into the mode.Performance: Not everyone looks at the chart after a match, but many do, and who would you trust more? The person who got ten KOs and one death, or the person with two KOs and five deaths? Kicking butt is the timeless way to “show and not tell.”Pregame: During the 45 seconds before the match starts, you need to get your team on board with following your command. Whether that means hyping them up about earning rewards, inciting violence for the blood lily, or using a funny line, use this time to get the team used to looking at the chat box and liking what they see. If you don’t set expectations here, it will be harder for your team to adjust if you start commanding midway through a match.
Before you Start:
There are some criteria you should check off before you step into the role.-Get some games under your belt.
Frontline is a complicated mode. Commanding makes it more complicated. If you go straight from this guide to commanding, you are going to fumble a lot. Theory is no substitute for experience.
Take what you learn in this guide and see how it applies to an average game. You will start seeing what goes wrong. Bad choices. Traps. You will also start noticing when something good happens, when things come together.You need to be aware of your surroundings before you can do it for others.-Kick Butt
No one likes a backseat driver. The same goes for commanders. You need to lead from the front. While being a solo player is a very different experience from being with a group and calling, it is still very possible to play well and learn. And don't forget, you can always bring along your friends with you.-Get your calls set up
Go to the macro section or make your own, but you need to have a few calls prepped and ready. Being a keyboard warrior is not very useful to your team or for your performance.
What does a commander do?:
As you become more comfortable with Frontline, it'll be time to begin your journey as a commander. But where to start? What to do? What does a commander do?At their very core, a commander does four things:1. Keep the group together.
This is by far the strongest thing a commander does. 24 People following a marker will beat 12 who do not every time. If all you are capable of is putting a symbol on your head and having a waymark following you around, then you are already doing a lot.2. Path to Locations
With your team following you, you also become responsible for which locations or nodes you go to, and how you get to them. A lot of this guide is about positional advantage, avoiding traps, and making sound decisions. A lot of that thought gets pushed onto you.The good news is, as long as you aren't putting your team between the 2 enemies, the difference between great pathing and good pathing is not very large. Making several "okay" or "decent" plays will always outweigh one amazing play followed by an awful one.3. Call Attacks
We've already established that you keep the team together and tell them where to go. You also take charge of when you should attack. Timing is everything. Holding your team back and letting the enemies walk into a trap, or making sure your own team is all gathered before charging forward, is the mark of a good commander.4 Call Retreats
You've called the attack. It stands to reason that you're also in charge of calling when to leave. One of the biggest flaws of an uncoordinated team is that they don't know when to retreat. They'll continue to push long after the ideal time to move on.
Calling your team back allows you to rearm, reposition, and ready yourself for the next attack while preserving your team's points.
Simple Commanding:
With these 4 things in mind. You ultimately only need 4 macros to command successfully. Everything else is simply fluff. You can add to your own repertoire or look at the commanding section in the macro tab, but these will serve you well to start.
Waymarker Macro:
This puts a waymarker on top of your position, making it very easy for the team to see where they should be. Constantly refreshing this will be one of the first habits as a commander you bulid.This is also the only macro you want to fill every space up with on this list.
/waymark D <1> <wait.1>
/waymark D <1> <wait.1>
/waymark D <1> <wait.1>
/waymark D <1> <wait.1>
/waymark D <1> <wait.1>
/waymark D <1> <wait.1>
/waymark D <1> <wait.1>
/waymark D <1> <wait.1>
/waymark D <1> <wait.1>
/waymark D <1> <wait.1>
/waymark D <1> <wait.1>
/waymark D <1> <wait.1>
/waymark D <1> <wait.1>
/waymark D <1> <wait.1>
/waymark D <1> <wait.1>
Everything else:
The other three macros you want will be these:
/a --- Please Follow --- <se.2>
/a --- ATTACK NOW --- <se.4>
/a --- RUN AWAY --- <se.11>
With all of those together, you can now command successfully. Slowly add more as you get more comfortable, and remember, practice makes perfect!
Bad Commanding:
There are things commanders shouldn't do to start, as it builds bad habits and doesn't contribute to refining their skills.Using Flags
If you've never pinged a location with a flag, then great work, but if you have, please understand that it is not useful for Frontlines.Flags need to be clicked on, a feature that console players rarely have access to. It requires everyone to click on them, which takes a lot of time, and it also slows you down as it takes time for you to send it when you could be fighting or getting ready to fight.Flags lose their usefullness before even getting out of the gate in comparsion to a waymarker, which is always visible on you map and is updated in real time.Calling Nodes
Many new players fixate on the objectives. Remember that a node is so much more than an objective. It is an opportunity to attack and kill your enemies and build Battle High.Fixating on the objective is a classic trap that will lead to overly passive play.As a commander, you're not choosing which node to go for; you're looking for which fight you can take and win.More is More
Some will say you don't need soundeffects on your calls. They are wrong.
Using sound effects strategically enhances your team's performance massively.Your calls are useless if no one looks at them, and sound effects let your team know that there is something to check, that something is happening.My own style averages around 15 pings a minute. That can be excessive for some, but for many others, it's not enough. Yours will be lower starting out, as you have fewer calls and thus less information to convey, but don't be afraid if that number starts rising as you take on more responsibilities.Less is More
Oversaturation is also a concern. If you are constantly filling the chat with information that isn't needed, then it all starts to become white noise. Deliver the relevant information when it becomes relevant, and let anything that isn't important stay unnotiched.
Review:
So, how do you improve? How do you know how well you did as a commander? It ties back to the four things a commander does. You must ask yourself:Did I keep my team together?
Did I go to good positions?
Were my attacks successful?
Were my retreats successful?The answer to these questions could be both Yes and No, depending on what point of the game you were at. Examine both, and see the reason why.It's a bit excessive, but you can always record your footage and look over it later.Regardless, once you find those reasons, find out why you did something well; you simply need to repeat them.Whatever you did poorly, don't do them again.This culminates into:
Did we win the game?If Yes... Why?If No... Why?It could be luck, it could be your team was stronger, it could be your commanding, it could be the enemy commander, it could be your team stunk.Whatever the reason, discover why and file it away.As I near 10,000 games, I can very clearly see when I mess up and why. I can see when I lost us the game and when it was out of my hands.This process is not fun, it can drain your morale, but remember... you are not the sole reason for your team's loss. Do not hang it onto yourself. Let it flow through you and into the dumpster.On the otherhand. Remember, every win is not carried on your back. Your calls are useless if no one listens to them. Take pride in leading, but remember you are there for others.
Conclusion:
"When one learns from experience, the lessons never cease."This section is short because doing is the best teacher. I've written down my philosophy, my thoughts, but you need to go out there and find what works for you.I believe in you.Good luck, Commander.
Scenarios:
In this section, you will examine maps and score states to determine which actions your team and the opposing teams should take to maximize their chances of winning. This knowledge is not just for commanders. When the average soldier understands the theory behind a call, that call becomes far more effective.Look at each scenario and do your best to arrive at a satisfactory answer.
My own write-ups will appear below and will be marked as spoilers.There will also be an image showing the solution that is unspoliedI encourage you to write down your answer or say it out loud to help lock it in. Your mind has a tendency to course-correct after the fact, and committing to an answer helps prevent that.
Note: These images are made by different people, so not everything is uniform yet*
Seal Rock:
Example 1:
Looking at the map, there is an S-rank node in the middle and two B-rank nodes to the south. Two teams are close in score and could win if the others play this situation incorrectly.The question is this: What does each team need to do to ensure that none of the others secure a win? Remember that every team, regardless of their current score, still has a path to victory.Your answer should explain what each team should do to give themselves the best chance of winning, or at the very least, avoid losing.Current team positions are indicated by the colored squares, and active nodes are marked using the in-game indicators.
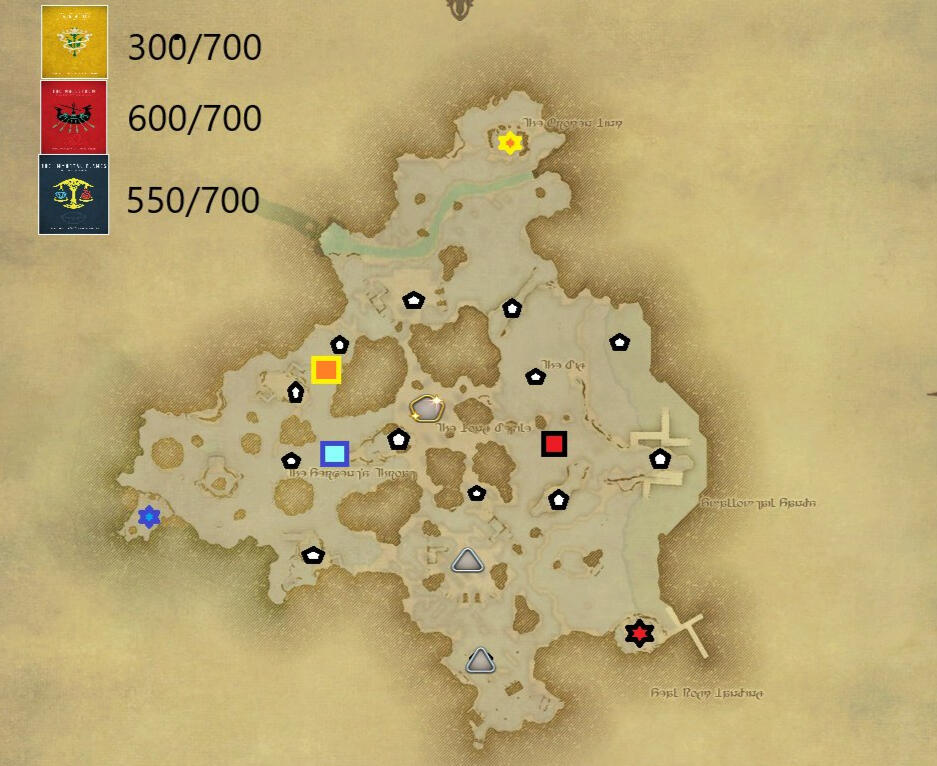
Solution 1:
With that established, we can safely assume Yellow takes the S-rank in the middle. The next question is where they are most likely to go afterward?
If you said further south to the nearest remaining node, you would be correct.
Once again, if either Red or Blue attempts to take the sandwiched southern node, they will be caught up with Yellow and lose.
This means that if all three teams are playing optimally, Blue and Red should contest the furthest node south. One of them may be able to secure a win there, but Yellow will closely monitor the situation and be ready to intervene as scores tighten.
This scenario is designed to demonstrate that the S-rank is a trap, and that the correct answer is not always to take the highest-value or closest node.
It also illustrates that every team remains in contention. After this sequence resolves, Yellow will sit at roughly 520 points and be in an excellent position to win on the next spawn. That does not remove Blue or Red from the game, however, as strong node spawns in upper mid or upper east can still swing the outcome.
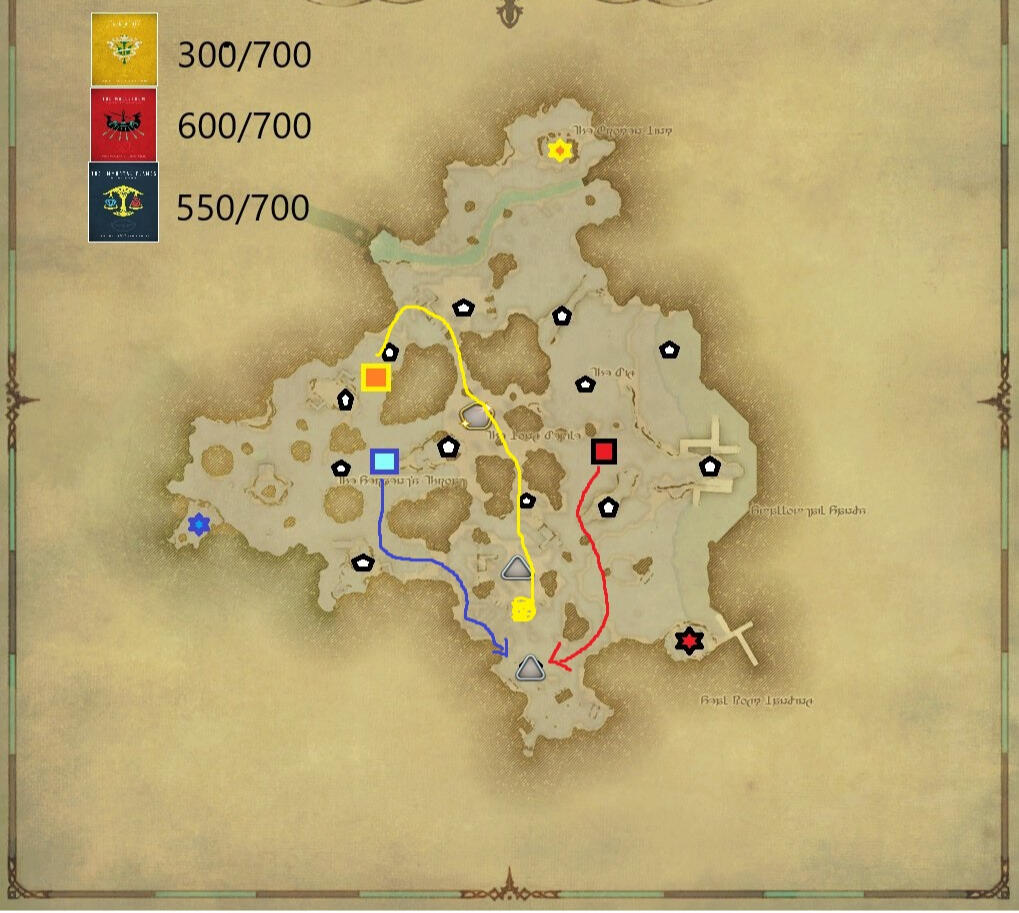
Example 2:
This scenario is a bit different. You are playing as Blue, positioned in the corner.There is an A-rank and an S-rank node in the caves, but Red is already in position to contest them.Additionally, there is a B-rank node to the north and another A-rank node to the far east, both of which Yellow is already positioned to capture.
As Blue, what do you need to do to either secure a win or, at minimum, avoid losing the match?
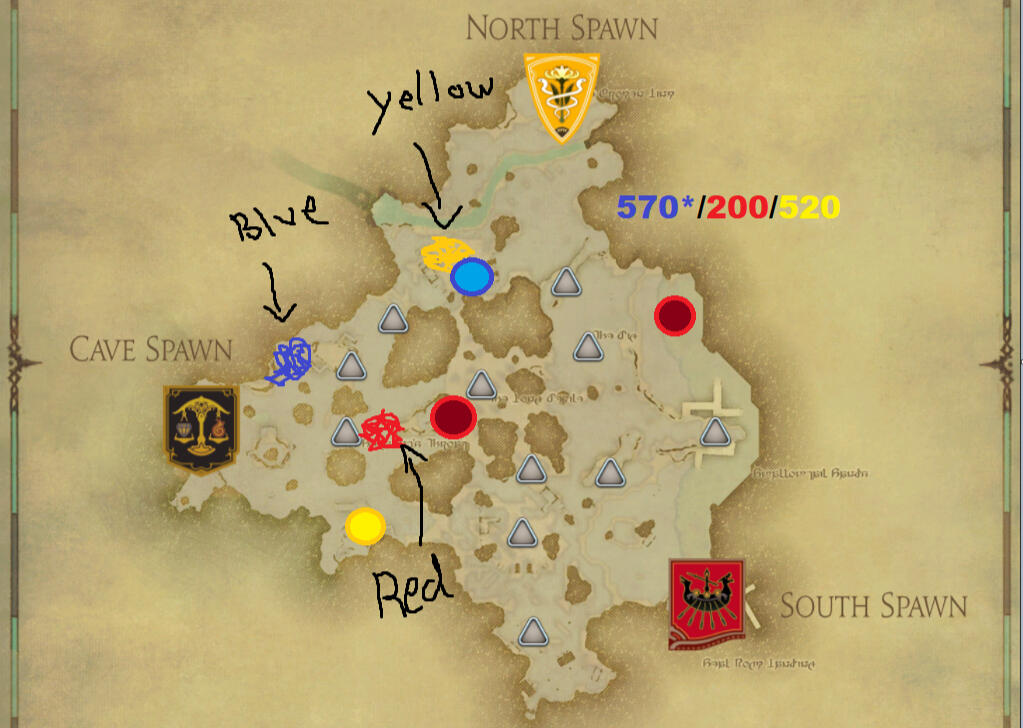
Solution 2:
Even if Red decides to throw and attack Blue simply because they are in first place, this is still Blue’s only viable option to stop Yellow from winning. That is the responsibility of the team in second place. Third place has no obligation to assist unless doing so directly increases their own chance of winning.
Even under the assumption that Red is weak and the cave nodes could be taken easily, Blue must remember that Yellow is positioned to pinch them. If Blue used all of their resources, they would be wiped out by Yellow.
This is another reminder that the closest node or the highest-rank node is not always the correct choice.
It also reinforces that the scoreboard alone does not determine who is “ahead.” Red should be rotating east and positioning to deny either northern team a win. Chasing Blue in this scenario loses Red the game, as it prevents them from meaningfully contesting Yellow.

Example 3:
Here's a scenario that is happening a bit earlier in the match. Yellow has just suffered a major loss, getting hit by Red and sent back to spawn. Red has captured the East node and is looking to go middle to capture that one as well.Meanwhile, Blue has captured the NW and W nodes in the caves and are also moving middle to try and capture that node.The question is: what should Yellow do?
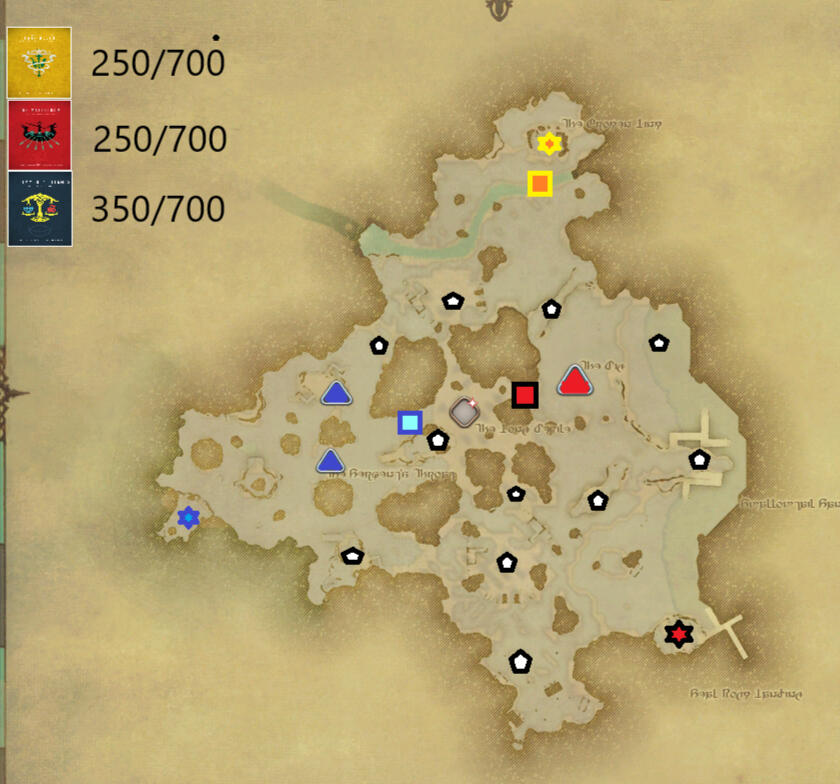
Solution 3:
If you go East to re-engage Red in a pinch. Blue will be able to claim the middle node, and the fight will push even further East, Meaning Blue will claim 3 nodes with a chance at the node. Not only that, but the node values are going to leave them at 650, meaning they're very close to winning, and with lucky spawns or quick kills, the game is over.
Shatter:
Example 1:
In this situation, you are the Blue team with 1200/1600 points with your big ice up. Yellow has 1400/1600 points with their big ice up. Red is 3rd with no safe ice. They've decided to engage yellow from the funnel entrance.What should you do as Blue in this situation?
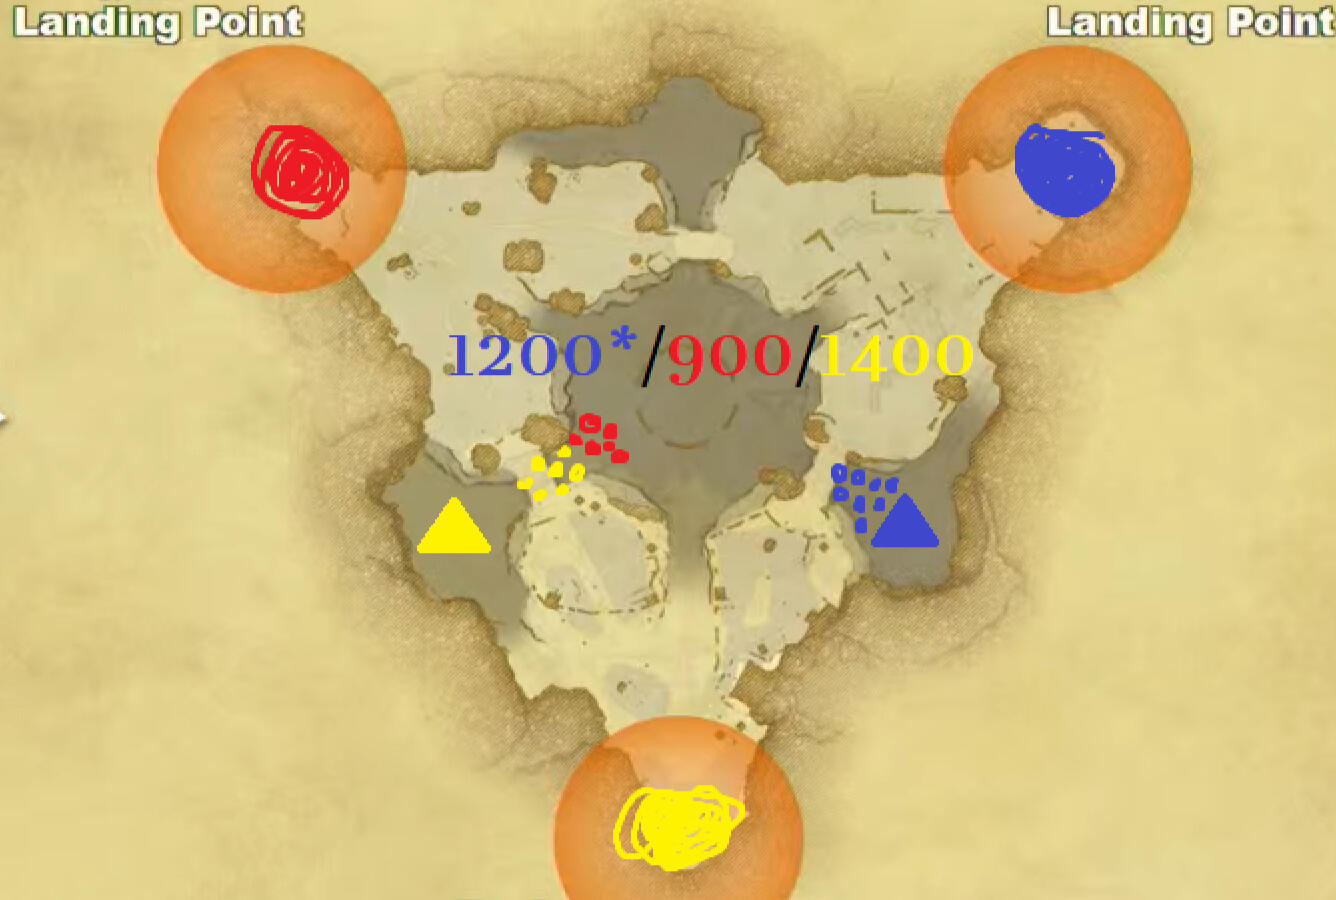
Solution 1:
Blue needs to go through Yellow’s spawn funnel and pinch Yellow at their ice. This is the only viable way to ensure you do not lose the game.
Do not go through the middle funnel. Red is already there and will block you from entering.
You need to crush Yellow and get enough of their ice so that they will not win the game when it breaks, or they will need to farm enough Red kills to make up the difference.
After ensuring Yellow cannot win, you need to hightail it out of there, because the Yellow players you just killed will be respawning behind you.
DO NOT WAIT TO BREAK YOUR ICE.
You need to go now. If you wait, Yellow might crush Red and break their ice before you get there. If Red is dead, it is no longer a pinch, and you will not have the time to beat Yellow down and stop them from breaking their ice.
You are in a really good position to win if you do this correctly. Do not blow it.

Example 2:
The positions are the same, but the scores have changed. Does this affect what you should do? Maybe... maybe not?You're still Blue in this scenario. What should you do?
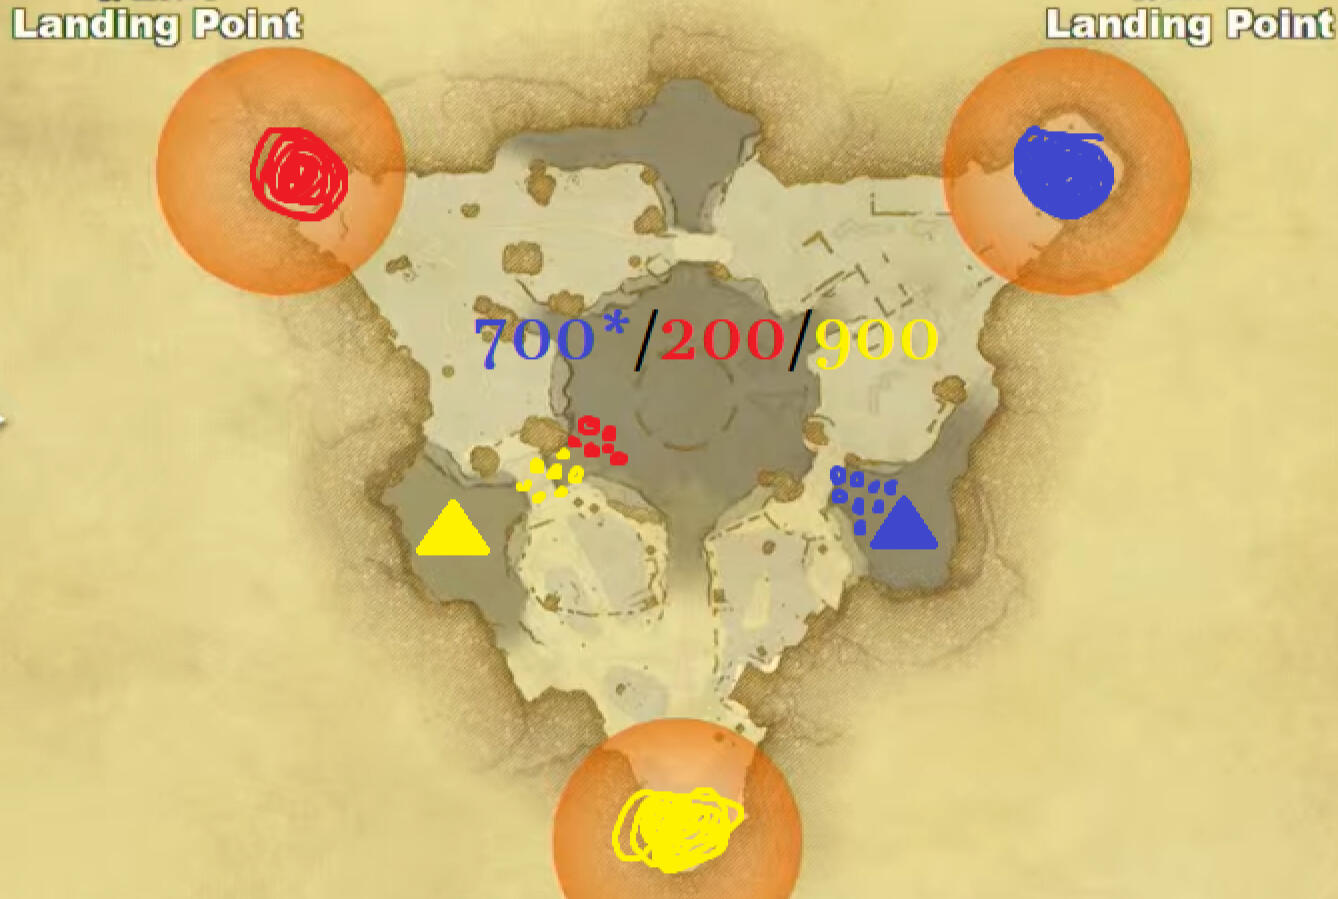
Solution 2:
Because of that, the correct answer does not change. You should still go through Yellow’s spawn and pinch them.

Example 3:
Well, the positions are still the same again, but now your team is the weak one in 3rd. Red is in the lead now, but they still don't have a safe ice.You're still Blue in this scenario. What should you do?
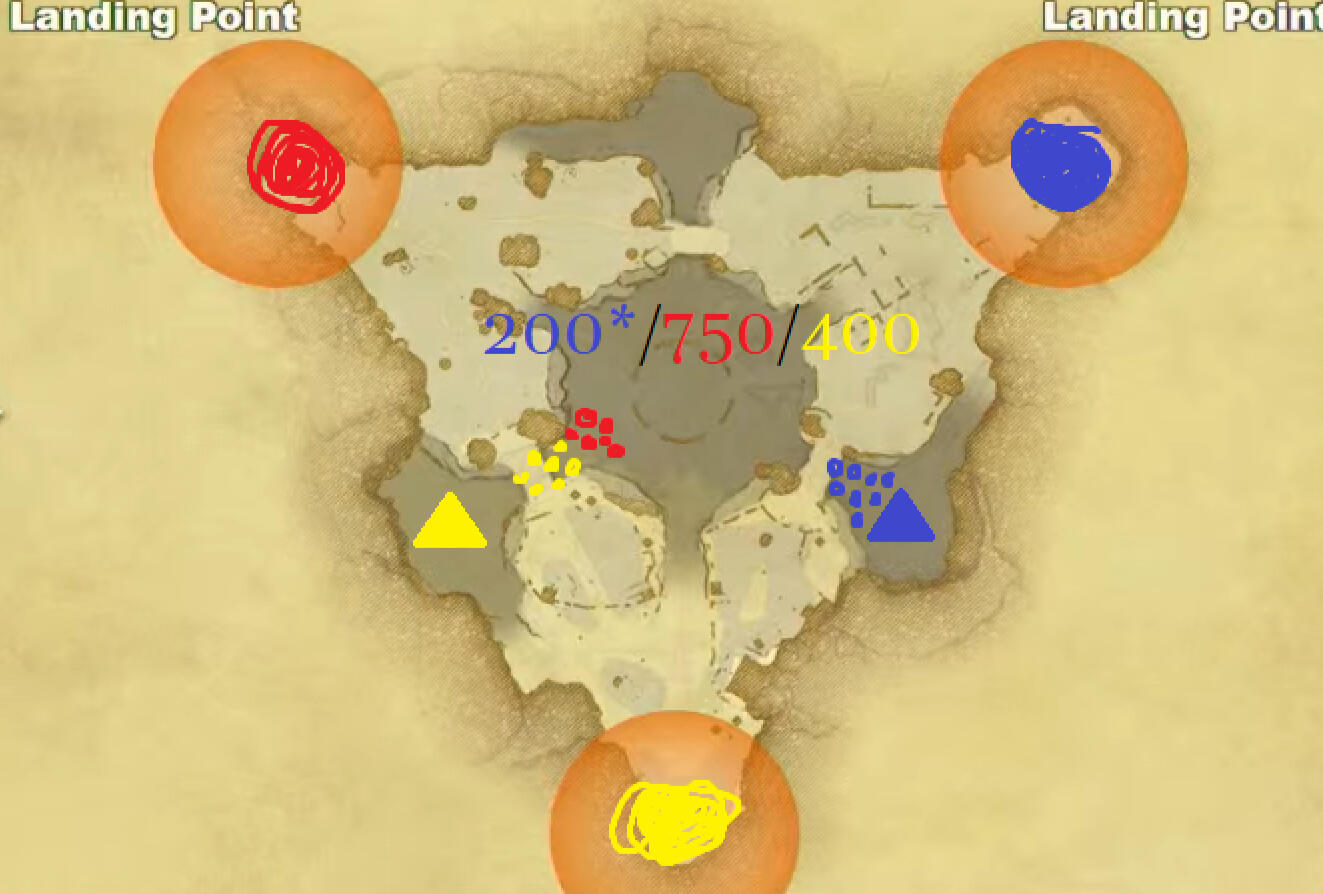
Solution 3:
As 3rd place, your priority is to catch up... and the fastest way to do that is by killing the team in 1st.
Our goal is to circle around mid and pinch Red, while avoiding unnecessary contact with Yellow. If you rotate clockwise, you’re far more likely to collide with Yellow, which accomplishes nothing and risks wasting resources. Instead, rotate counter-clockwise. This ensures you hit the correct target and cuts off Red’s escape routes.
I’ve marked a very safe disengage path in case Yellow turns aggressive. If Yellow doesn’t contest you, you can also rotate cleanly through your own mid tunnel without risk.
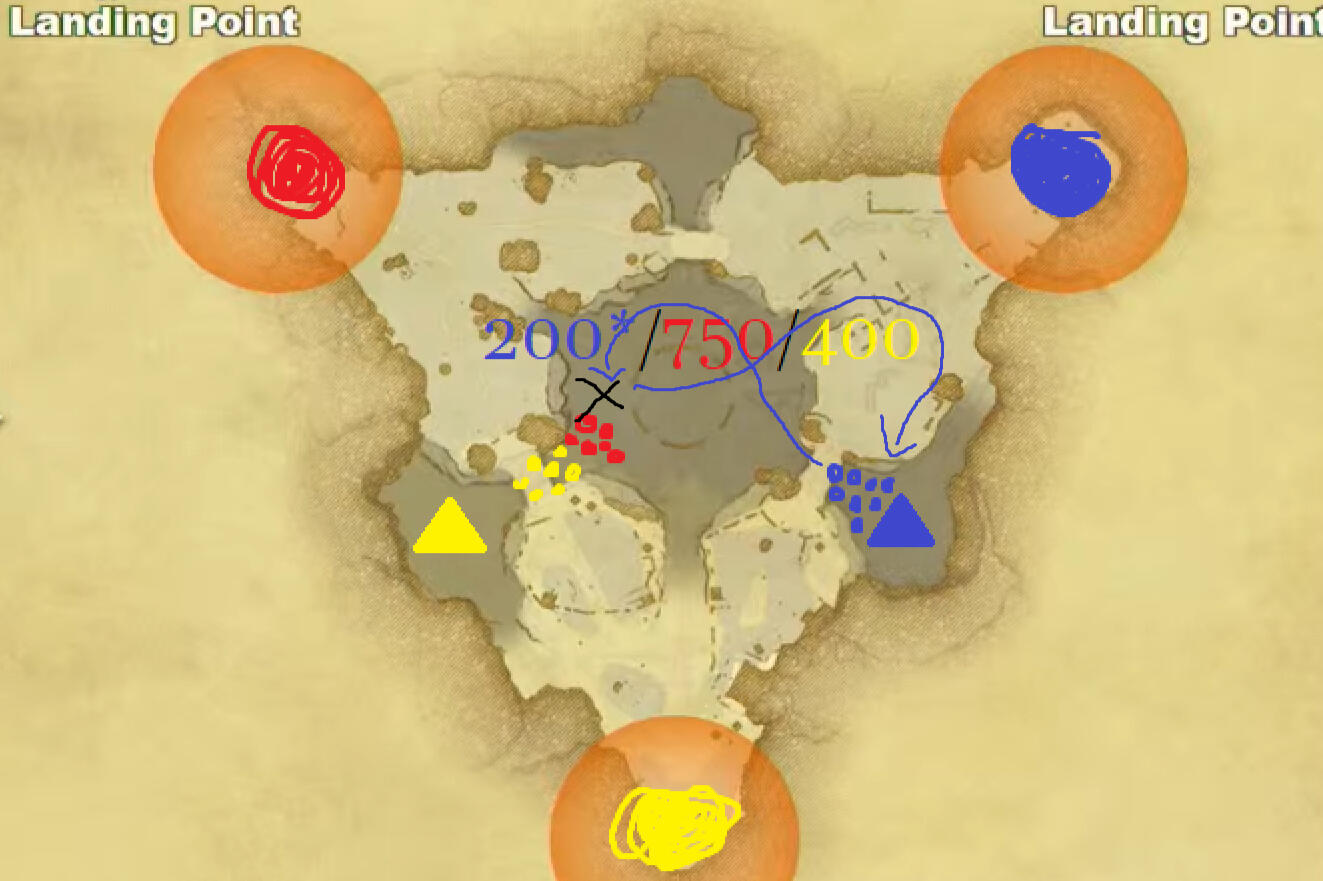
Onsal:
Example 1:
This is the start of the game. We're Red in this one. What should we do to not get pinched?
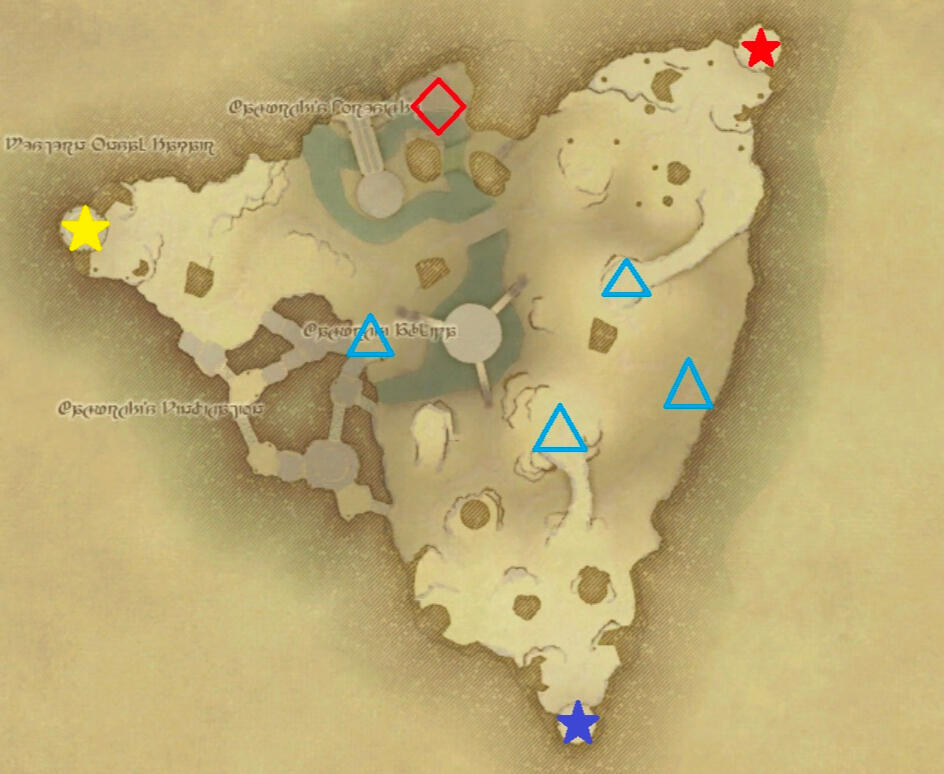
Solution 1:
If you push north, Blue will move up and pinch you.
If you continue south, Red will wrap around from behind.
This is the only node where a potential pinch can be converted into a pseudo-mid fight—putting all three teams into a triangle formation that prevents the situation from spiraling out of control.
Hopefully, Blue will be spread out, and you can easily take care of them before Yellow arrives, but it can be difficult.
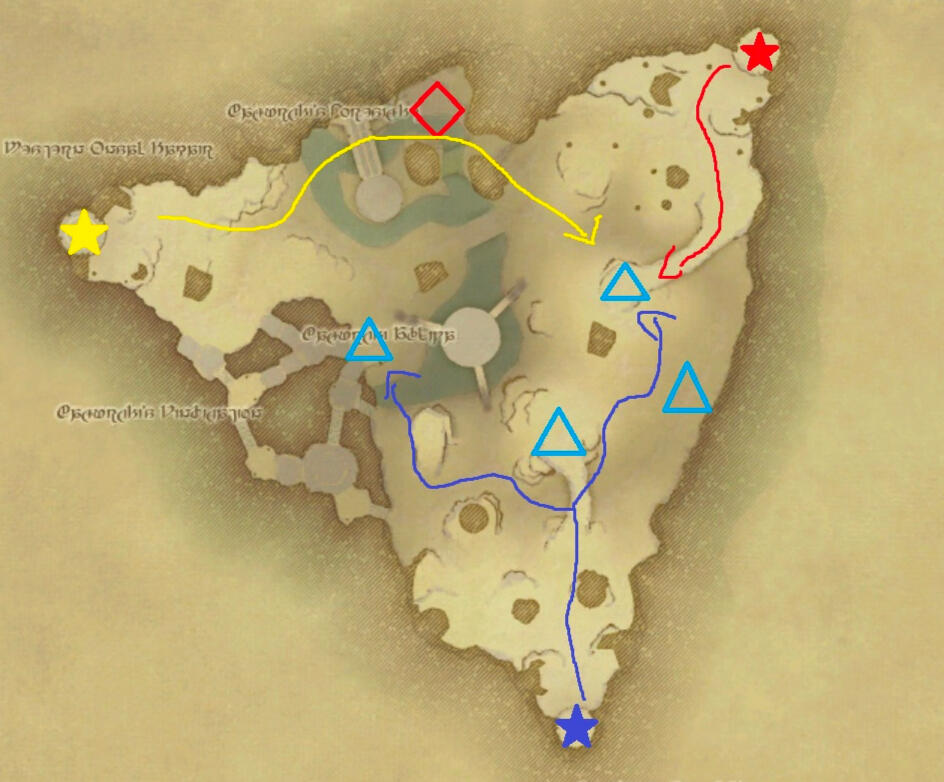
Example 2:
This one is also the start of the game. We're Blue this time, use what we went over in the previous example to draw a path that won't get us pinched.
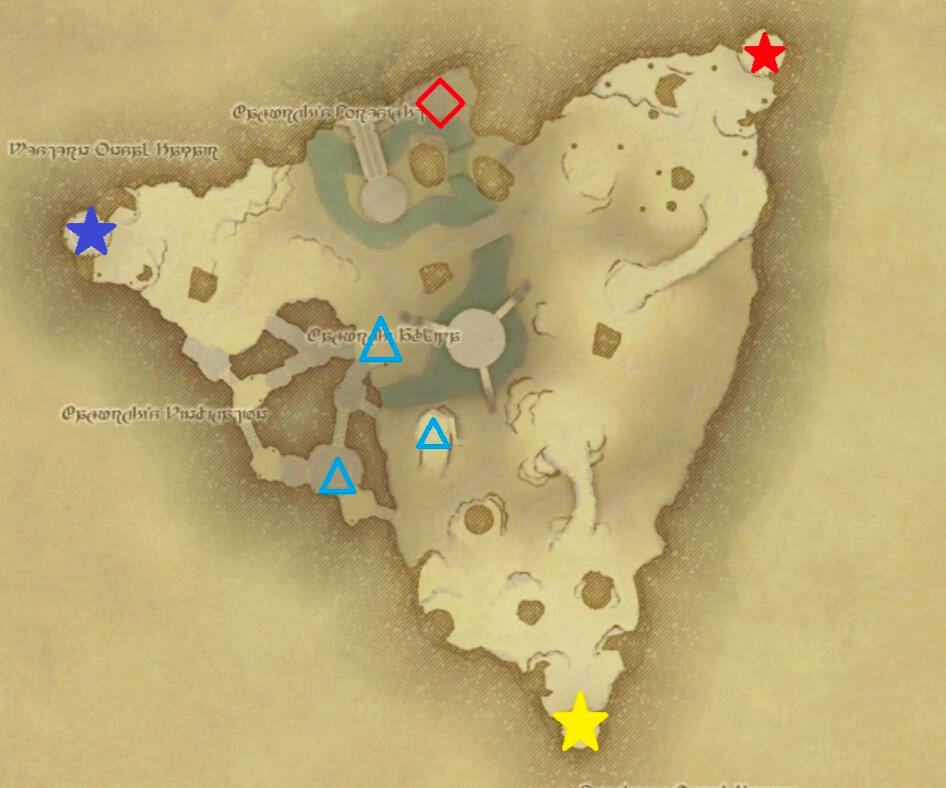
Solution 2:
Rotating around this side lets you take advantage of a spread-out Yellow team, who may also be delaying Red further north. If that happens, you’re in a prime position to push up and secure the node before either team can respond effectively.
